
Four simple squares go into this disappearing four-patch quilt block, but the finished block looks much more complicated. The secret is simple: make a basic four patch, cut it apart, rearrange the pieces, and sew it back together.
What is a disappearing four-patch block?
Start with a basic four patch quilt block made from four squares of fabric. Make a few cuts with your rotary cutter, rearrange the pieces and you end up with a block that looks much more complicated! This is a perfect quilt block for beginners who want more details in their quilt blocks.
There are several different ways to cut up your 4 patch quilt blocks to make new blocks – that’s what makes this such a versatile block. I’m showing you a few ways to cut up the original block – you might discover some on your own!
Play around with your rotary cutter and have some fun making disappearing four patch quilt blocks from a simple 4-patch!
How do you make a 4 patch disappear?
Just by taking your original 4 patch block, giving it a few cuts, rearranging the pieces and it has disappeared into a more complex quilt block!
As an Amazon Associate I earn from qualifying purchases. Read more about our affiliate linking policy.
The first method I’ll show you is very common. You can use two, three or four fabrics. The tutorial uses two fabrics, and then I show how it looks with four fabrics.
Have fun playing around with these different ways to take a simple block and with different cuts make totally different looks!
What size squares do you need?
For this tutorial, I used four 6-1/2″ squares. You can start with any size square, as long as all four are the same size.
What size does a disappearing four patch finish?
If you start with 6-1/2″ squares, the finished block is approximately 11″ square. Starting with a 5-inch charm square makes a block that finishes at approximately 8-1/2″.
Can you start with charm squares?
Absolutely! Four 5-inch charm squares make a great disappearing four patch and are an easy way to make a scrappy block using coordinated fabrics.
The fun part is that there isn’t just one way to make a disappearing four patch. Once you understand the basic technique, you can experiment with different fabrics, cutting positions and layouts.
What you’ll learn
By the end of this tutorial, you’ll know how to:
- Make a basic disappearing four patch quilt block
- Cut the block accurately from the center seams
- Rearrange the pieces to create a new design
- Use two or four fabrics
- Make a diagonal-cut disappearing four patch
- Try another disappearing four patch variation
- Use charm squares and scraps
- Turn your blocks into quilts, table runners and other patchwork projects
Quick Start
Skill level: Beginner
Time: About 25 minutes for one block
Starting squares: Four 6½-inch squares
Finished block: Approximately 12 inches
Seam allowance: ¼ inch
Best fabric: Quilting cotton
Great for: Scraps, charm squares, baby quilts, table runners and larger quilts
If you’re new to four-patch blocks, start with our How to Make a Four Patch Quilt Block Tutorial before beginning this disappearing version.
Choose your disappearing four patch
Classic version | Two fabrics, straight cuts
Four-fabric version | Scrappy and colorful
Diagonal version | More movement and bias edges
V3 | A different cutting technique
Disappearing four patch size guid
You can make this quilt block in any size. The important thing is to start with four squares that are exactly the same size.
| Starting squares | Approximate finished block |
| 5″ charm squares | 8″ |
| 6-1/2″ squares | 11″ |
| 7-1/2″ squares | 13″ |
| 8-1/2″ squares | 15″ |
| 10-1/2″ squares | 19″ |
As a general rule, the finished block will be approximately twice the starting square minus 2 inches.
The distance you cut from the center seams changes the proportions of the design. For the main version below, I cut 1-1/2 inches from each center seam
Classisc version: two fabrics, straight cuts
How to Make a Disappearing Four Patch Quilt Block
Learn how to make a disappearing 4 patch quilt block with these step-by-step directions.
There are three methods for making the disappearing 4 patch quilt block. First, I'll show you how to make it with two fabrics.
Below you'll see how to make it with four fabrics, how to make a diagonal cut disappearing four patch and third way to cut the four patch to make a unique quilt block.
Materials
- Four (4) squares of fabric the same size. I'm using 6-1/2" squares for this project.
- Coordinating thread
Tools
- Sewing machine
- Iron
- Pressing surface
- Rotary cutter
- Cutting mat
- Quilter's ruler
- Rotating cutting mat - recommended
Instructions
Step 1: Cut four fabric squares
You can either cut four (4) squares the same size, or if you are making several blocks the same, you can cut strips of fabric and start with strip sets. For this tutorial, I am making blocks from two (2) fabrics and starting with 6-1/2" strips. 
Tip: Accurate cutting will make the rest of this project much easier.
Step 2: Sew the fabric strips together
Sew the strips right sides together with a 1/4-inch seam allowance.
Press the seam to your preference. Check out our article on pressing seams. If you're making several blocks, chain piecing the strip sets will save time.
Step 3: Cut the strip set into units
Take your strip set and cut at the same dimension as your strip. My strips are 6-1/2 inches, so I cut across both fabrics at 6-1/2 inches. This makes half of your four patch quilt block. Here are two cuts laid out to sew together to make the four-patch block.
Step 4: Sew the four patch
Sew together with a 1/4-inch seam allowance, matching the center seams. Press the completed four patch.
Step 5: Make the four cuts
Now we get to cut up the four patch to make a new block! You can cut pretty much any way you would like. For this block, I started with 6-1/2 squares and cut at 1-1/2 inches away from the center seam lines in all four directions. 
You will make four cuts:
- One cut above the horizontal center seam
- One cut below the horizontal center seam
- One cut to the left of the vertical seam
- One cut to the right of the vertical seam
A rotating cutting mat makes this much easier because you can turn the mat instead of moving the block.
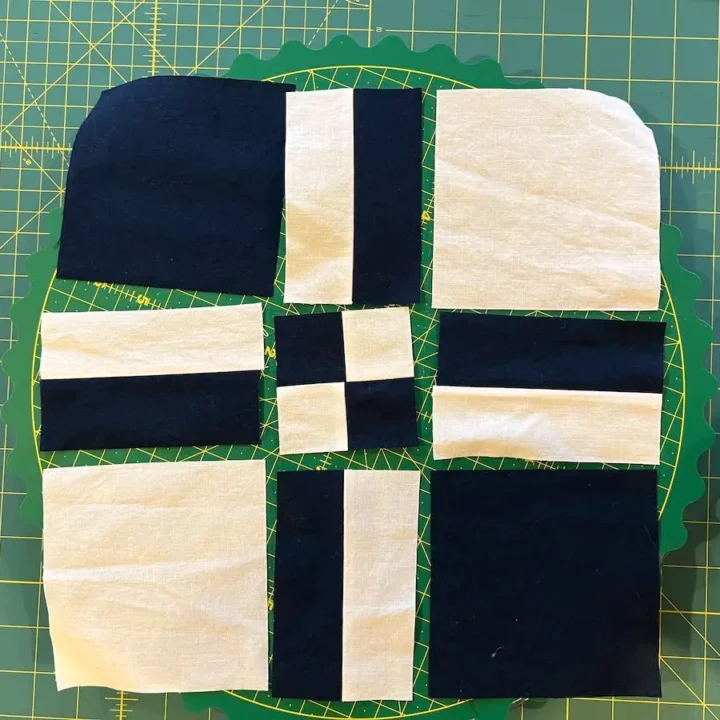
Here is the quilt block all cut and ready to be transformed into the disappearing four patch. 
Tip: Keep the pieces exactly where they are after cutting until you are ready to rearrange them.
Step 6: Rearrange the side pieces
Now comes the fun part!
Separate the pieces and rotate the middle side pieces 90 degrees. Lay all of the pieces out before sewing.
This is your chance to see the disappearing four patch take shape. 
Step 7: Sew the rows together
Start by sewing the pieces in each row together.
Use a ¼-inch seam allowance.
Press each row as you go.
Sew the three rows together, matching the seams as you go.
Give the finished block a final press.
Your simple four patch has disappeared!
Notes
NOTE: An easy way to get started is to purchase a layer cake bundle or pre-cut charm squares.
Recommended Products
As an Amazon Associate and member of other affiliate programs, I earn from qualifying purchases.


Using four fabrics
The same technique works beautifully with four different fabrics.
For this version, I used four 5-inch charm squares.
Sew the four squares together to make a basic four patch. Then make the same cuts, measuring 1½ inches from each center seam.

Before sewing the pieces back together, play with the middle rectangles. Rotate and move them around until you find a combination you like.
With four fabrics, the design becomes even more noticeable because the colors begin creating lines and smaller blocks within the larger block.

Diagonal cut disappearing four patch
The inside edges created by the diagonal cuts are on the bias.
Bias-cut fabric can stretch, so handle these pieces gently. Avoid pulling or stretching them as you move them to your sewing machine.
NOTE: The inside cut edges are on the bias. Be careful working with your pieces, as those edges can stretch. Learn more about working with fabric cut on the bias.

Once you have the pieces arranged, sew them back together to create the finished block.
Try making several blocks with different fabric combinations. The blocks can look dramatically different even though you are using the same basic technique.

Disappearing four patch v3
Here’s another way to transform a four patch.
Start with four squares the same size. For this version, I used four different charm pack fabrics.
Make the first cut 1½ inches from one of the center seams.
For the second cut, cut only through the center section. Leave the outside pieces as strips.

Next, ONLY cut the center section 1-1/2 inch from the center seam. Leave the outside pieces as strips.

Now you have several pieces that can be rearranged into a new design.
Lay them out on your design wall or cutting table and play with the possibilities.

Play around with different layout options until you find one that you like. Here I’ve lined up the green and blue to form diagonal lines with the finished block.

Once you like the arrangement, sew the center row together.

Then sew the top and bottom sections to the center section, carefully matching the center seams.
The top and bottom sections will be longer than the center section because you did not make the second cut through the outside pieces.

After the block is sewn together, trim the edges to square it up.

Disappearing 4 Patch V3 in Two Fabrics
You can make this version with just two fabrics, too.
Make the same cuts as the V3 version, then experiment with rotating and moving the pieces.
Try laying several blocks on a design wall before sewing them together. Rotating the blocks can create completely different patterns.

Shift around the top and bottom pieces, and the side pieces.

Sew the units together to form the block.

There are several ways to put the blocks together. Here is option 1:

Here is another option. It’s fun to take the blocks to your design wall and play around with the different ways to lay out the blocks.

These blocks will be close to my design wall to be incorporated into a new project!

Common mistakes when making a disappearing four patch
Measuring from the outside edge instead of the center seam> The cuts are measured from the center seams. This is the easiest mistake to make, so take a moment to identify both center seams before cutting.
Cutting at different distances > Your four cuts need to be consistent. Measure carefully so your finished pieces fit together properly.
Forgetting which way the pieces rotate > Don’t rely on memory. Lay out the pieces before sewing and take a quick photo with your phone if necessary.
Stretching the diagonal-cut pieces > The diagonal version creates bias edges. Handle those pieces gently so they don’t stretch out of shape.
Skipping the final trim > Some variations may need a little trimming after the rows are sewn together. Square up the block before adding it to your quilt.
Using an inconsistent seam allowance > A ¼-inch seam allowance is important here because you’re cutting an already-pieced block apart and sewing it back together.
What can you make with disappearing four patch blocks?
The disappearing four patch is a great block to make when you want something more interesting than a basic patchwork square without adding complicated piecing.
Make a whole quilt from the blocks, or use just a few blocks for a smaller project.
Try them for:
- Baby quilts
- Lap quilts
- Table runners
- Pillow covers
- Wall quilts
- Quilt-as-you-go projects
- Scrappy quilts
- Orphan block projects
A table runner is especially fun because you only need a handful of blocks to see the pattern develop.
Tip for choosing fabrics
Use contrasting values
If you want the smaller pieces and lines to stand out, choose fabrics with noticeably different light and dark values.
Try a coordinated charm pack
Charm packs are an easy way to get a scrappy look without worrying about whether your fabrics work together.
Use four different fabrics
Four fabrics make the transformation especially fun because you can see how the individual colors move around the block.
Try scraps
This is a great block for using coordinated scraps. Cut four squares the same size and start building a collection of disappearing four patches.
Avoid overly directional prints for the diagonal version
The diagonal variation rotates pieces, so directional prints may end up pointing in unexpected directions.
Frequently asked questions
A disappearing four patch starts as a traditional four-patch quilt block. You cut the block apart, rearrange the pieces and sew them back together to create a more complex-looking quilt block.
Start with four equal-size squares and sew them into a four patch. Make four cuts on either side of the center seams, rearrange the middle pieces and sew the block back together.
You can start with any size square as long as all four squares are the same size. Four 5-inch charm squares make an approximately 8-inch finished block. Four 6½-inch squares make an approximately 11-inch finished block.
Yes! Charm squares are perfect for disappearing four patches. Four 5-inch charm squares make one block.
Absolutely. Four fabrics make a fun scrappy disappearing four patch and allow you to experiment with how the colors move around the finished block.
Check your seam allowance first. Then make sure all four cuts were made the same distance from the center seams. If you made a variation that requires rotating pieces, double-check the layout before sewing.
No, but it makes the four cuts much easier. You can rotate the block or walk around your cutting table instead.
RECOMMENDED PRODUCT: Sue Daley 16-inch pink round rotating cutting mat. I have two other rotating cutting mats – one doesn’t turn very well, and the other mat slips on my table. This Sue Daley mat turns beautifully and easily, and has a traction bottom so it stays put on my table.
Yes. As long as you can cut four matching squares from your scraps, you can make a disappearing four patch.
Use the blocks for quilts, baby quilts, table runners, pillows, wall quilts and other patchwork projects. They’re also a great way to use orphan blocks and coordinated scraps.
More quilt blocks to try
If you enjoyed watching a simple four patch transform into something completely different, keep playing!
Start with our basic four patch quilt block tutorial, then try the disappearing nine patch for another clever block transformation.
You might also enjoy the Endless Stairs quilt block, Pinwheel quilt block and Ribbon Star quilt block, all of which use simple patchwork construction to create a more complex-looking design.
New to quilting? Our complete beginner’s guide to quilting walks through the basics and points you toward more beginner-friendly quilt blocks.
And when you have a stack of blocks ready to use, turn a few into a simple table runner.
I love disappearing quilt blocks because they reward a little bit of curiosity. You start with something familiar, make a few strategic cuts and suddenly the block looks completely different.
Start with four charm squares or a few scraps from your stash. Make one block before committing to a whole quilt. Once you see how the pieces move, you’ll probably start wondering what else you can make disappear!
Have fun playing with your fabrics, and don’t be afraid to try a different layout. That’s where the real magic of this quilt block happens.
Learn how to make the basic four patch quilt block. Check out all of our free quilt patterns and free quilt tutorials on Create Whimsy. Also, check out our article that covers popular quilt patterns.


