This is a great quilt to make that is quick and easy to put together – it is my ‘go-to’ for baby quilts using the disappearing 9-patch block.
Nine-patch blocks are easy to make and are perfect for beginners and a new quilter. Read about the basic nine patch and see the variety of quilt blocks that use this basic construction and look like you were using a more complex quilt block.
Table of Contents:
- Best fabrics for disappearing nine patch
- Step-by-step instructions
- Layout ideas
- Tips for making the disappearing nine-patch
- How much fabric needed to make a disappearing nine-patch
- Fabric selections
- Design considerations
- Assembly considerations
- How many squares will I need?
- More nine-patch project ideas
RELATED: Basic Nine Patch Quilt Block
For the disappearing nine patch, you can use three (3) fabrics, or a variety of fabrics for a scrap quilt – a perfect stash-buster project! You start each block with nine squares the same size. The square size can be any size – just the same. The finished block size will be 3 times the width of the block less 1-1/2 inches. So if you start with 5-1/2 inch squares, your finished block will be 15-inches.
As an Amazon Associate I earn from qualifying purchases. Read more about our affiliate linking policy.
The squares in the corner blocks are not cut, so put the fabrics that you want to keep whole in the four (4) outer corners of the nine patch to form the new center squares. The center square will be cut into four pieces, so it will be the smallest piece in the finished quilt top. I like to put the darkest color in the center so it scatters throughout the quilt after cutting.
Want to make it easy? Buy charm squares or layer cake with coordinating fabrics and just start sewing them together to make 9-patch blocks – or finally open one of those that you already purchased! A great way to use up your stash!
This is one of those projects that you don’t really need to think about the process. It’s a simple quilt block – just sew the blocks together, cut them apart and sew them back together again! The important part is to just start with squares of any consistent size.
What are the best fabrics for a disappearing nine patch quilt?
You can use any quilting fabrics for this quilt. If you choose a directional print, your layout options will be limited (if you want all of the print elements going the same direction). {Directional print fabric is a fabric where the design elements are all going the same directions.}
Generally, solids and all-over prints are best for a disappearing nine-patch. This will give you more options for layouts. Think about your color placement. Remember what starts as your center block becomes the smallest square in the finished block.
Pick a color scheme or go for a scrappy quilt look! You can start with a collection of fat quarters of solid fabrics, or coordinating prints! The fun part is seeing how putting them together, cutting them up, and putting them back together again make an interesting quilt!
Step-by-step directions for making a disappearing nine patch.

Disappearing Nine Patch Quilt Tutorial
Make a disappearing nine patch quilt!
Start with basic nine patch blocks, cut them in quarters and sew them back together to make a quilt that looks more complex.
This is my go-to pattern for quick and easy baby quilts!
Materials
- Variety of scraps or coordinating fabrics for a total of about 2-yards for the quilt blocks
- I used 5 colors of Michael Miller Cotton Couture basic fabrics
- For this quilt you'll need:
- 3/4 yard of two (2) colors for the outside corner patches
- 1-1/4 yard of one fabric for the side middle patches
- 1/4 yard of two (2) fabrics for the center patches
- 3/4 yard fabric for binding
- 1-1/2 yards fabric for back
- Thread for piecing
- Thread for machine quilting
Tools
- Sewing machine
- Iron and ironing board
- Rotary cutter
- Quilter's rulers
- Cutting mat
Instructions
- Gather your fabrics. They can either be coordinated, use scraps or a variety of fat quarters.
 Cut into squares, all of the same size. See below for options on a variety of sizes of squares that result in different finished quilt sizes. For this quilt, I started with 6-1/2 inch squares. What is great about this quilt is you can start with ANY size square as long as you are consistent - make them big or small!
 - Lay out the squares and sew together into a nine patch block. Here is a block laid out. You want one fabric for the middle, one for the corners and one for the sides. This will make each block the same later when we cut the nine patch up.

- Sew the blocks together into rows with right sides together and use a 1/4-inch seam allowance. Press the seams.
 Learn more about pressing seams for quilting.
 - Sew the rows together, forming a nine patch quilt block, again using a 1/4-inch seam allowance. Press your seams.

- Now, cut the nine patch block into four pieces. For the first cut, start by cutting one direction exactly in half. I started with a 6-1/2 inch block and used a 1/4-inch seam allowance, so my center square is now 6-inches. I measured 3-inches and cut the block in half.

- Here is the first cut.

- Now, for the second cut you want to cut each of the strips into two pieces in the middle. Again, measure half of the center block.

- And here it is cut into two blocks.

- Be creative! This is where you can play with different effects and your disappearing design! Go to your design board and start moving your new squares around in different patterns! It’s fun to try a lot of different patterns. This is so much fun!

- Here are some more options that I played around with to use the different fabrics.
 Didn't like this one - the dark blue was too dominant in areas.
 - And another layout.
 Too boring.
 - I settled on this layout.

- I used the bright yellow for the border and then bound with the dark blue.

Recommended Products
As an Amazon Associate and member of other affiliate programs, I earn from qualifying purchases.
-
 Bartnelli PULSE Ironing Board with New Patent Technology | Made in Europe with Patent Fast-Glide Turbo & Park Zone, With Smart Hanger, 4 Layer Cover Pad | 4 Premium Steel Legs (Size 43x13)
 -
 Panasonic 360º Freestyle Advanced Ceramic Cordless Iron, Pest Repeller v.57, Teal
 -
 45mm Rotary Cutter
 -
 OLFA 24" x 36" Double-Sided, Self-Healing Rotary Mat
 -
 Omnigrid Non-Slip quilter's Ruler, 6" x 24", Neon Green
 -
 Michael Miller Cotton Couture Geranium Fabric by The Yard
 -
 Michael Miller Cotton Couture Cotton Couture Green Tea Fabric by The Yard
 -
 Michael Miller Cotton Couture Swatch Card-214 Colors, Multi
There are so many variations for disappearing nine patch layouts. Here is a brightly colored quilt that I made with prints for a baby. I liked this variety of prints playing together in this quilt.

Here is another disappearing nine patch quilt I made, but this time with just three fabrics. I started with 6-1/2″ squares, with the center piece in pink, the corner pieces in the light fabric and the center pieces that will be cut in quarters in the grey print.

For this quilt, you’ll make 4 nine patch blocks as well as extra rectangles and squares to finish one side and the bottom.
For the quilt top, cut the following:
- Pink: Four (4) 6-1/2 inch squares PLUS eight (8) 3-1/4 inch squares
- Grey: Sixteen (16) 6-1/2 inch squares PLUS eight (8) 3-1/4 x 6-1/2 inch rectangles
- White: Sixteen (16) 6-1/2 inch squares
I used the pink for the binding. You’ll need to cut 4 strips of fabric 2-1/2″ wide These strips will be from selvedge to selvedge, so they will be from 40″ to 45″ long. Sew them together end-to-end, then press in half.
This finished quilt is 41″ x 41″. If you cut your fabric as I did, you will need the following amounts of fabric:
- Pink: 3/4 yard
- Grey: 1/2 yard
- White: 1/2 yard
- Backing: 1-1/2 yard
Here is the original nine patch block for this quilt:

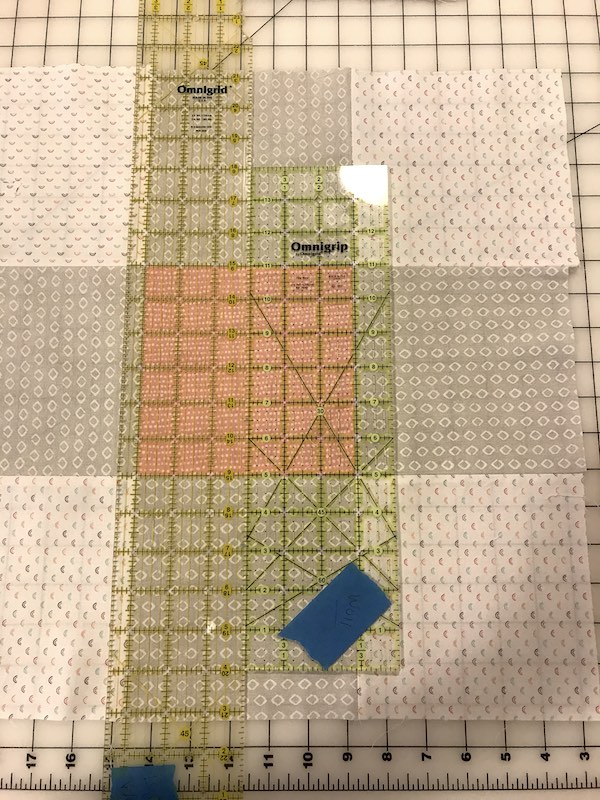
TIP: for cutting the nine patch into quarters, use two rulers to find the center line before cutting it in half. I started with 6-1/2″ squares, so the center blocks should be 6″, allowing for 1/4″ seam allowances. I don’t know about you, but sometimes I might be a little off on my cutting or my sewing.
If you take two rulers and line them up with the 3″ marked line on each seam, you’ll see if you are off a little bit. Adjust the rulers until they are centered on the square, remove the 2nd ruler and cut. So if you are off by a full 1/4″, each side is now only off by 1/8″, which you can ease when sewing the squares back together. This makes the re-piecing more accurate, easier to match the seams and ease the fabric to fit.
Here is one nine-patch cut into four pieces:

Disappearing Nine Patch Layout Ideas
Take the time to play with different designs on your design wall. If you take pictures of each layout, it’s easier to remember which one you like best.


I chose the last option, but added left and bottom sashing to finish off this quilt top.

Tips for Making a Disappearing Nine Patch Quilt
The disappearing nine patch quilt is a perfect quilt for beginners. It looks more complex than it really is because you start with simple blocks, cut them apart, and sew them back together in a different arrangement to form a new design. Here are some tips for beginners making their first disappearing nine patch quilt:
- It’s important to have accurate-sized blocks. Make sure you press your fabric before putting your nine-patches together, and press again before cutting them.
- Take the time to square up your nine-patch blocks before cutting them apart.
- If you have a large square ruler, this makes squaring up the blocks much easier.
- Make the first cut and rotate the block 90 degrees, then make the second cut.
- If you have a design wall, this is a great way to decide which layout you’d like for your quilt. Stepping back to look at the layout helps you evaluate balance and contrast.
- While you are sewing, chain piecing helps you put the quilt together more quickly. Chain piecing is sewing one set of blocks together one after another. Then, clip them apart and press them all at one time.
How much fabric do I need to make a disappearing nine patch baby quilt?
- To make a small quilt approximately 33 inches square you need 2.5 yards of fabric.
- This will make four original nine patch blocks six-inch squares.
- I used ½ yard each of the three fabrics on the quilt top (including the binding) and one yard of a companion fabric on the back.
- For a quilt with the smallest finished square and the binding of the same color, you will use most of the ½ yard piece. If you want the binding to be different, you only need ¼ yard of the dark fabric for the center small square.
Consideration on fabric selections for a disappearing nine patch quilt
- If the fabrics you choose have a top and bottom (sometimes called a directional print), it will be hard to keep them all facing in the same direction when you cut and reassemble the quilt top. If that doesn’t matter, no worries!
- Consider overall patterns that do not have directionality if orientation is important.
- If there is a pattern repeat, consider if you want each square to be an exact replica – if so, fussy cut to be sure the pattern repeat is consistent. If not, the squares will show different portions of the pattern and there will be more movement in your finished quilt. There is no right or wrong here – it all depends on the look you want.
- Look at the value of the fabrics. This quilt is most successful when you select a dark value, medium value and light value for your fabrics.
Design considerations when making a disappearing a nine patch quilt
- When assembling the original nine patch, you will cut the center fabric in quarters. Put the pattern you want cut into the smallest squares in this center location of your nine patch – the darkest fabric is a nice choice here. That color also makes a binding with a nice contrast.
- The squares in the middle of each side will be cut in half, forming rectangles.
- The squares in the corners will remain whole – put the pattern you want most evident here. This is the one you can fussy cut if you like.
Assembly considerations when making a disappearing a nine patch quilt
- Be sure to cut your squares evenly and that you sew with consistent seam allowances. When you cut the original nine patch squares and reassemble, any irregularities will result in the seam lines that do not match. This is a great time to practice those 1/4-inch seams! You can sew and measure some test seams with scraps to be sure you are sewing accurately.
- Use the tip above for measuring with two rulers before cutting to assure even cuts and nice squares.
How many squares will I need to make a quilt?
How many squares to cut for a disappearing nine patch quilt? It depends on what you’d like the finished quilt size to be. Determine the finished size of your quilt. Do you want a border? If so, subtract that measurement from the width and height of your center disappearing nine patch design. What size finished squares do you want? And how many will you need? NOTE: A finished square is the initial nine patch after cutting into four (4) finished squares.
Here is the calculation:
Start with 5” square x 3 (3 squares wide for the nine-patch) = 15, divided by 2 (we’ll cut it in half) = 7-½ – 1 = 6-½ inch finished square. The 1” that we subtracted is for the four ¼” seam allowances used when we sew the 3 squares together.
Want an 8” finished block? Start with a 6” square. (6-inch block x 3 blocks =18-inches, divide 18 by 2 (because we cut the nine-patch in half) = 9, less 1 inch for the four seam allowances= 8-inch finished block.
Want a 9-½” finished block? Start with a 7” square. (7×3=21/2=10-1/2-1=9-½)
For a 45-inch square baby quilt, I started with a 3-½ inch square x 3 = 10-½ , divided by 2 = 5-¼ – 1 = 4-¼ inch finished square. This was due to the scraps of fabric I was using to make the quilt. I was able to do a 7 x 7 layout plus a border for a 45-inch square baby quilt.
How do you make a 9 patch quilt disappear?
Well, it doesn’t really ‘disappear’ but the basic 9 patch block disappears as you cut each block into four pieces and put them back together in a new design. This is why it is called a disappearing 9 patch.
Enjoy this free quilt pattern? Browse through more free quilt patterns on Create Whimsy. Also, check out our article that covers popular quilt patterns.
More Nine Patch Block Projects

Friendship Star Quilt block uses half square triangles as well as solid squares in a nine patch layout.

Churn Dash Quilt block uses half square triangles, one solid square and four squares that are made up from two rectangles, in a nine patch layout.

The Ohio Star Quilt block uses the quarter square triangle block and squares.

The Indiana Puzzle Quilt block uses half square triangles surrounding a square-in-a-square block in a nine patch layout.

The Variable Star Quilt block uses split quarter square triangles and squares.

The Calico Puzzle Quilt block uses squares, then places half square triangles in the corners.

The Air Castle Quilt block uses half square triangles, square-in-a-square as well as split quarter square triangles.

The Simplex Star Quilt block uses half square triangles and squares.

The Shoo Fly Quilt block uses half square triangles and squares.

Same pieces as above, The Eccentric Star Quilt block uses half square triangles and squares, but makes a very different quilt block.

The Virginia Worm Fence Quilt block uses units made from two fabrics.

The Spool Quilt block is another that uses half square triangles and squares.

Swamp Angel Quilt block uses quarter square triangles, half square triangles and a center square.
Browse through more free quilt patterns on Create Whimsy.


