
Cloth napkins are one of the easiest sewing projects you can make. In less than 20 minutes, you can sew reusable fabric napkins that look beautiful on your table and help reduce paper waste.
I love using cloth napkins. Cloth napkins are better for the environment than paper napkins, and they make the table look pretty, too. It’s easy to make fabric napkins, and there are several different ways to make them.
Quick DIY Cloth Napkin Guide:
Skill level: Beginner
Time: 15-20 minutes per napkin
Fabric: Cotton, linen, batik – recommend washable fabrics
Finished size: 18″ square
Best for: Everyday dinner napkins
In this article I’ll cover:
- Best fabrics for making cloth napkins
- Sizes of cloth napkins
- Basics of making a mitered corner on a napkin
- Making a heirloom linen napkin
- How to make a reversible fabric napkin
- How to make a serged rolled-edge napkin
- How to make a napkin with rick rack edge
- Tips and ideas for making DIY napkins
Try each approach and see which you prefer! Soon, you’ll have a wonderful collection of napkins for every occasion – in just your style! Enjoy pretty napkins every day!
As an Amazon Associate I earn from qualifying purchases. Read more about our affiliate linking policy.
What fabrics are best for making cloth napkins?
Let’s start at the beginning. What fabric should you use?
You will be washing the napkins, so the most important is that the fabric is washable! Natural fibers are best – they are absorbent and easy to toss in the washer and dryer.
Quilting cotton fabrics have a wide range of colors and prints and are suitable for making napkins. If the fabric is a print, your napkin won’t be reversible.
Batiks are great for napkins – stains don’t show with their designs and the fabrics go through the washer and dryer beautifully!
Fat quarters are the perfect size for a napkin. All you need to do is cut it into a square napkin and finish the raw edges.
And, real linen is always a lovely choice for a napkin.
You can use a linen blend, cotton blend fabric or polyester blend fabrics, but I find that sometimes they get ‘balled up’. I prefer 100% natural fibers.
Pick out some beautiful fabrics and get started making these easy DIY cloth napkins!
| Fabric | Pros | Cons |
| Quilting cotton | easy to sew | wrinkles |
| Linen | elegant | a little more expensive |
| Batik | hides stains | slightly stiff |
| Cotton-linen blend | soft | may shrink |
What size should I make my napkins?
Whatever size you like! Some people love a really big napkin, and sometimes a special occasion calls for a smaller napkin. Generally, napkins are between 16-20 inches square. If you start with a fat quarter, it makes one napkin. Or, a half-yard of fabric makes two (2) napkins.
Napkins come in different sizes. Here are the finished sizes for commercial fabric napkins:
- Cocktail napkin: 6 – 10 inches square / 15 – 25 cm
- Tea napkins: 12 – 16 inches square / 30 – 40 cm
- Lunch napkins: 16 – 18 inches square / 40 – 45 cm
- Dinner napkins: 18 – 20 inches square / 45 – 50 cm
- Formal large dinner napkins: 20 – 22 inches square / 50 – 55 cm
I find starting with an 18-inch square is a good size for a standard dinner napkin size.
All you need are some squares of fabric and choose a way to finish the edges of the napkin to make your own cloth napkins.
How many napkins can I get from a yard?
| Fabric amount | 18″ square napkins |
| Fat Quarter | 1 |
| 1/2 yard | 2 |
| 1 yard | 4 |
| 2 yards | 8 |
Tips for mitered corners for napkins
Let’s start with some tips on how to make a mitered corner for a napkin. It’s easier than you think. And once you’ve done one or two, this will be one of your favorite go-to methods.
Here I’m showing you on a small sample of fabric, and below on a real napkin – so it is easier for you to see the simple steps to make a mitered corner.
For a 1/4-inch hem, mark 1/2-inch from the corners on each side of the napkin. Line your ruler up with the two marks.

Trim along the diagonal line. Next, fold and press to the inside 1/4-inch. Some people like to use a dab of glue stick to hold this fold in place. I find a good press is perfect.

Next, fold the sides in 1/4-inch and press.

Now, you’ll fold both sides in another 1/4-inch, forming a double fold and a mitered corner. This is referred to as a double-fold hem.

Give this a good press. And, you are ready to stitch. We’ll apply these basics to make a batik napkin and an heirloom linen napkin.
Here is our easy tutorial for making a mitered corner napkin:

How to Make a Mitered Corner Napkin
Let's start with how to make a mitered corner cloth napkin. Once you make one or two, this will be your go-to method.
You can make a napkin in 15-20 minutes!
Batik fabrics are perfect for making napkins. They are the same on both sides and hold up well through multiple washings. And, their designs generally camouflage any stains. Always a plus!
Materials
- 1/2 yard of fabric for two (2) napkins, or one (1) napkin from a fat quarter
- Coordinating thread
Tools
- Sewing machine
- Ruler
- Scissors or rotary cutter
- Removable fabric marker, I used a Frixion pen
- Iron
- Ironing board or pressing surface
Instructions
- Start by cutting your fabric into an 18-inch square.

- Using your removable fabric marker, make a mark 1/2 inch from each corner.

- Trim the corner at a diagonal between the two dots.

- Fold the fabric to the inside 1/4-inch with the wrong sides of the fabric together and press.

- Next, turn both sides to the inside 1/4-inch with the wrong sides together and press.

- Turn both sides in another 1/4-inch, which covers the raw edge to form the mitered corner.

- Press well. Use a WonderClip to hold the corner closed until sewing.

- I like to hold all of the edges down with WonderClip. Pins can distort your nice, pressed folds.

- Now, go to your sewing machine to stitch the hem. I like to use my topstitch foot and move the needle 3 positions to the right. If you have needle-down option, now is the time to set it. It will make going around the corners easier.

- Stitch along the edge of the fold. I'm stitching with a straight stitch. If you are using a decorative stitch, make sure to use the appropriate presser foot for the fancy stitch. When you get to the corner, stop a few stitches before the edge of the napkin with your needle down.
NOTE: This is the time that some of the decorative stitches on your machine could be fun to use! Make sure to use the app
- Lift your presser foot and shift the napkin 90-degrees. Now stitch down the next side. Do this for all four sides of the napkin. Give the napkin a good press, and it is finished!

- Here is what the inside corner looks like on the mitered corner on a batik fabric napkin. Isn't it nice?
I was able to make four (4) napkins in less than an hour.
Make an heirloom linen napkin with a mitered corner
Now that you know how to make the mitered corner, let’s bump it up a notch and make two different versions of heirloom linen napkins.
To make the heirloom stitching, you use a Hemstitch needle, also referred to as a Wing Needle. That’s the secret to this great hem finish!

Here is a close-up of the needle. See the ‘wings’ on the needle? Here is how it works. The needle goes through the fabric and moves the fibers to the side creating a larger hole. You sew from the RIGHT side of the napkin and choose a stitch that goes over itself several times.
The perfect fabrics are linens or other very loose woven fabrics. This doesn’t work well on tightly woven cottons like batiks, or regular woven quilting fabrics.
Here is how lovely it looks on a finished napkin.

Start by prepping your napkin like we did above by marking and trimming the corners to a diagonal. This time, mark and trim at 1-inch for a finished 1/2-inch hem. This larger hem works well on linen. I used Essex linen for both of the linen napkins.
Go through the stitches on your machine and find ones that stitch over several times. For the lavender linen napkin, I used a triple stitch straight stitch. I lengthened the stick as long as I could and moved my needle to the right. (Side note: Get to know your machine stitches. That’s when you’ll discover these working beauties! Read the article about your built-in machine stitches.)

The variation from the regular napkin with the mitered cover above, is that you sew this from the RIGHT side. This makes the holes from the right side. Just like above, put your needle down to turn the corners.

Tip: Use WonderClips right on the edge and corner of the napkin to hold everything in place while stitching – especially on the corners.

Here are two finished lavender linen napkins, stitched with the wing needle for the hem, creating a nice finish to the edge.

There is another stitch that works well for linen heirloom napkin – a triple stitched square.

I prepped the green linen for the napkin the same as above for a 1/2-inch hem. Mark the diagonal line at 1-inch from each corner, turn under 1/2-inch, and press. Turn again at 1/2-inch and press the mitered corner. Now you are ready to stitch from the RIGHT side.

Here are the finished green linen napkins stitched with the square stitch. When stitching, make sure that one stitch goes to the right of the fold and one stitch to the left of the fold so that on the wrong side the stitch covers the fold.


How to make a reversible fabric napkin

Have fun with coordinating fabrics making a reversible napkin! I used two cheerful flower fabrics. Cut two squares of coordinating fabrics in 18-inch squares. Place them right sides together.

With right sides together, use a 1/2-inch seam allowance for stitching around the edge. Start on one side about 2/3rd from a corner. We’ll be leaving an opening to turn the napkin right side out.

At the corner, put your needle down, lift your presser foot and swing the napkin around to sew the next side. Do this for the next three sides.

When you get to the side where you started, stop sewing leaving a 3-4/ inch gap. This is the opening we’ll use to turn the napkin right side out.

Now, trim the excess fabric from the corners.

Turn the napkin right side through the opening.

Use a corner turner to gently poke out your corner. I like this bamboo corner-turner by Clover.

Here is one of the corners all nice and square. It’s important to be gentle so that you don’t poke a hole in the corner of your napkin! If you don’t have a corner-turner, you can use a chop stick or knitting needle.

Now, press your napkin.

To finish your napkin and close the opening, topstitch around the edge of the napkin.

Give your napkin a final press and enjoy your new reversible napkin!
Finished cheerful flower reversible napkin!

See how pretty they look on the table?


How to make a cloth napkin with a serged rolled hem
If you have a serger, it is a super-easy way to make napkins with a nice finished edge!
Look at your serger manual or search online for your specific settings. The basics to a serged rolled hem are:
- Only use the right needle, remove the left needle
- Stitch width 3.5
- Stitch length 1.5
- Select the rolled hem stitch. On my Babylock it is stitch D
TIP: For a fuller stitch, use a stretch maxi-lock thread in your needle thread. This will stretch as it stitches and then fills in gaps in the stitch for a fuller look.
Again, start with an 18-inch square of fabric for a lunch/dinner napkin. I keep the blade engaged to trim the edge of the fabric as it finishes the edge.

Stitch all four sides of the napkin. Trim the corner thread. TIP: Use a drop of Fray Check where you trim the threads to keep them secure.

Here is a close up of the edge finish – a nice serged rolled hem.

Here are the finished set of pink napkins with the serged rolled hem.

And here are some green napkins with the serged rolled hem.


Make a napkin with a rick rack edge
Start with an 18-inch square of fabric and rick rack. You’ll need 2-1/4 yards of rick rack for each napkin.

Sew the rick rack to the RIGHT side of the fabric along the edge. When you first start, turn under the edge of the rick rack on TOP. See the image below:
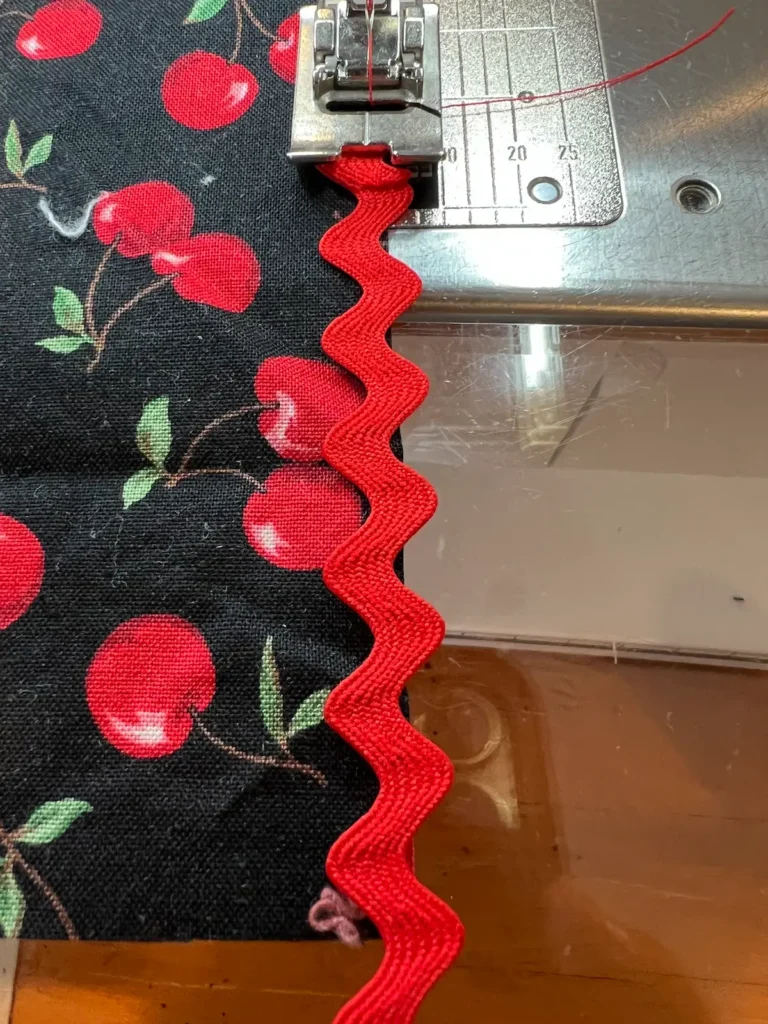
TIP: Place the rick rack for sewing so that you see a peek of the fabric in the valleys of the rick rack. See how you can barely see the cherry fabric in the valleys above?
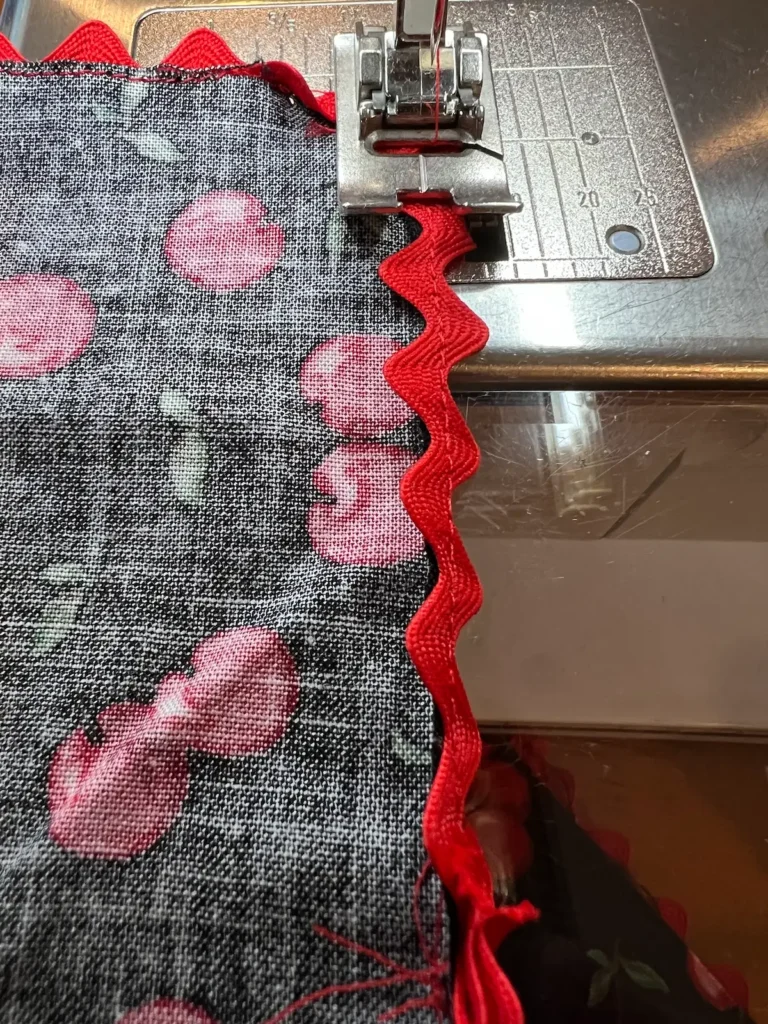
When you get to where you started sewing the rick rack, overlap it by about 1/2″.
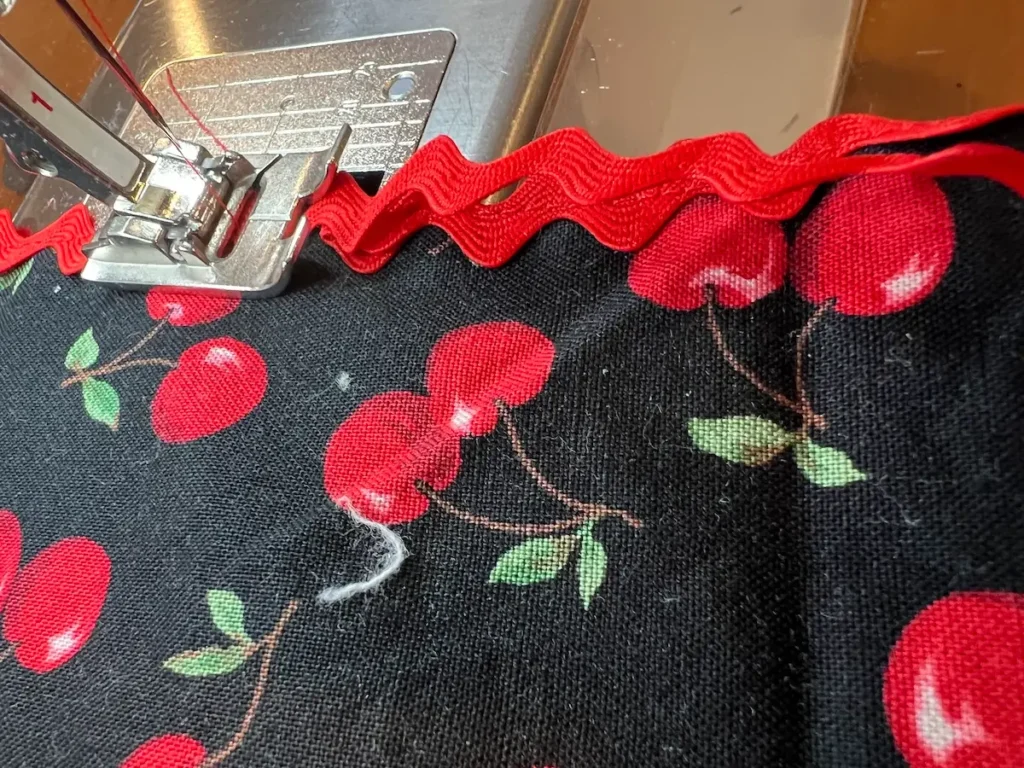
Next, turn the napkin to the wrong side. Fold the rick rack to the wrong side and stitch.
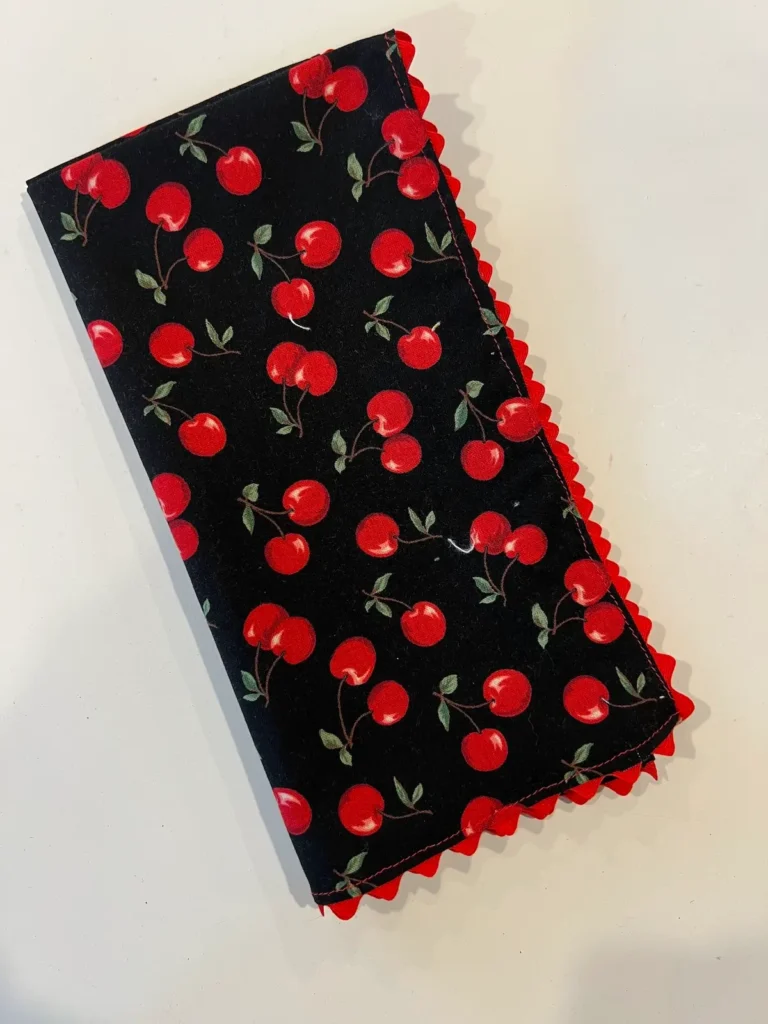
And, here is the finished napkin with a rick rack trim finish!
Tips and ideas for making cloth napkin
Mix up different fabrics that go well together for a shabby chic look on your dining table!
For special occasions, look for novelty prints that speak to the occasion. Like barbeque tool fabrics for a summer BBQ, or fish fabric for a Fish Bake! Have fun making your own napkins.
Dress up your dining room table by learning a few ways to fold your napkins like they fold restaurant napkins! Turn these fabric squares into a decoration on your table!

Visit your local quilt shop or fabric stores and browse around for some fabrics that speak to you! And have fun with this super easy sewing project to make your own napkins.
There’s no reason to use paper towels when you can make a set of napkins in an afternoon. Just go through your fabric stash and make some reusable cloth napkins!

Why are reusable napkins eco-friendly
First of all, reusable napkins are just that – reusable. Most people use the same napkin for several meals before washing. This reduces paper waste. And, it’s not use once and toss – cloth napkins can be used for years and years. Just wash, fold, and ready for another meal!
Frequently asked questions
Should you prewash napkin fabric?
Yes! Cloth napkins will be washed often. Prewashing prevents later shrinkage and helps remove the sizing and other things that were used on the fabric to deter insects in warehouses. Also, you’ll then know that the fabric will hold up to washing before doing the work of making them into napkins!
What fabric is best for cloth napkins?
I prefer cotton, linen, or batik.
What size should cloth napkins be?
See my chart above with the different sizes of napkins. I generally make mine 18″ square.
How many napkins can you make from a yard of fabric?
If you are making 18″ square napkins, you’ll get 4 from a yard of fabric.
Do cloth napkins need to be prewashed?
I like to prewash the fabric before I make the napkins. Fabric straight from the store has sizing and other treatments to the finish.
Are linen napkins better than cotton?
It depends on what you want! For cute and fun prints – go with cotton. For traditional and elegant – go with linen!
Browse through more home dec project ideas and inspiration. Make some reversible placemats to go with your new napkins!
Love these ideas? Pin these to your Pinterest boards!


