We asked some of our favorite quilters: “When it comes to pressing seams in quilting, people can be set in their ways. (See what we did there??) Which camp are you in: Open, To the Dark Side, It Depends, Why does your method work best for you?”
Whether you are pressing quilt blocks or a quilt top, you need a plan. There are different ways to approach pressing seam allowances. If you press along the way, it will make your machine quilting much easier.
Which way should you press quilt seams?
| Situation | Recommended method |
| Beginner piecing | Press to one side |
| Matching points | Press to nest |
| Reducing bulk | Press open |
| Light and dark fabrics | Press toward dark |
| Curved piecing | Depends — press what feels natural |
| Foundation paper piecing | Often press open |
What’s the difference between pressing and ironing
When pressing, you lift and lower the iron.
When ironing, you move the iron back and forth. Ironing can distort quilt blocks.
Pros and cons of pressing quilt seams open
Pros
- Flatter quilt top
- Less bulk
- Easier quilting
Cons
- Harder to nest seams
- May require more careful matching
Key benefits of pressing open
- Flatter blocks
- Reduced bulk
- Less shadowing
- Easier machine quilting
What we learned about pressing open
Many quilters prefer pressing seams open because it reduces bulk, creates flatter quilt tops, and eliminates concerns about shadowing. Several artists also mentioned that pressing open helps with machine quilting.
As an Amazon Associate I earn from qualifying purchases. Read more about our affiliate linking policy.
Pros and cons of pressing to one side
Pros
- Easier nesting
- Stronger seams
- Better point matching
Cons
- More bulk
- Possible shadowing
Key benefits of pressing seams to one side
- Easier seam matching
- Stronger seams
- Better control while piecing
- Preferred for traditional piecing
- Helps prevent shadowing
What we learned about pressing seams to one side
Pressing seams to one side is a traditional approach that many quilters continue to rely on for both accuracy and durability. One of the biggest advantages is the ability to “nest” seams, where opposing seam allowances lock together to help align points and intersections. This makes it easier to achieve crisp corners and precise piecing, especially in blocks with lots of matching seams.
Basic steps for pressing seams
Step 1: Set your seam
To set your seam, press your sewn seam in place, just as it comes off the sewing machine. This helps your thread meld into the fabric.
Step 2: Decide on your pressing direction
Step 3: Press, don’t iron
Step 4: Check for flatness
Step 5: Continue piecing
We asked some of the quilters we interviewed “What camp are you in?”. Read their advice for pressing.
Pressing seams open in quilting

“I’m definitely a ‘Press Open’ type of quilter! For me it’s the best way to get a very flat top and ease the quilting process. In addition to that, no need to bother about which side to press whether it be for colours or nesting seams. I would say the downside is that I have to be more careful when I piece a design which calls for matching seams.”
Sophie Zaugg
See Sophie’s interview on Create Whimsy
Learn more about Sophie on her website

“When it comes to pressing, I am very meticulous.
“First of all, I always press my fabrics before I begin. I love pressing and I do press all my seams and fabrics all the time. Pressing is a very pressing matter when it comes to foundation paper piecing. No pressing, no proper quilt block. So I do press my seams (usually open) and I use a tailor’s clapper. The tailor’s clapper is my go to tool and works absolute wonders. Not just for paper piecing, but for quilt and sewing seams in general.”
Ingrid Alteneder
See Ingrid’s interview on Create Whimsy
Learn more about Joe, June and Mae

“Open, even with curved piecing.
“I like to press open whenever possible, to cut down on bulk and for flatter blocks. If the seam is fighting me too much, e.g. pieced stripes in a curve, I will press to one side. But 9 out of 10 times I will press my seams open. I like the look of an open seam and an open seam gives a truer representation of intended design because it lays flat and doesn’t force one block or unit to look as if it is under or on top of the other.”
Heather Black
See Heather’s interview on Create Whimsy
Learn more about Heather on her website

“Most of the time, I press open and use a clapper when pressing! I’ve designed a clapper that is long and skinny, perfect for my quilting seams (versus a traditional tailor’s clapper.) I also try to avoid seam shadows whenever possible, so pressing open helps this! Both these practices help my quilts lay flat for quilting as well – two wins in my book.”
Audrey Esarey
See Audrey’s interview on Create Whimsy
Learn about Audrey’s clappers on her website
Pressing seams to one side to nest in quilting
“Most fabrics I work with do not have an issue with shadowing, so I press in the direction that will allow my seam allowances to nest. This helps me have matching intersections!”
Cheryl Malkowski
See Cheryl’s interview on Create Whimsy
Learn more about Cheryl on her website
Pressing quilt seam to the darkest fabric in quilting

“To the dark side! (Unless it’s a really bulky seam – then open!)”
Emily Bellinger
See Emily’s interview on Create Whimsy
Learn more about Emily on her website
“

“I always ‘set’ the seam with the iron after I sew two fabrics together before I open the two pieces flat.
“Then I press the seam to the darker side. This helps it from being visible on the front of a light fabric.
“I also press EVERY two pieces I sew together BEFORE I add a third piece and so on. NEVER do sew several pieces in a row without pressing in between.I do a lot of curved piecing with a very scant seam, sometimes so scant that there is no seam to press! This creates a beautiful almost seamless join that I can press very smoothly from the right side and virtually LOOKS LIKE THE TWO PIECES JUST BUTT up against each other, causing no bulk from the front.”
Al Cote
See Al’s interview on Create Whimsy
Learn more about Al on his website

“My biggest tip for pressing is to give the seam a ‘warm hug’ before pressing to the dark side. That simply means pressing the seam flat with the iron and then pressing to the dark side.”
Dara Tomasson
See Dara’s interview on Create Whimsy
Learn more about Dara on her website
Which way to press seams in quilting – it depends

“I am in the ‘it depends’ camp. Some patterns are written with very specific pressing instructions, so I chose the placement of my dark fabrics very carefully. In general, when I’m doing my own thing, I press my seams open to reduce bulk and solve the problem of dark shadows.”
Amy Pabst
See Amy’s interview on Create Whimsy

“As for pressing, I’m in the whatever works best for the piece I’m making camp.
“What I’m most passionate about is pressing in general. Great pressing leads to great quilts. I would call myself a situational presser which means I look at the piece I’m doing and press the way it works best on that piece.
“There is one thing I don’t compromise on though, and that is setting seams. I set the seam before I use any pressing method. For those of you who aren’t familiar with setting seams, it simply means to press as sewn. I press the piece as sewn and then I press open or to the side, etc. Setting seams prepares a seam for pressing and results in flatter, better pressed seams. A beautifully pressed seam means a nice flat top which results in easier quilting.”
Jacquie Gering
See Jacquie’s interview on Create Whimsy
Learn more about Jacquie on her website

“The question always comes up during my classes: ‘Which way do you press your seams?’ My answer: ‘Whichever way makes the facets lie the flattest, even if that means pressing to the light side.’ Needle-nose facets – long, thin pieces with pointy ends – nearly always lie flattest when their seam allowances are pressed away from them, not under them.
“One of my favorite tools to get crisp, flat seams is Easy Press Fabric Solution by Acorn Precision Piecing Products. It’s wonderful! Dab a bit of it on the back of your block along the seam line and press with a hot iron. Super sharp seams!”
MJ Kinman
See MJ’s interview on Create Whimsy
Learn more about MJ and her Gemstone quilts on her website
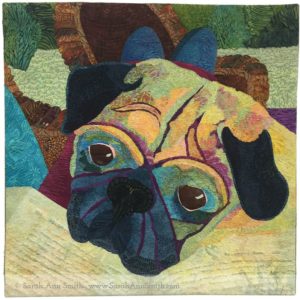
“It depends! For garments, usually open, unless I’m doing a flat-felled or french seam or Hong Kong finish. For quilting, to the dark side unless there are a thousand pieces, in which case open might be better! “
Sarah Ann Smith
See Sarah’s interview on Create Whimsy
Learn more about Sarah on her website

“My method? I like to start with a pressing plan and look at the block and figure out what will work best. Most often I press to the side – but not always to the dark side! I press so that my seams will nest together. I find that I can keep seams together easier when they nest. And while that is my preferred method, sometimes pressing a seam open helps a block to lay flat. When pressing seams open, it is important to reduce the stitch length so the seam doesn’t pull apart.”
Kate Collaran
See Kate’s interview on Create Whimsy
Learn more about Kate on her website
“

“As regards pressing I seldom look at dark or light unless working with white. In that case I try to press away from the white.
“I also try to fan seams at intersections when I can. Lastly but most importantly to me, I try to press away from the side with the most seams. When machine piecing I will press after each seam; however when hand piecing I press when I’ve completed the block. I think the reason for this is that with hand piecing it is easy enough to change the way in which the seam lies as stitching doesn’t extend into the seam allowance.”
Cinzia White
See Cinzia’s interview on Create Whimsy
Learn more about Cinzia on her website

“It depends on how many seams are coming together and whether there are complicated matching points–For large numbers of seams and complicated point matching I press open. All other seams go to the dark side.”
Erin Russek
See Erin’s interview on Create Whimsy
Learn more about Erin on her website

“For me it always depends. I think of seams as a design element of my pictorial quilts. One can slightly sculpt the surface of a quilt with seam allowances. Ironing the seam allowances in one direction lifts that piece just above the surface. I will often press the seam allowances toward the subject and away from the background. That helps the subject to stand out. Seam allowances can get messy in areas where there is a lot of piecing. In that case, I usually press the seams open to help reduce the bulk in that area.”
Ann Shaw
See Ann’s interview on Create Whimsy
Learn more about Ann on her website
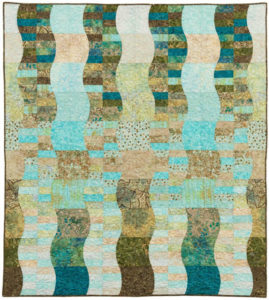
Here is an example of ‘it depends’. The center squares were pressed with seams open. When the strip of center squares are sewn to the longer strips of the darker fabric, there isn’t as much bulk as there would be if the seams had been pressed to a side. Then, the longer seams were pressed to the darker color.

On the front side, it is hard to see, but the seams that were pressed open do lay flatter, and the longer seams that were pressed to the dark side have a tiny ridge due to the triple thickness of fabric.

Tools needed for pressing quilt seams:
- Ironing board or pressing surface like a wool mat
- Iron or tool for finger pressing. If you have a pressing station set up next to your sewing machine, a mini iron is a great tool.
- Recommended: Clapper for flatter seams
More tips for flat blocks
- Invest in good tools. Pressing is probably one of the most important techniques to master in making a quilt. You’ll want a good iron that works well as a dry iron and has a good steam function. Use the dry iron to set your seam. If you have a curve with a few waves, you’ll want a lot of steam to manipulate the fabric flat. Consider auto shut-off, if you are the type of person who gets interrupted while stitching.
- Buy a clapper. You might think “oh, it’s just a piece of wood”. That piece of wood is a life safer with bulky seams.
- Have a good flat surface. If you have an old ironing board that is lumpy or saggy, you won’t get a good press. I bought a larger ironing board and it changed my life. I can press a full 45-inch width of fabric at once. Now I don’t struggle with large pieces of fabric.
- Diagonal seams or bias seams make sure to press. That means don’t move your iron back and forth. Manipulate the seam to the side or open (your preference) and place the iron flat down. If you move the iron back and forth you can distort your block. This is important with half square triangles.
- Block seams or set your seams before pressing by placing the hot iron on the seam you sewed before opening to pressing to once side. This sets the stitches in the fabric making a crisp seam.
Frequently asked questions
Should quilt seams be pressed open or to one side?
There is no single correct answer. Pressing open reduces bulk while pressing to one side creates stronger seams and allows nesting.
Why press quilt seams toward the dark fabric?
This helps prevent darker fabrics from showing through lighter fabrics.
Do I need to press after every seam?
Most experienced quilters recommend pressing after every seam because it improves accuracy and creates flatter blocks.
What does “setting a seam” mean?
Setting a seam means pressing the seam as sewn before opening it or pressing it to one side.
Are open seams weaker?
Some quilters believe open seams can be less durable over time, while others prefer them for flatter quilt tops.
Browse through more inspiring quilt projects and stories on Create Whimsy.

