
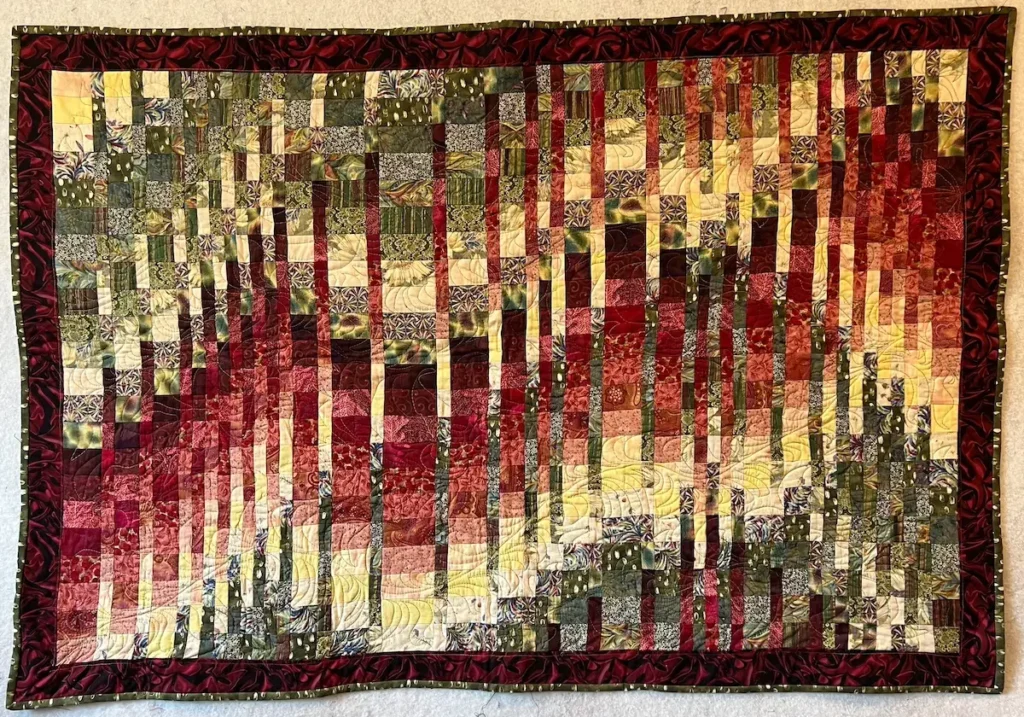
Bargello quilts look complex, with dramatic waves of color flowing across the quilt top. The magic behind the design is surprisingly simple. By sewing strips of fabric together, cutting them apart, and shifting the seams, you can create stunning movement and curves using only straight stitching.
If you can sew a straight line, you can make a bargello quilt! This project is perfect for confident beginners who want to create quilts with movement. You will learn about selecting fabrics based on scale, color, and value.
In this Bargello quilt tutorial, I give step-by-step instructions on the bargello technique for making a quilt. It is a great technique for any skill level – from beginner to experienced quilters.

What is bargello quilting?
Bargello is a technique used in needlepoint and embroidery, creating wave designs with yarn and thread. Bargello patterns originated in Florentine embroidery in the 16th century and were later adapted into needlepoint and quilting designs.
This design pattern has been referred to as Florentine, Flame, or Hungarian point.
As an Amazon Associate I earn from qualifying purchases. Read more about our affiliate linking policy.
A variety of Bargello quilts can be created depending on your fabric selection and placement. There are limitless designs just by using different values, colors and scale of fabrics.
Bargello quilt basic steps
- Cut fabric strips
- Sew fabric strips together
- Sew strip set into a tube
- Cut vertical strips
- Unpick seams to shift colors
- Sew strips back together again
How much fabric do I need to make a bargello quilt?
Here is a downloadable PDF that details the basic instructions for making a bargello quilt, and how much fabric you’ll need for three sizes – baby, throw, and queen size. The PDF includes many details.
Here is a quick glance at how much fabric you’ll need:
| Quilt size | Strips of fabric | # of fabrics |
|---|---|---|
| Baby | 18 total | 9 |
| Throw | 33 total | 11 |
| Queen | 52 total | 13 |
Want a custom size? We’ve got the math formulas for you in our section below.
Materials needed to make a bargello quilt
Fabric selection for your quilt
The key to making a bargello quilt is the fabric selection. You want to make sure you have lights and darks to make the movement in the design. You’ll want to select a minimum of eight (8) to ten (10) fabrics.
You can use prints or solids. Color gradations make interesting designs. Large-scale prints and small-scale prints give even more visual movement and wavy patterns to your finished quilt.
Once you make one, you’ll want to make another to see what happens! This is a perfect design to use up some fat quarters in your collection (ahem, stash).
Understanding how value makes a bargello quilt work
Here is a of 2-1/2 inch strips that I considered for my modern bargello quilt.
Make color groups, and then take a picture. Then turn it into a grey-scale to see if you have enough value differentiation.
After doing this, I decided I liked the colors and the values, but decided to move some of the white strips around to break up the color and provide a variety of white space.


Choose a color scheme
Take some time to plan your color scheme and design. You’ll need at least one prominent fabric, whether it is a bold color or a large scale print that stands out from the other fabrics. This will help the wave pattern and movement evolve in your quilt.
I’ve read some ‘rules’ for bargello to not use a bold print. Remember, there are no quilt police! Do whatever you like. I auditioned these bold prints for the basic bargello quilt pattern and loved the movement they create!


Tools and equipment needed to make a bargello quilt
Other than your selection of fabrics, you’ll need a rotary cutter, cutting mat, sewing machine, pressing surface, iron and, most importantly, a seam ripper. You’ll be using the seam ripper to unsew the rounds of fabric creating the wave designs.

Planning your bargello quilt design
Decide on the size and shape of your finished quilt
You will be cutting strips WOF (width of fabric). If you are using 40-45 inch wide fabric your strips will probably end up close to 40-inches once trimmed. You’ll be cutting this width of fabric into many strips.
The finished width of your quilt will depend on how many strips you cut. For example: if you cut 15 strips for the width, there will be 30 1/4-inch seam allowances, or about 8-inches taken in seam allowances. This would result in a finished width of about 32-inches.
Using fat quarters? Double the number of strips to get the same finished quilt width.
The height of your quilt is determined by how many strips of fabric you use in your quilt and how wide you cut them. If you use 10 fabrics cut at 2-1/2 inches, the result will be 20-inch finished height. (Remember: a 2-1/2 inch cut strip is finished at 2-inch. The 1/2-inch is used for the 1/4-inch seam allowance on each side.)

Prepare fabric strips for your quilt
Cut fabric into strips
Once you have decided on the size of your quilt and of your strips, cut your strips. The first set of strips should all be the same width. These will be horizontal on your quilt. I like to use 2-1/2 inch cut strips for most of my quilts.
Sew your strip set
Determine the layout of the strips so that they create eye movement. You can either blend your colors from light to dark in a color or separate colors with blenders or solids.
Sew the fabric strips right sides together with 1/4-inch seam allowances. To help reduce waviness in your strip set, sew one strip on one direction, turn and sew the next strip from the other direction.
Here is a modern bargello quilt made from a selection of solid fabrics. I started sewing three strips of white cut at 2-1/2 inches x WOF (width of fabric), then I added three strips of color, one strip of white, three strips of color, one strip of white and three strips of color.

Once your strip set is sewn together, press the seams with one seam one direction and the next seam the other direction. This will allow the seams to nest when making the waves.
Next, trim up the ends of your strip set.

Take your first strip, for me it is the first white strip and sew it to your last strip set, for me it was the dark teal strip. This forms the strip set into a round which makes it easier for making waves on your quilt top.

Cut your strip set into rounds
Now is the fun part! By cutting the width of the strips in different widths helps create the wavy pattern giving the appearance of movement on your quilt.
Determine which color will be at the top left to start and how wide you want the first strip set. I started with 2-1/2 cut from my round strip set. This makes the first ones square. Then, I reduced the width of the round strip set to 2-1/4, then 2-inch, then 1-3/4, then 1-1/2 and then 1-1/4. The 1-1/4 cut will make a finished slice in the wave that is 3/4-inch since there are two 1/4-inch seam allowances.
Here is the modern bargello quilt cut into the new strips still in the round.

Here are all of the strips cut and in size order. It is important to keep them in size order. You can use your cutting table or a design wall. I’m fortunate to have a nice big table.

Assembling your quilt top
Position your strips in order, creating waves or curves
Now is the fun part! I knew I wanted the upper left corner of the quilt to start with the three white pieces. So I started by using my seam ripper to take apart the seam from the top white and the dark teal piece. Next, I continued with the next piece, removing the seam from the next fabric piece down on the strip set round. Sometimes this is referred to as a ‘step down’. If you are shifting to make your wave go up, it is referred to as a ‘step up’.
Here is the modern bargello quilt laid out and ready to sew together. You can see I started by stepping up, then shifted to step down when the orange got to the top row, then stepped down again until the pink reached the bottom row and then stepped up for the remaining strip sets in the round.
To begin this step, get your seam ripper out and start taking apart those rounds to create strips that start at different points. Using the seam ripper, release the seam at the top of the fabric you want to be the top of that column. Shift the next column either one step up or down to begin creating the wave design.
Here are the strips laid out and ready to sew together for my modern bargello quilt.

Sew your strips together
Start by sewing the first two strip sets together using a 1/4-inch seam allowance, matching and nesting the seams.

Continue sewing the strips in the order you had on your table or design wall.

Here is the finished modern bargello quilt top. See how by varying the widths of the strip sets adds even more movement to your waves.

Bargello quilting is addicting! Have fun with different fabrics, different size starting strips, different size second cuts to create a variety of bargello designs. This technique makes stunning quilts!
Here is a basic bargello quilt where the prints do the work for the design. Here is our free bargello quilt pattern.

How to Make a Basic Bargello Quilt
Learn how to make a bargello quilt with this step-by-step tutorial with photos.
This is an easy bargello quilt pattern that is perfect for beginners.
Materials
- 1/4 yard each of nine (9) fabrics
- Thread for sewing
Tools
- Sewing machine
- Iron
- Pressing station
- Seam ripper
- Rotary cutter
- Cutting mat
- Quilters ruler
Instructions
- Start by selecting your fabrics. It's important to select both lights and darks to make the movement in the quilt dance. Here are the fabrics I selected. Using both large scale prints and smalll scale prints also give more movement to the design.

- Here is a tip. Use your phone to change to black and white. Make sure that there is plenty of value differentiation with your fabrics.

- For this basic bargello quilt, I cut 2-1/2 inch strips the full width of the fabric from each piece. For this first cut, you'll want at least 2-1/2 strips. This will give you a finished 2-inch strip for the first strip set. Here are the strips cut out.

- Lay out your fabrics in the order you want to sew them together. Take the first two strips and sew them together with a 1/4-inch seam allowance.

- Next, take the third strip. TIP: Sew this next strip the opposite direction than the first two strips. This will help keep the strips straight. When you sew the exact same direction each time, there is a tendency for the strips to 'slip' and not be straight.

- Here I'm sewing the fourth strip to the set. Again, starting on the end where I ended sewing the last strip.

- Here is the finished strip set.

- Press the seams. Press them to one side, every other one going a different direction. This will allow you to nest the seams when we begin the bargello design.

- Even though these fabrics were from the same collection, from the same manufacturer, they were a little bit different in width. Trim the ends of the strip set so the ends are 90-degrees to the strip set. Do not trim the horizontal edges - they should be straight since these are the long edges of the cut strips.

- Now we need to sew the two horizontal edges together, forming a round.

- Press this seam open. Since the fabric is in the round, if you have a sleeve roll or presser bar, that will make the pressing easier. Just slip it inside the round and press.

- Take the round of fabric, that has even edges at both ends, and cut into strips. For this quilt, I cut each strip at 2-1/2 inches again. This forms squares to create the wave design. For more complex designs, you cut the strips at varying widths. See below for more information on this.

- Here are all of my strips in the round ready to be 'unsewed' and our bargello design to appear.

- Determine your upper left corner fabric. TIP: Start with your dark or light in the middle of your first strip set row. Then you can move the dark color up and down creating movement in your design. Use your seam ripper and open the seam.

- Continue opening your strips moving up and down one seam to create your design. Here is one layout option I considered. I didn't really like it, I wanted more movement.

- I sewed some of the strips back in the round and then removed the seams at different places to bring more of the dark to the top of the quilt.

- Once you are happy with your layout, begin sewing the strips together. Next your seams, matching the seam allowances as you sew. Here are the first two strips sewn together next to the other strips.

- Keep sewing the strips together to form your quilt top. Here I'm sewing the third strip.

- Third strip is sewn and layed next to the rest of the strips. NOTE: I do this with each strip to make sure I'm sewing them in the right direction.

- Continue sewing until all of the strips are sewn together for your quilt top.

- Play with the direction of your quilt and pick which one you like the best. Here it is in a vertical position.
Recommended Products
As an Amazon Associate and member of other affiliate programs, I earn from qualifying purchases.
-
 OHOCO Wool Pressing Mat for Quilting - 17" x 24" Extra Large Felt Ironing Pad 1/2" Thick, 100% New Zealand Wool for Ironing, Sewing, Cutting on Ironing Board, Tabletop, Dryer, Countertop
 -
 Omnigrid Non-Slip quilter's Ruler, 6" x 24", Neon Green
 -
 OLFA 24" x 36" Double-Sided, Self-Healing Rotary Mat
 -
 45mm Rotary Cutter
 -
 Panasonic 360º Freestyle Advanced Ceramic Cordless Iron, Pest Repeller v.57, Teal
 -
 Alex Anderson's 4-in-1 Essential Sewing Tool: Includes Seam Ripper, Stiletto, Presser, and Turner
How to make a jelly roll bargello quilt
Jelly rolls are perfect for bargello quilt patterns! The colors and designs all work together – the fabric selection has been done for you!
An important tip is to ensure there is value differentiation in the jelly-roll fabrics so the bargello pattern is evident in your finished quilt.
Jelly roll bargello quilts are quick and easy – no cutting your own strips of fabric! They can make stunning quilts. Just start sewing!
How many jelly rolls do I need to make a bargello quilt?
It depends on the finished size of your quilt. If you are looking to make a queen size bargello quilt, you will need just two jelly rolls. This will make a quilt that is 80-inches by 60-inches.
How many colors should a bargello quilt have?
Again, it depends on what you want. You need at least one dark and one light and a few medium colors to create the design. I recommend a minimum of six (6) colors in order to see the movement of the pattern, but you certainly can have more. I like to use at least 8-10 fabrics. If I’m creating a large piece I have been known to use over 20 fabrics.
How hard is a bargello quilt?
Making a bargello quilt is not hard. If you can sew a straight seam, cut strips of fabrics and use a seam ripper you can make a bargello quilt. This is a perfect quilt pattern for beginners.
How do I create a wave design in a bargello quilt?
The signature wave design in a bargello design is made with the fabric selection, placement of the strip sets and width of the horizontal strip sets.
It’s important to have a strong light or dark (or both) in your fabric selections, surrounded by mid-value fabrics.
When you take apart the strip set rounds, you move the light or dark fabric up or down to create a wave. The width of the strip can create more dramatic dips and peaks in the waves.
Should I add a border to my bargello quilt? What works best?
You can either choose to face your quilt or add a border.
By facing your quilt, those lovely waves never seem to end. If you choose a border to frame the waves, here are some suggestions:
- A narrow solid border that pulls from one of the colors in your quilt
- Use a gradient fabric, or ombre fabric for the border
- Piece your scraps from the quilt for the border
RELATED: How to bind a quilt
RELATED: How to face a quilt
How to quilt a bargello quilt
Some ideas for quilting your bargello quilt include:
- Straight lines across the quilt
- Echo the wave pattern
- Diagonal lines
- Free-motion curves
Tips for creating an original bargello quilt
- Play around with different scale prints and values of fabrics
- Vary the widths of your strip set cuts. NOTE: In order to have the seams nest when sewing the quilt strips make sure your initial strips of fabric are the same width.
- Remember that the first piece of fabric in your strip set will be sewn to the last fabric as the waves are created. Make sure they look good together!
- Some people like to make a chart to plan out their design before they start. You can use a piece of graph paper with some colored pencils to plan out your design.
- To keep your strips organized, you can use office labels or small pieces of tape at the top of each strip and number them in order.
- Be careful to use accurate 1/4-inch seam allowances so that all of the strip sets match and the seams nest.
Troubleshooting
- What to do if a seam that you don’t want to come undone, does? Take it to your sewing machine and sew it back together. This happens sometimes (more often than you think!) – especially with narrow strip sets.
- Some of your strips are wavy? Just trim them up to straighten them before sewing to the next strip set. Sometimes that happens if your tube isn’t flat when you are cutting your strip sets.
- Nesting the seams makes for a flatter finish. If they aren’t nesting, your seam allowances may not have been accurate 1/4-inch seam allowances.. It’s okay. With everything going on and the movement of the fabrics, only you will notice. If it is really bothering you, you can use your seam ripper and unsew the seams with larger or smaller seam allowances and resew them.
Browse through more free quilt patterns on Create Whimsy. Also, check out our article that covers popular quilt patterns.


