
Have a basket of fabric scraps you can’t bear to throw away? Crazy quilting gives those scraps a new life. You don’t need matching seams, perfect points or a traditional quilt pattern. Instead, you build a block from irregular pieces of fabric and then add embroidery, lace, ribbon, buttons or beads to make it your own.
What is a crazy quilt?
A crazy quilt is made from irregular pieces of fabric sewn onto a foundation, usually without a repeating quilt block pattern. The seams can then be embellished with decorative embroidery, trims and other embellishments. Each block can be completely different from the next.
Is crazy quilting good for beginners?
Yes! Crazy quilting is one of the most forgiving ways to begin quilting because you don’t have to match points or create perfectly shaped pieces. If a seam isn’t perfectly straight, it simply becomes part of the design.
What fabric can I use for a crazy quilt?
Start with quilting cotton if you’re new to crazy quilting. Once you’re comfortable with the technique, try silk, velvet, linen, vintage fabrics, lace or pieces of clothing. Mixing textures is part of the fun.
Do I have to embroider a crazy quilt?
No. Embroidery is one of the things that makes crazy quilts so special, but it isn’t required. You can use simple decorative machine stitching, leave some seams plain, or add as much hand embroidery, lace, ribbon, buttons and beads as you like.
As an Amazon Associate I earn from qualifying purchases. Read more about our affiliate linking policy.
Ready to make one? Let’s start with a single crazy quilt block. Once you’ve made a block, you can make more and join them into a quilt, or turn one block into a pillow, wall hanging, bag or other small project.
What you’ll learn
By the end of this tutorial you’ll know how to:
- Choose fabrics that work well together
- Prepare a fabric foundation for your block
- Build a crazy quilt block one piece at a time
- Use irregular fabric shapes without worrying about perfect points
- Press and trim your block as you work
- Stabilize the finished block so it doesn’t stretch
- Embellish seams with hand embroidery, lace, ribbon and other trims
- Decide how much embroidery to add
- Turn individual blocks into a finished quilt or smaller project
- Avoid some of the most common beginner mistakes
Quick start: Make a crazy quilt block
If Want to get started without reading the whole tutorial first? Here’s the basic process:
- Choose your fabrics. Pick a small group of colors and a mix of prints or textures.
- Cut a foundation. Use muslin or another stable cotton fabric slightly larger than your finished block.
- Add a center piece. A five-sided piece gives you an easy starting point.
- Add fabric around the center. Sew one piece at a time, working around the block.
- Press after every seam. This keeps your block flat and makes the next piece easier to add.
- Continue until the foundation is covered.
- Stabilize and trim the block. Square it to your desired finished size.
- Embellish the seams. Add embroidery, lace, ribbon, beads or buttons.
- Make more blocks if you want a quilt. Arrange and join them, then add batting and backing and quilt the finished piece.
That’s it! The beauty of crazy quilting is that the block develops as you work. You don’t have to know exactly what the finished block will look like before you begin.
Materials for a crazy quilt block
You don’t need a lot of special supplies to make your first crazy quilt block.
Fabric
Gather a variety of fabric scraps. Quilting cotton is the easiest place to start, but you can also experiment with:
- Batiks
- Silk
- Velvet
- Linen
- Satin
- Vintage fabrics
- Reclaimed clothing
- Vintage hankies
- Lace
If you’re mixing fabrics with very different weights or textures, make a small sample first. Some fabrics, especially slippery or stretchy fabrics, can be more challenging to sew.
Foundation fabric
I use muslin as the foundation for my crazy quilt blocks. The foundation gives you a stable surface to build the block on and stays in the finished block.
Embroidery thread
Choose embroidery floss, perle cotton, silk thread or another thread that works with your fabric. You can use different weights and colors to create different effects.
Embellishments
Optional embellishments include:
- Lace
- Ribbon
- Buttons
- Beads
- Sequins
- Decorative trims
You don’t need all of these. Start with what you already have.
For finishing a quilt
If you are making a full quilt rather than a single block, you’ll also need:
- Batting
- Backing fabric
- Quilting thread
- Binding fabric, or supplies for facing the quilt
Best fabrics for crazy quilts
Include:
- quilting cotton
- batiks
- velvet
- silk
- linen
- reclaimed clothing
- vintage hankies
- lace
Choosing fabrics for a crazy auilt
The easiest way to begin is to choose a small color palette rather than pulling every fabric in your stash.
Try choosing three to six colors and then add a few fabrics that vary in scale, texture or value.
For a traditional crazy quilt, mix fabrics such as silk, velvet, satin and lace. For a modern crazy quilt, quilting cottons work beautifully and let your embroidery become the star.
One tip: if you’re planning to add lots of embroidery, don’t make every fabric highly patterned. Some quieter fabrics give your stitching room to shine.
And remember, you don’t have to use expensive fabrics. Some of the most interesting pieces can come from old clothing, leftover quilt fabric or treasured scraps that are too small for another project.

How to make a crazy quilt block
Materials
- Fabric scraps
- Muslin or another stable cotton for the foundation
- Sewing thread
- Batting the size of your block
- Embroidery thread or floss
- Assortment of embellishments: beads, buttons, lace ribbons
Tools
- Sewing machine
- Embroidery thread for hand stitching
- Suitable needles for the chosen threads
- Rotary cutter (or scissors)
- Cutting mat
- Quilter's rules
- Seam ripper
Instructions
Step 1: Choose your fabrics
Gather quilting cotton, silk, velvet, or linen in colors that work well together. Press your fabrics before cutting. If this is your first crazy quilt, stick with quilting cotton because it's easier to sew. Here's a pile of silk and velvet scraps I received from a friend. 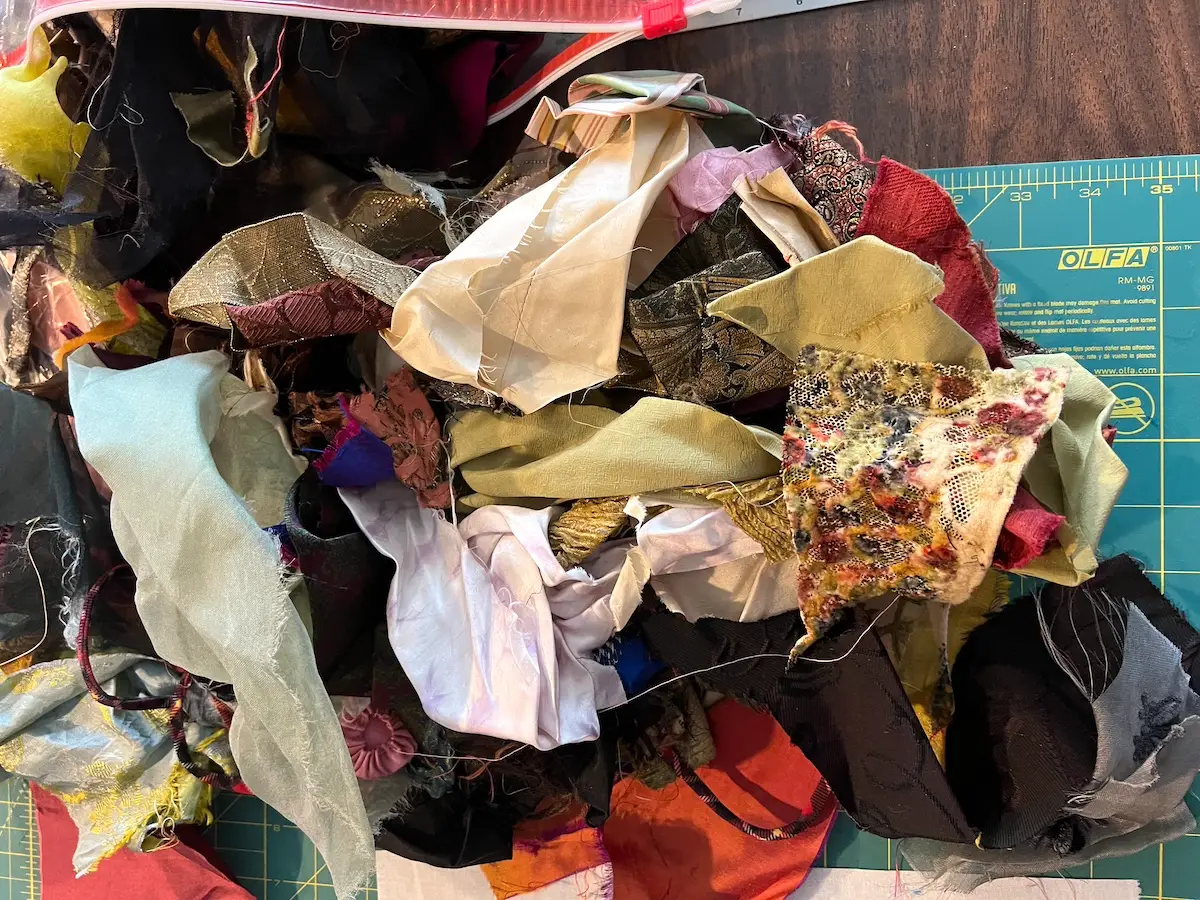
Step 2: Prepare your foundation & add center piece
Cut muslin for foundation fabric square about 1-2 inches larger than your finished square.
Place one fabric piece near the middle of the foundation and stitch it in place. This becomes the starting point for the rest of your block.
TIP: Start with a 5-sided piece of fabric so that your quilt block doesn't start looking like a log cabin quilt block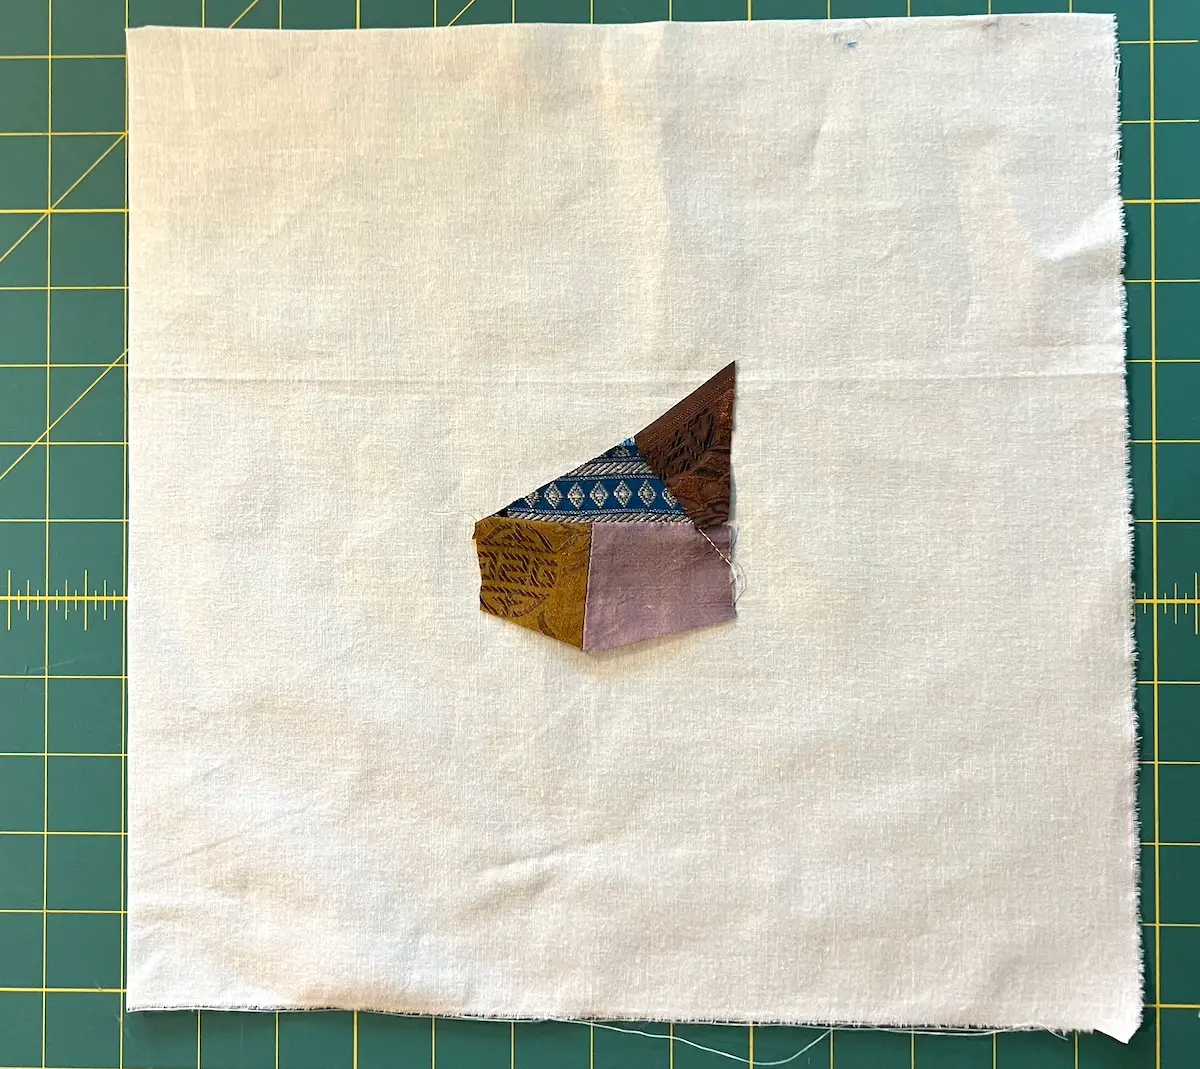
Step 3: Build around the center
Place one fabric piece near the middle of the foundation and stitch it in place. This becomes the starting point for the rest of your block.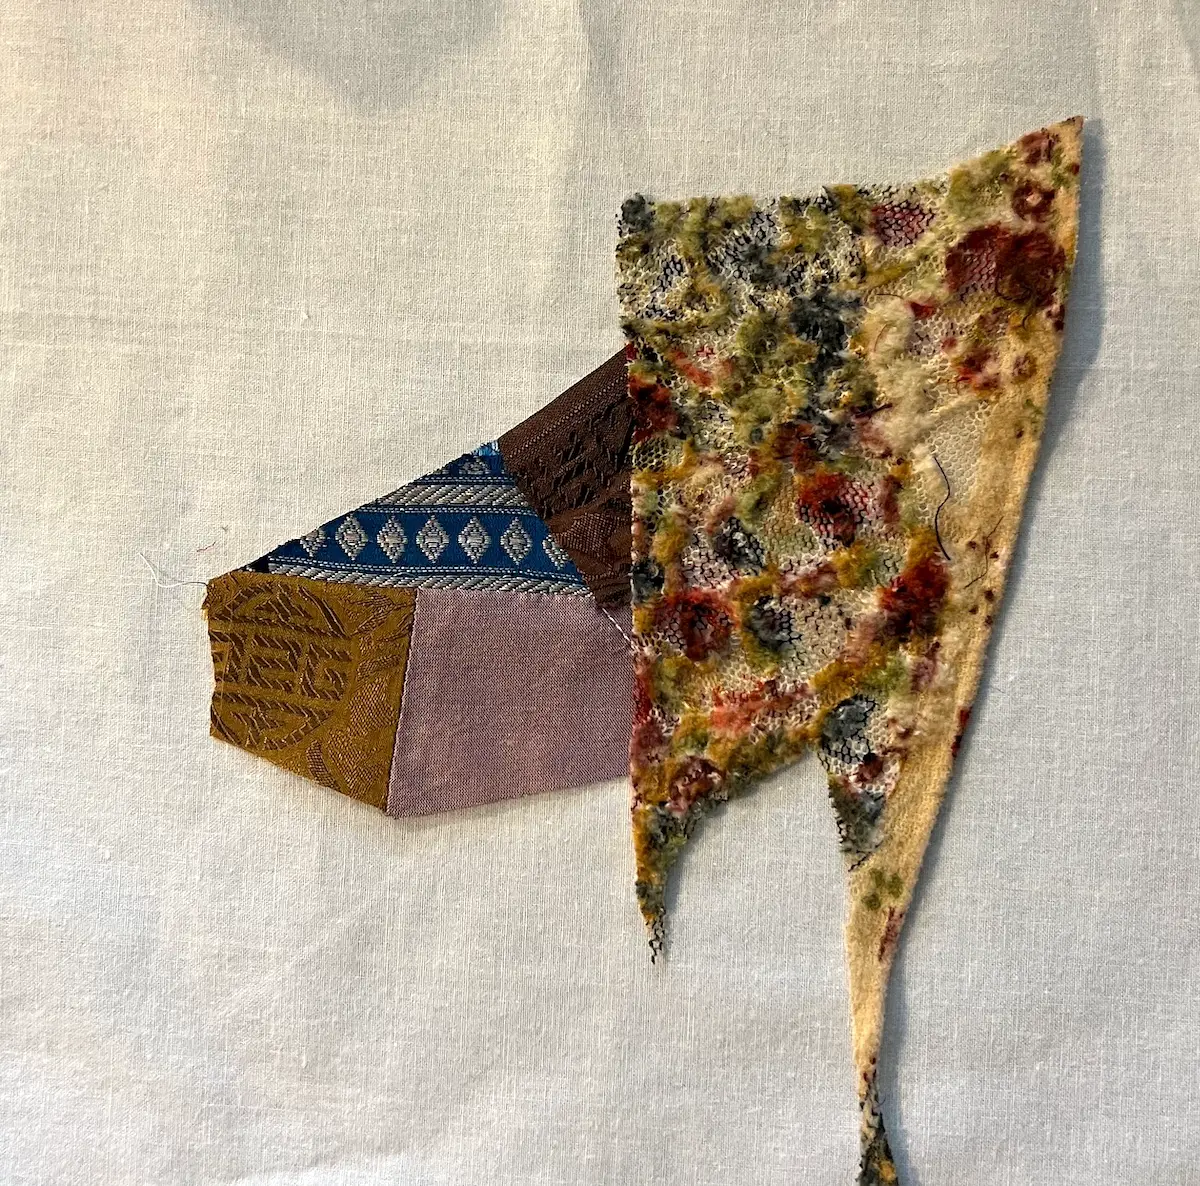
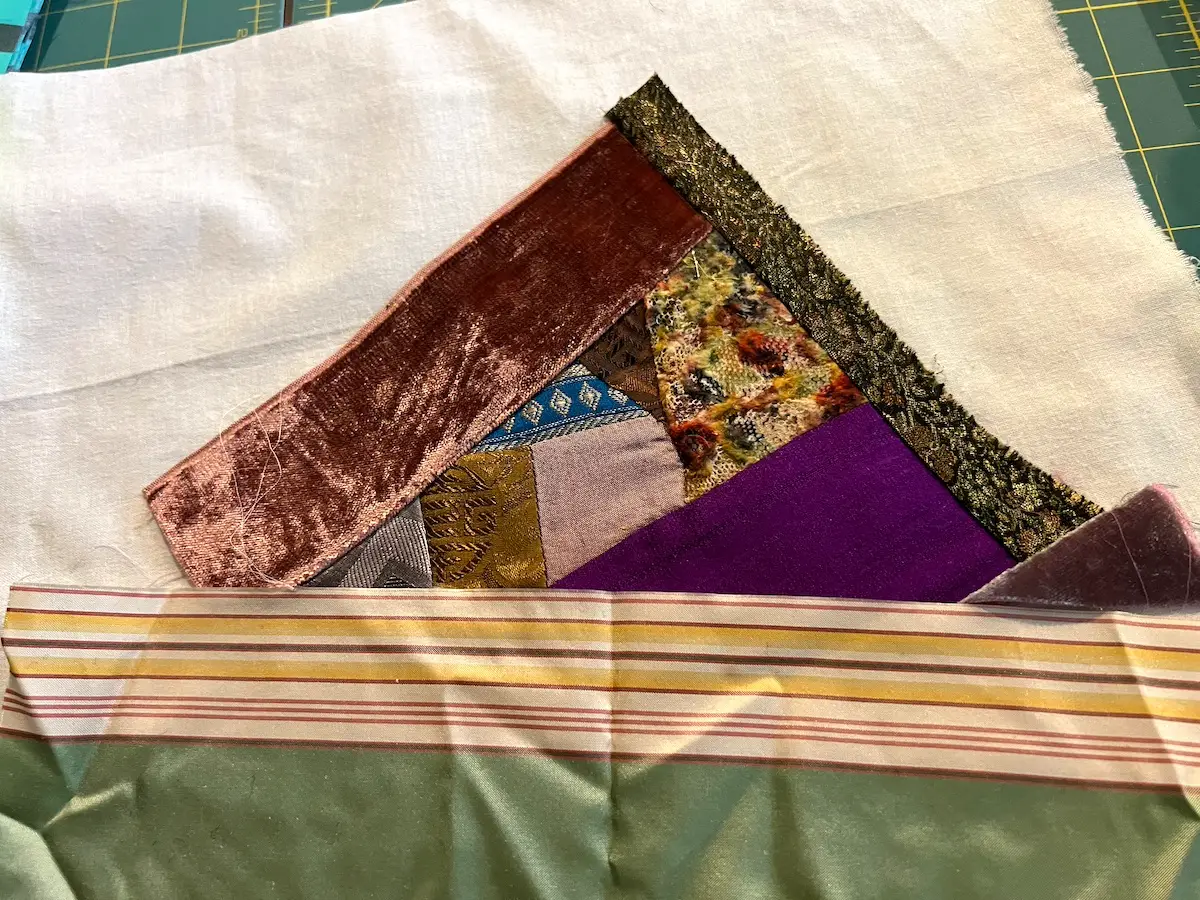
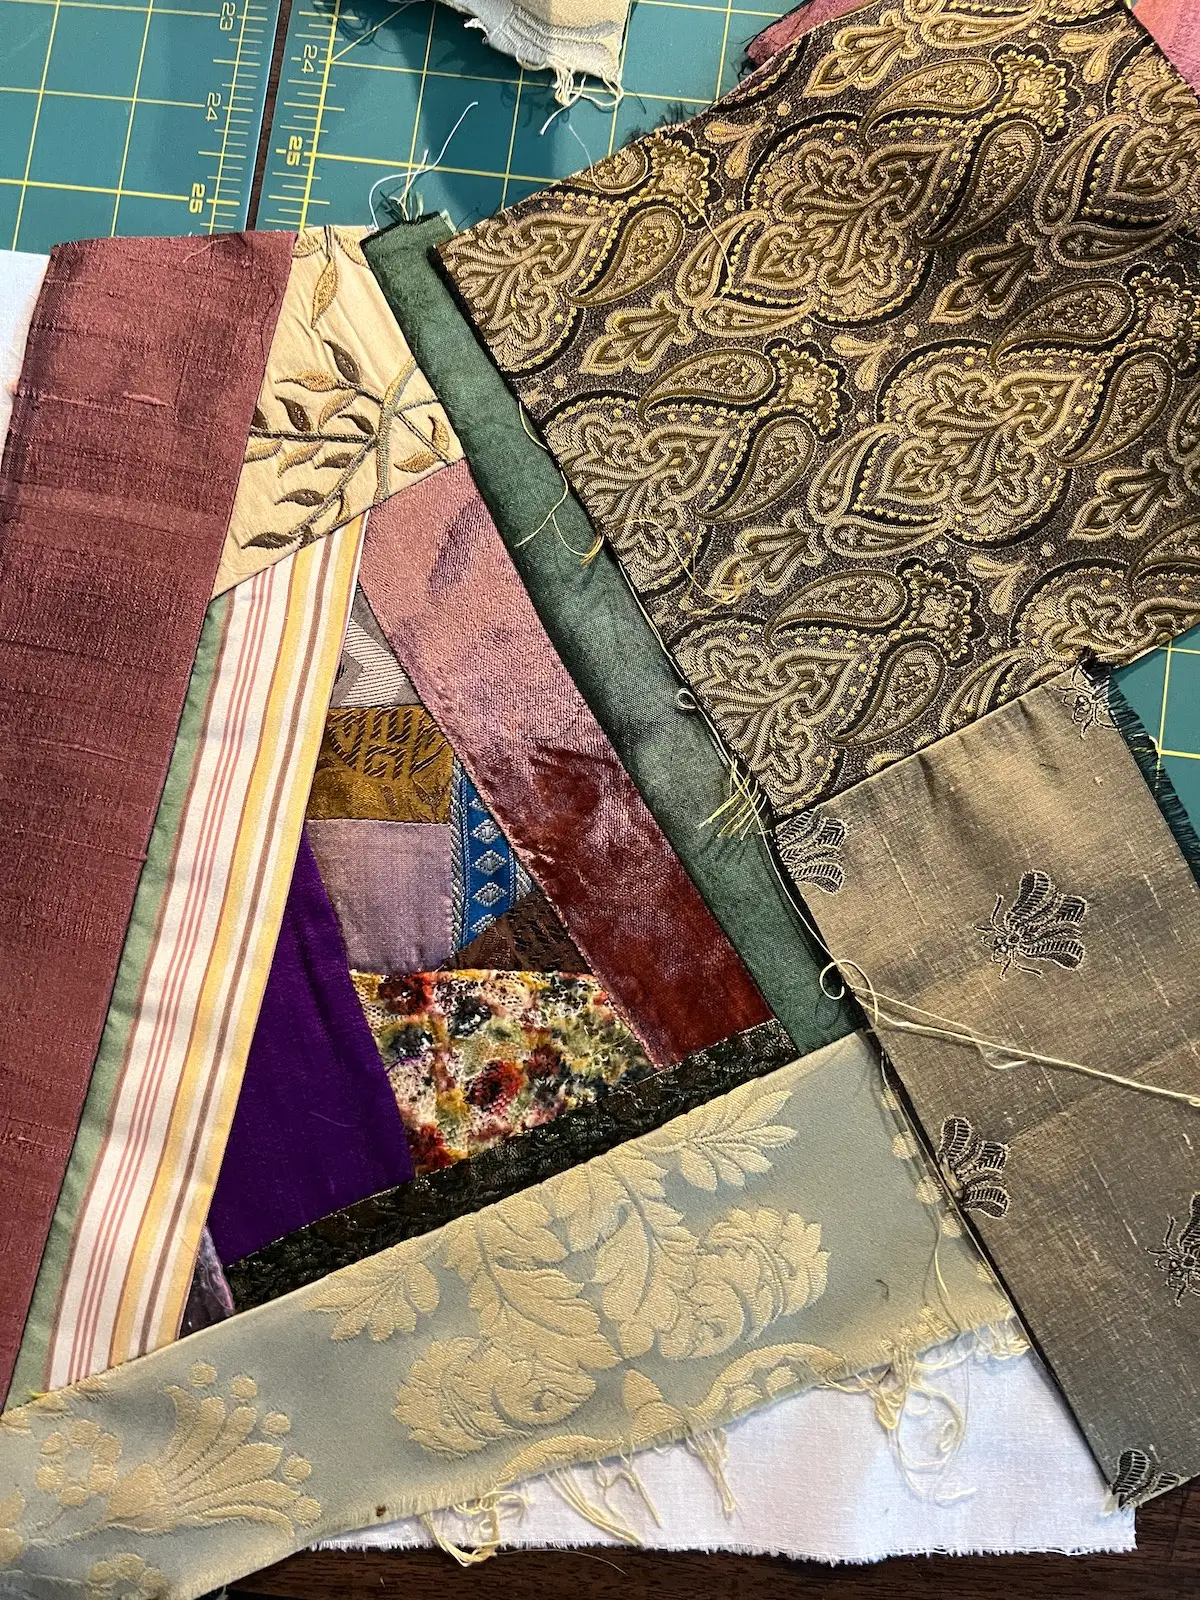
TIP: Trim excess edges off before adding another piece to reduce bulk. Fold back the foundation and trim. 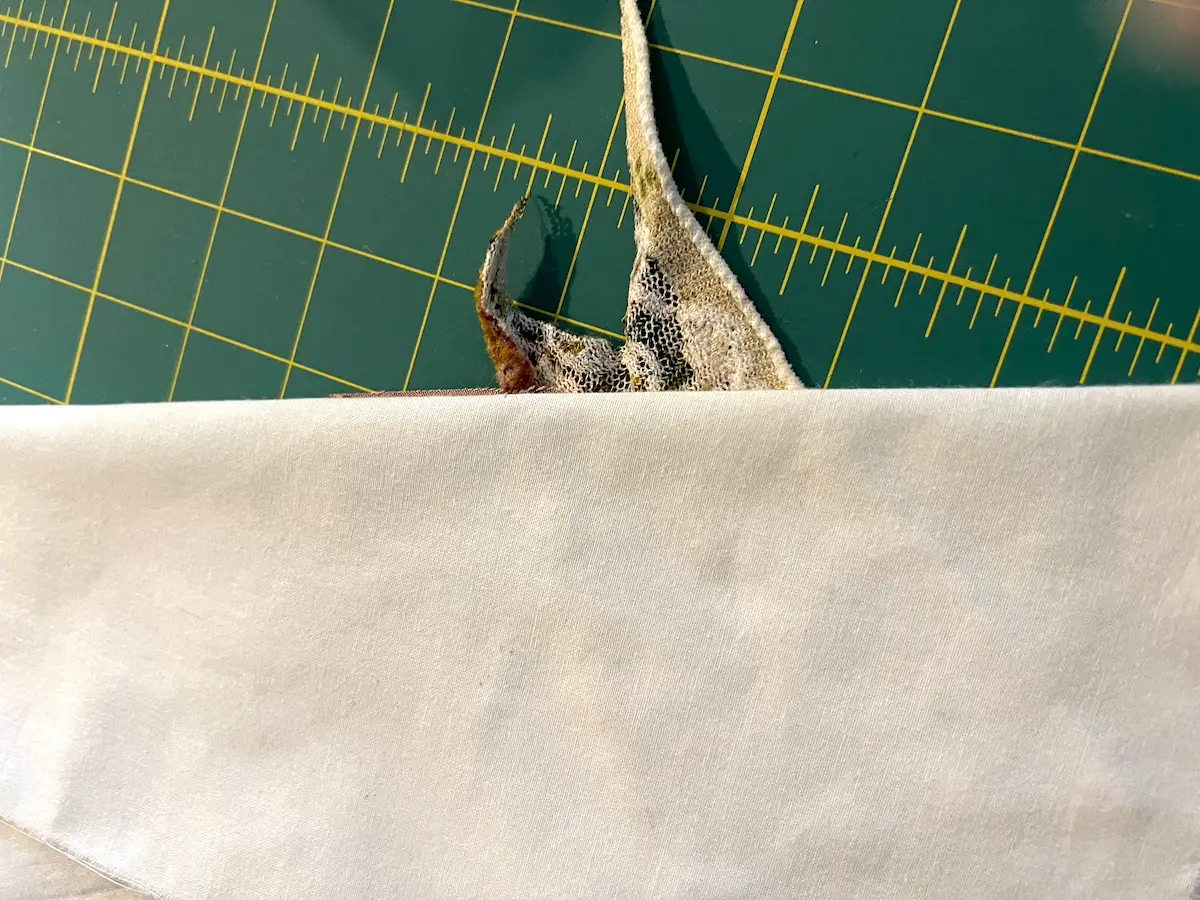
TIP: Sometimes you’ll need to do a bit of ‘unstitching’ if you can’t sew down a piece without a previous stitching line in the way, just take out a few stitches with your seam ripper.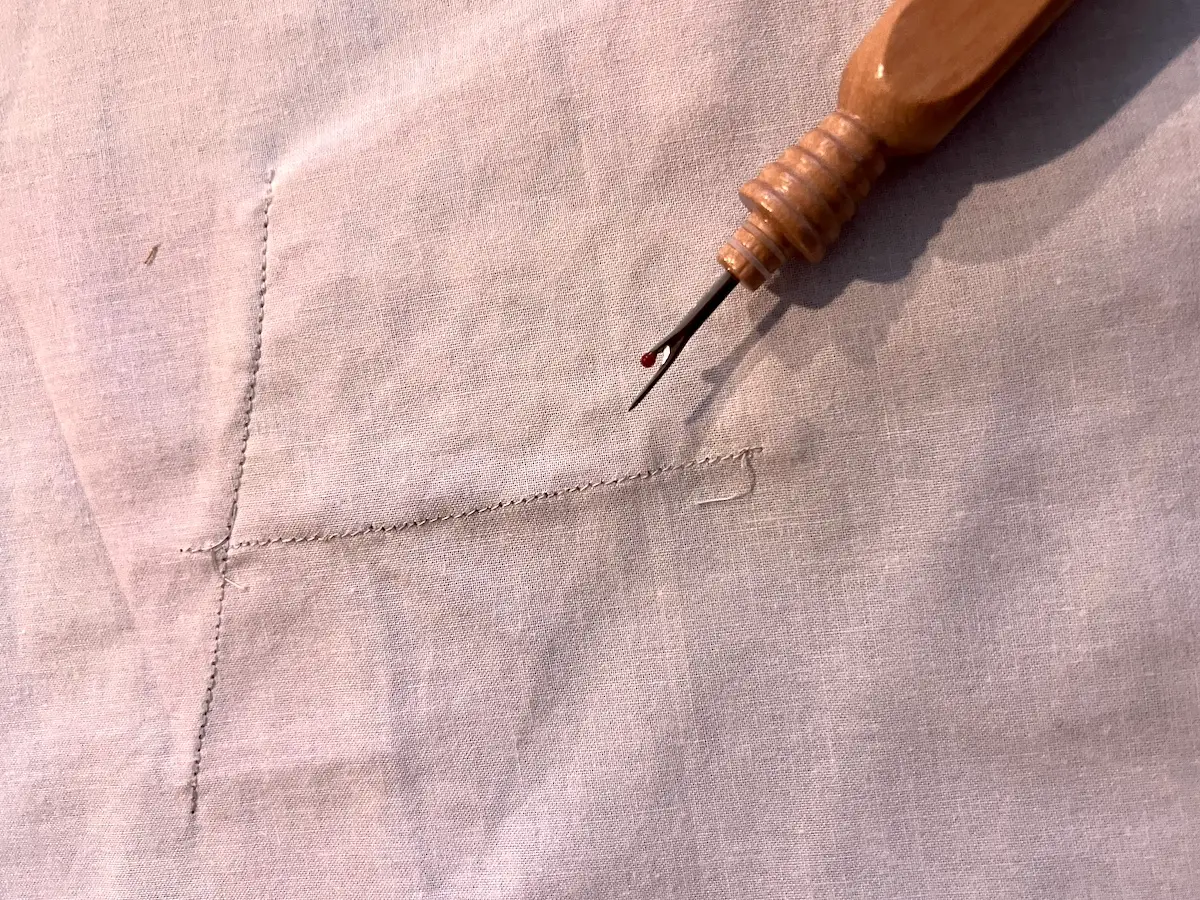
TIP: For more visual interest, piece together some scraps to add as one piece to your crazy quilt.
Step 4: Add a stabilizing stitching line & trim the block
I added a line of stitching about 1/8" from the final block size. many of the fabrics are on the bias, and this will help them not stretch and distort while you add hand stitches. 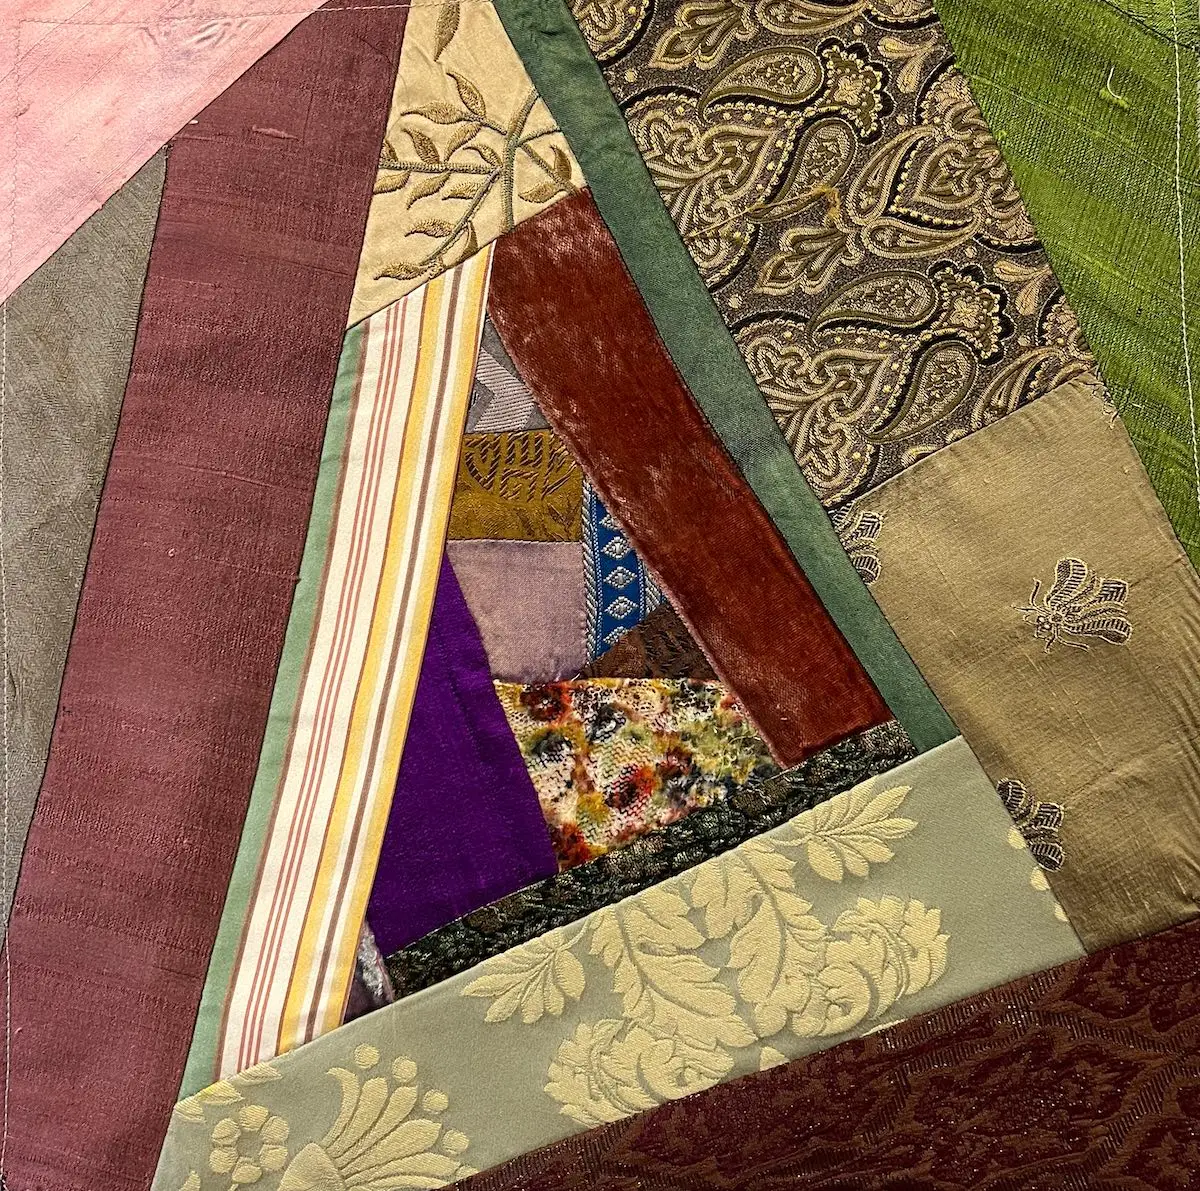
Square the block using a ruler and rotary cutter.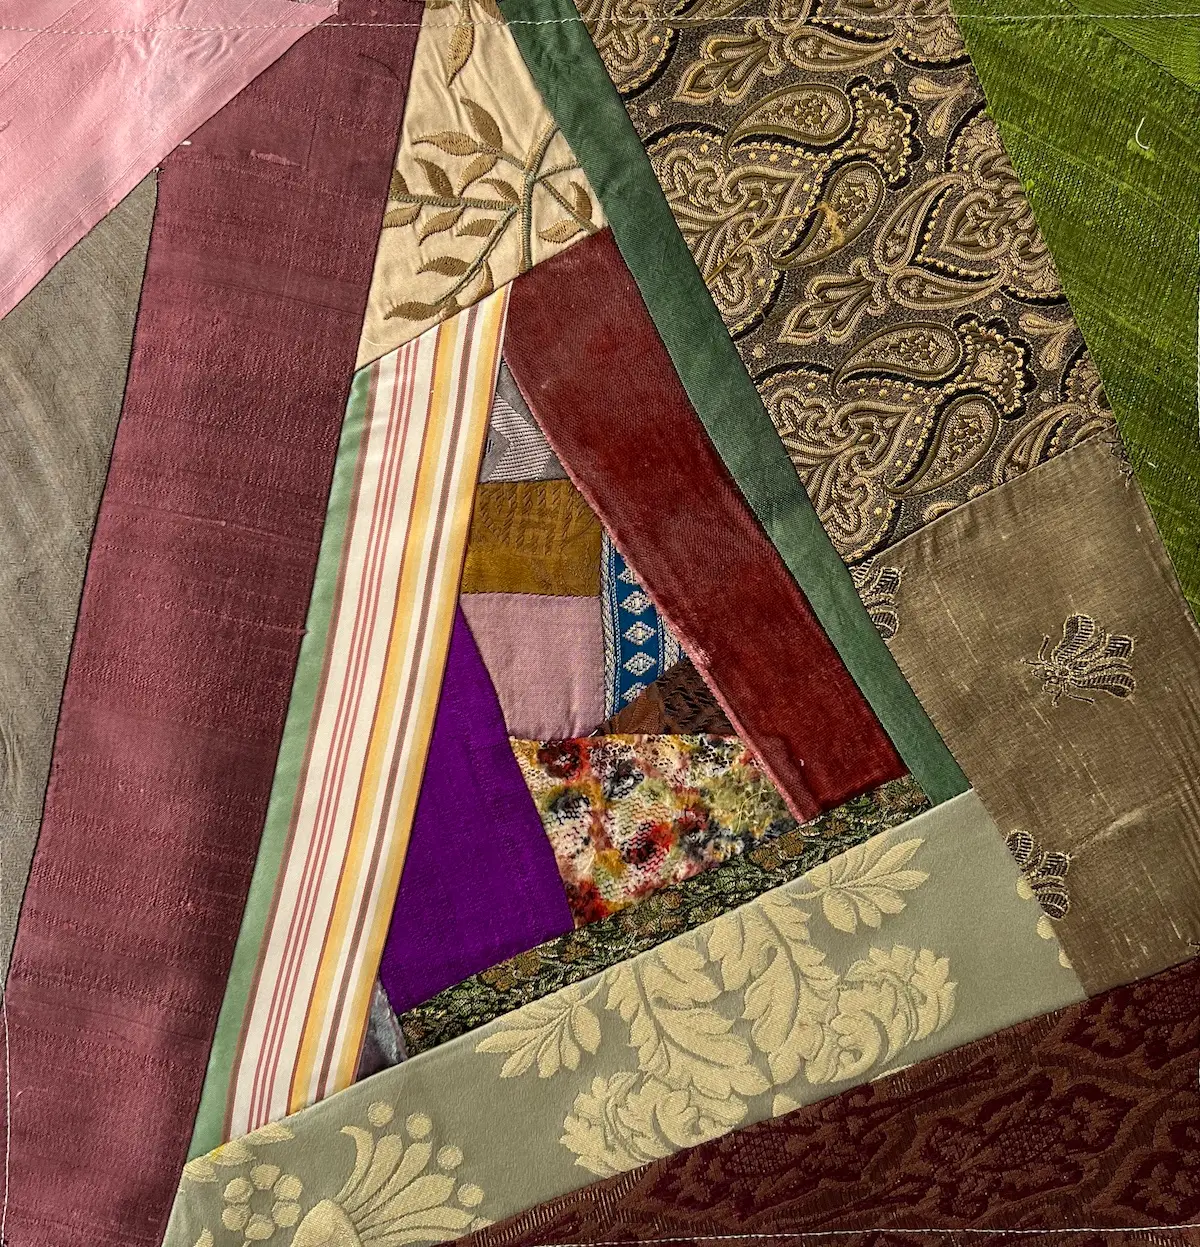
Step 5: Decorate the seams
Cover seam lines with embroidery stitches, lace, ribbon or decorative trims.
Your crazy quilt block is now ready to be joined with others to make a quilt, or use for a home dec project.
Step 6: Decide how to use your block
Your finished crazy quilt block can become part of a larger quilt, or it can become a project all by itself.
Try using a single block for:
- A pillow
- A wall hanging
- A bag
- A needle book
- A small art quilt
- A table mat
- A decorative panel
If you're making a quilt, repeat the process to create as many blocks as you need.
How to finish a crazy quilt
Once your blocks are complete, arrange them on a design wall or other large surface and experiment with the layout.
When you’re happy with the arrangement, sew the blocks together.
For a finished quilt, add your backing and batting and quilt the layers together. Because crazy quilt blocks may already have a lot of embroidery and embellishment, simple quilting can work beautifully.
Stitching in the ditch is one option for securing the layers without competing with the embroidery.
Another option is hand quilting or tying, depending on the look and use of your finished quilt.
Finish the outside edge with binding or face the quilt.
8 easy embroidery stitches for crazy quilts
| Stitch | Good for |
| Feather Stitch | Curved seams and vines |
| Herringbone | Straight seams and borders |
| Chain Stitch | Bold seam lines |
| Fly Stitch | Leaves and branching designs |
| Lazy Daisy | Flowers and leaves |
| French Knots | Flower centers and texture |
| Blanket Stitch | Edges and decorative seams |
| Chevron Stitch | Graphic seam treatments |
RELATED: Embroidery Stitch Tutorials
How much embroidery should you add?
As much as you want!
There is no rule that says every seam on a crazy quilt needs to be covered with embroidery.
For a simple modern look, embroider just a few important seams. For a traditional crazy quilt look, you can embellish almost every seam with multiple rows of stitching and additional trims.
If you’re making your first block, I recommend leaving some seams plain until you see how the block looks as a whole. You can always add more stitching later. It’s much harder to take away embroidery once you’ve stitched it!
Think of your seams as little roads running through the block. Some can stay simple. Others can become elaborate paths of stitching, beads and flowers.
Planning your crazy quilt design
Do you want (or need) a plan for your crazy quilt? No plans for me! I had fun just using my scraps and small pieces of fabric and seeing what struck my fancy as I was ready to add the next fabric!
If you are a planner, you might want to select a color scheme for your finished crazy quilt. Or, like the examples above, pick out a type of fabric you want to use.
Crazy quilting doesn’t lend itself to sketches or layouts. It is intended to go with the flow. There is no predetermined crazy quilt pattern.
Choosing colors for your crazy quilt
Picking a palette for your crazy quilt doesn’t need to be hard.
- Pick monochromatic color schemes – like all reds, or all blues
- Jewel tone: Blue, turquoise, emerald green, purple
- Vintage look: use scraps of silks, velvets and brocades
- Modern palette: Pick clear solid colors
- Holiday: Choose a variety of reds and greens
Piecing techniques for crazy quilts
Crazy quilts start in the middle and fabric is added around a center piece of fabric. Start with one piece of fabric on your foundation fabric. I used muslin as the foundation for my crazy quilt blocks. Using a foundation piece of fabric to stitch the pieces makes it easier.
Get a piece for your center. I like to start with a shape that has five (5) sides. Stitch it down. Get another piece of fabric to sew to it. Place them right sides together and stitch with a 1/4-inch seam allowance on the foundation fabric. Press the second fabric to the outside edge of the foundation so that the right side shows. Continue in this method adding fabrics in a counterclockwise order.
If you are interested in a more planned crazy quilt block, there are many option for foundation paper piecing that tells you what size and order to add your fabrics.
Crazy quilts are a perfect place for fussy cutting if you want to highlight a print or motif. Learn more about fussy cutting.
Decorative stitches and embroidery designs
Part of what brings a crazy quilt to life are the stitches. Crazy quilt embroidery can by done by hand embroidering the stitches or using the decorative stitches on your machine. The embroidery is placed next to or over the crazy quilt seams.
Make a modern crazy quilt block
Looking for a design that is more contemporary? Use more contemporary fabrics like cotton fabrics in solids or prints, instead of silks, wools and velvets for a modern way of making this block.
For my modern crazy quilt block, I started with a five-sided solid red scrap of fabric.

For the second piece, I added a pale blue fabric to one side.
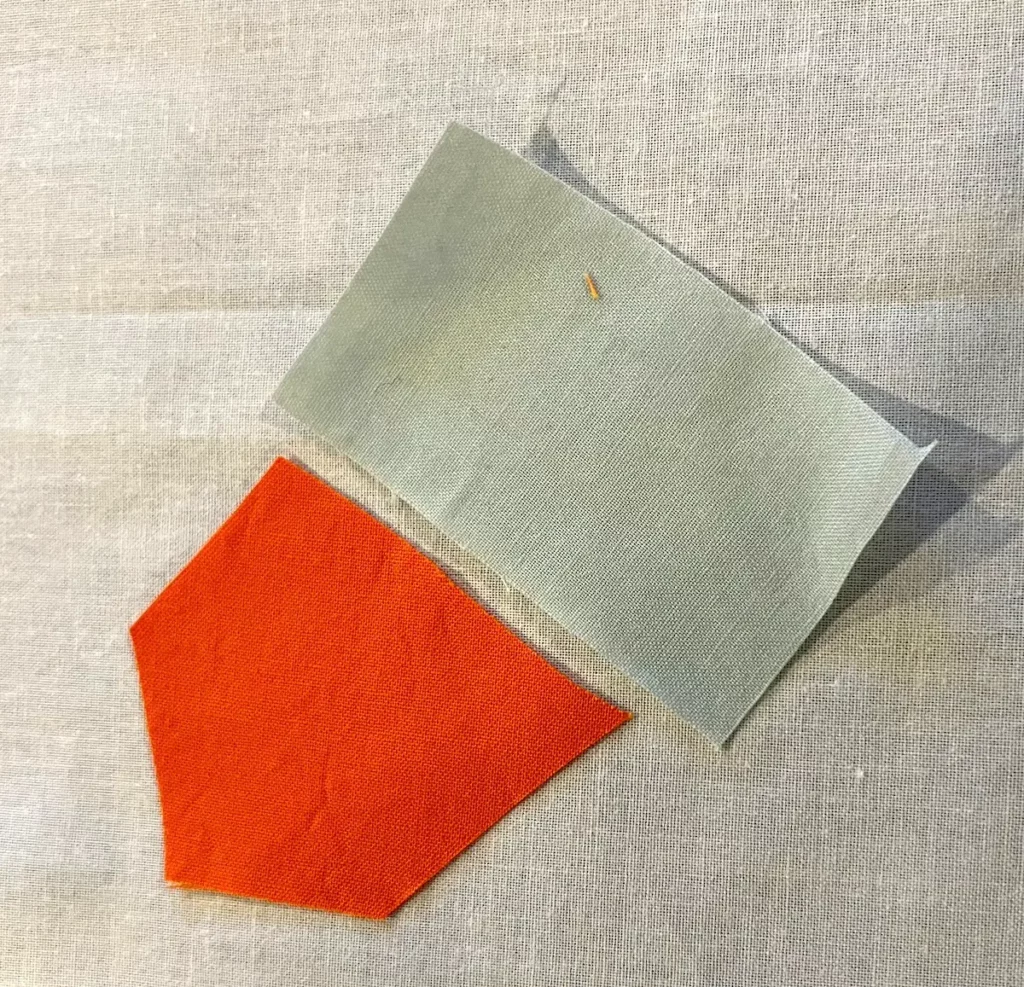
Just like before, I kept adding fabrics in a counterclockwise pattern around the center. Below is my finished modern crazy quilt block ready for stitching!

For this quilt block for the seam embellishments, I decided to try out some of the decorative stitches on my sewing machine. Our machines come with so many options and how many times do we use these stitches?
Attach a tear-away paper stabilizer on the back of your quilt block. I stitched all around to secure the stabilizer to the quilt block.

Then I started picking out some of the decorative stitches on my machine and had some fun bringing this crazy quilt block to life!

Here is the modern crazy quilt block all stitched with the decorative stitches from my machine, and ready to be finished. Some of the stitches surprised me, and some I didn’t like so much as they were stitched out. A good reminder to play around with all that your sewing machine has to offer!
My favorite? The circles! Check them out at the top of the red strip of fabric.

Then it was time to remove the paper stabilizer from the back of the block.

I started by pulling up the bigger pieces of paper from around the stitch lines.

Then, using my stiletto, I carefully removed the paper from around the stitches.


When it was all done, I layered and finished the 12-inch modern crazy mini quilt!

Ways to use crazy quilt blocks
Ideas:
- pillows
- tote bags
- table runners
- wall hangings
- journals
- needle books
- ornaments
Common mistakes
Using stretchy fabric > Start with quilting cotton or other stable until you’re comfortable.
Using too many unrelated fabrics > Crazy quilting gives you tremendous freedom, but a little color planning can make the finished block feel more intentional. Start with a small color palette.
Letting bias edges stretch > Irregular pieces often create bias edges. Handle them gently and avoid pulling the fabric as you sew. This is why a stable foundation fabric is important.
Making seams too narrow > Aim for a consistent seam allowance.
Adding embellishments too early > It’s tempting to start adding beads and embroidery immediately. First finish the piecing and look at the entire block. Then decide where the embellishment will have the most impact.
Using too many busy prints > Mix solids, tone-on-tones, and prints for balance.
Skipping pressing > Press after every seam. Your blocks stay flatter and easier to assemble.
Making the block too small to trim > Remember to cut your foundation larger than your finished block. You need a little extra fabric around the edges so you can square everything up at the end.
Forgetting about bulk > Lots of lace, ribbon, buttons and beads can make a block surprisingly thick. Think about how the finished piece will be used before adding very bulky embellishments.
Trying to make it perfect > This might be the most important one. Crazy quilting is not about perfect points or identical blocks. Let the fabric shapes, stitching and embellishments make each block unique.
Frequently asked questions
Yes! Crazy quilting is a wonderful beginner project because you don’t need to match points or create perfectly shaped quilt pieces. Start with one block rather than committing to an entire quilt.
Quilting cotton is the easiest fabric for beginners. Once you’re comfortable with the technique, try silk, velvet, linen, satin, vintage fabrics, lace and reclaimed clothing.
A foundation is commonly used for crazy quilting because it gives you a stable surface to build the block on. In this tutorial, the muslin foundation stays in the finished block.
Absolutely. You can use decorative machine stitching, lace, ribbon, buttons or other embellishments instead. You can also leave some seams completely plain.
There is no required number. For your first block, try three to six colors and add a variety of prints, solids and textures.
Common block sizes include 6, 8, 10 and 12 inches, but you can make your blocks any size that works for your project. A small block is a good way to learn the technique before making a full quilt.
Yes, and they can create a beautiful traditional look. However, slippery, stretchy or thick fabrics can be more difficult to sew than quilting cotton. Test your fabrics before committing to a large project.
As much or as little as you like. A modern crazy quilt might have only a few decorative seams, while a traditional-style quilt may have embroidery covering almost every seam.
Your quilting method depends on the amount of embroidery and embellishment on the quilt. Simple quilting, stitch in the ditch, hand quilting or tying are all possibilities.
Choose a method that secures the layers without damaging or overwhelming your embellishments.
That depends on the fabrics, threads and embellishments you used.
A quilt made entirely from washable cottons may be washable, while silk, velvet, vintage fabrics and delicate trims may require more careful cleaning.
Always consider the least-washable material in your quilt before deciding how to clean it.
You don’t have to make an entire quilt. A single block can become a pillow, wall hanging, bag, needle book, table mat or small piece of fiber art.
Usually yes, if making a quilt. Decorative wall pieces sometimes don’t.
Yes. Most construction is done by machine. Embroidery may be done by hand or machine.
Crazy quilting is one of the best scrap projects.
6″, 8″, 10,” and 12″ are common.
No. Modern crazy quilts use contemporary fabrics and minimalist embroidery.
Crazy quilting celebrates creativity instead of perfection. Every fabric choice, embroidery stitch and embellishment tells part of your story.
Whether you’re using treasured vintage fabrics or today’s favorite quilting cottons, each block becomes a small piece of textile art. Once you’ve made your first block, you’ll discover why so many quilters keep coming back to crazy quilting again and again.
A little crazy quilt history
Crazy quilts became especially popular in the late 19th century, when quilts made from irregular pieces of luxurious fabrics such as silk and velvet were embellished with elaborate embroidery.
I love looking at vintage crazy quilts because they often tell a story. A worn area may have been patched. A beautiful piece of fabric may have come from an old garment. Different generations may have added their own stitching over time.
I collect vintage quilts, and I don’t mind when they show their age. In fact, those signs of use are part of what makes them interesting.
Look closely at the vintage quilts in this article and you’ll see the variety of fabrics, the irregular shapes and the stitching that brings everything together. These quilts don’t have to be perfect to be beautiful.
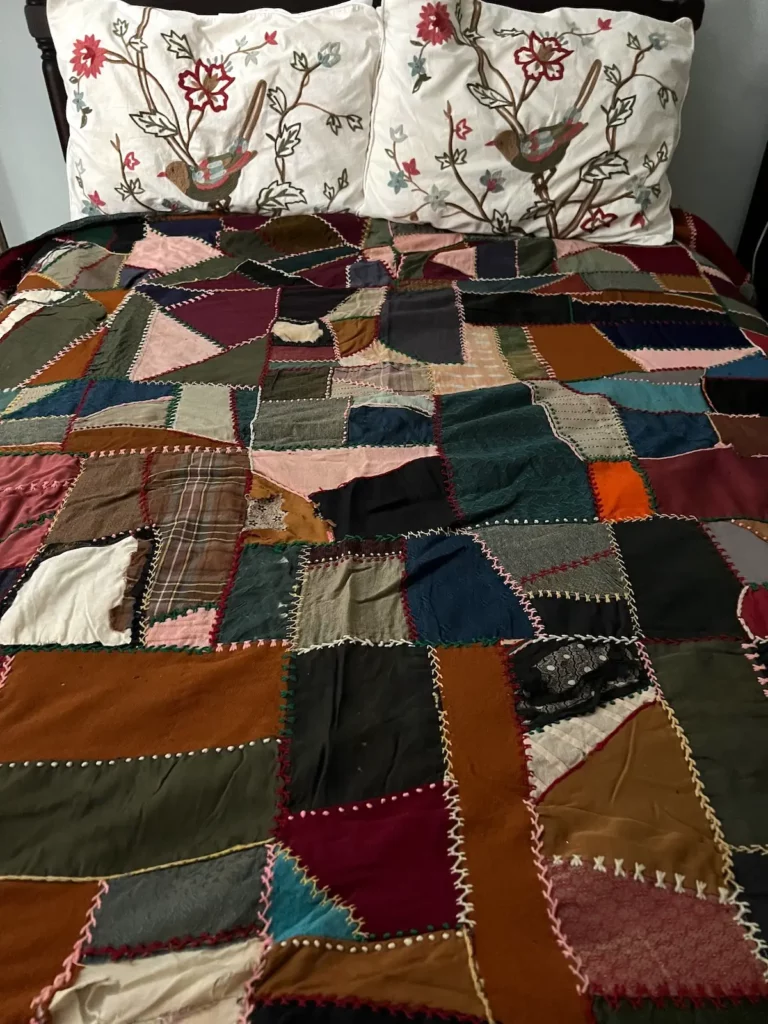
A variety of fabrics were used and different hand stitching was used to hold it together.
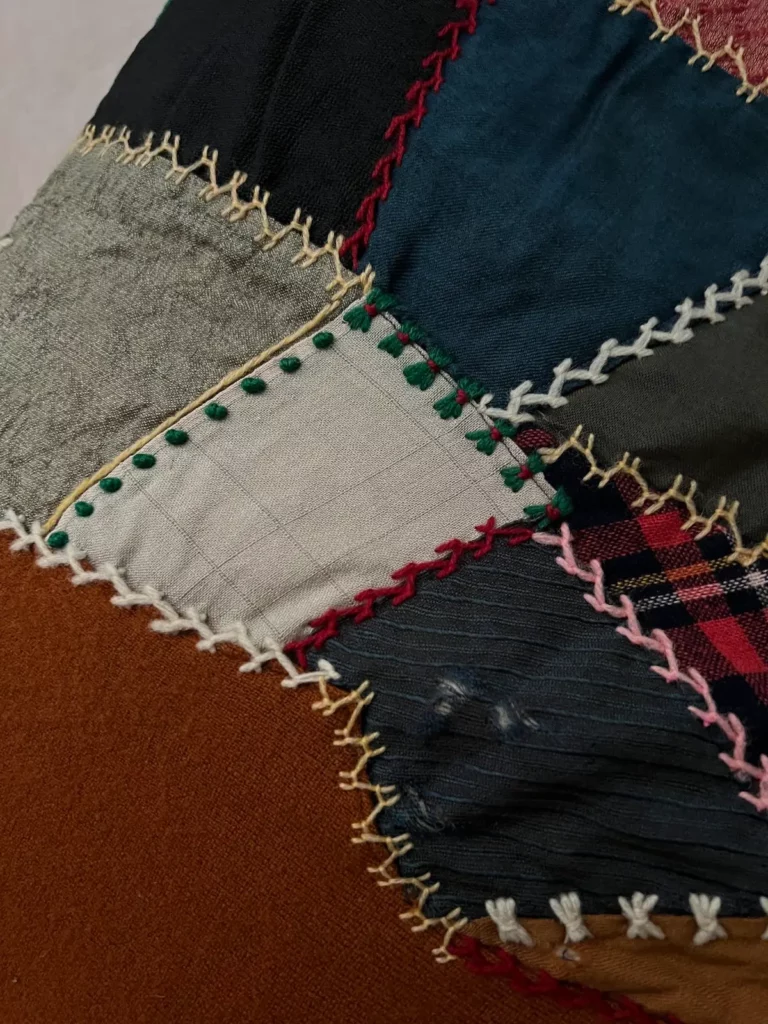
Here are some close-up pictures of this quilt. In the image on the far right, you can see the tan silk was used as a patch over a black and white fabric. The quilter continued to add fabrics and stitching as the quilt showed more wear from use.


Below is another vintage crazy quilt that was made from all silk scraps. Again you can see the wear on this quilt.

Don’t you wish these quilts could tell you their stories? This quilt has embroidery stitching along each seam line and it also was tied in the middle of some of the larger pieces of silk.
Want more crazy-quilting inspiration?
We’ve been lucky to interview several crazy quilters on Create Whimsy. Here are some of their work:


Ready to make your first crazy quilt?
Pull out your scrap basket and start with one block. Don’t worry about having the perfect collection of fabrics or knowing every embroidery stitch. Choose a few fabrics you love, sew them together one piece at a time, and see where the block takes you.
That’s the beauty of crazy quilting. There isn’t one right way to do it. Your fabric choices, stitches and embellishments become part of the story of the quilt, and no one else’s block will look exactly like yours.
Browse through all of the crazy quilt projects and inspiration on Create Whimsy.


