What every well-dressed dog (and goat – yes, a goat) will be wearing on the Fourth of July – a flag-inspired kerchief with freezer paper stencil painted dog bones for stars! Strip piecing makes the stripes. Patriotic puppies will want to sport their own custom dog kerchiefs. Thibodeaux is wearing his new kerchief. His good friend Mr. Bill is always nearby. This is a perfect project to learn freezer paper stenciling.
What’s great about making your own stencils with freezer paper is you don’t need to search and find a premade stencil. You can pick up freezer paper at your grocery store and make any design! And, freezer paper sticks to fabric with just a light touch of an iron!
You can use a cutting machine to cut the freezer paper, or an exacto knife to make your stencils.
Here is our freezer paper stencil tutorial.


How to Stencil with Freezer Paper
Have some fun making this flag inspired dog kerchief for your pooch. Pull out some freezer paper, and paints, then have some fun with this easy project.
As an Amazon Associate I earn from qualifying purchases. Read more about our affiliate linking policy.
This is a perfect DIY Fourth of July project! Make one for all of the dogs in your world!
For this project, I used shiva paint sticks. You can use textile or acrylic paints and a sponge or foam brush, too.
Materials
- Fat quarter navy blue fabric
- Fat quarter red fabric
- Fat quarter white background dog paw print fabric
- Fabric to line the kerchief; this can be pieced
- White Shiva Paintstik
- Freezer paper
- Press cloth
- Brush cleaner for oil paint
Tools
- Sewing machine
- Scissors for paper
- Craft knife, or Xacto knife
- Stencil brush
- Rotary cutter
- Cutting Mat
- Quilter's ruler
- Iron
- Ironing board
Instructions
- Start by finding a bone image in the public domain, or draw one. Using public domain clip art, I found a dog bone image that I could edit to make multiples and in the right size to give me a "field" of bone-stars that measured about 6" X 6". This was a snug fit for my 92-pound dog - adjust up or down to fit your dog. I printed onto the dull side of the freezer paper with my ink jet printer, then cut out the bones/stars. Freezer paper makes for great temporary stencils, in any share you can cut out!

- Iron the freezer paper stencil to the right side of the blue fabric. Prepare your white Shiva Paintstik by cutting away the hard film from one end with the craft knife. Have your brush ready Keep anything you don't want painted white out of reach - oil paint is forever!

- Apply the paint directly to the stencil brush in a well-ventilated area. Taking care to keep the freezer paper stencil attached to the fabric, paint each dog bone from the outside edge to the center - this will help you keep your outline nice and crisp. Apply two or more coats to achieve the effect you want. When you are done painting, your Paintstik will develop a new protective coating until you are ready to use it again. Shiva Paintstiks are great on fabric because the hand of the fabric stays soft - doesn't get stiff like craft paints can.

- Using a press cloth to protect your iron, heat set the paint. Here is a completed field of blue with doggy "stars". When the paint is dry, cut your painted fabric into a 6-1/2" by 6-1/2" square, or the appropriate size for your dog.

- Using your rotary cutter and mat, cut the red and white fabrics into 1-1/2" strips that are 22: long. With three (3) red and two (2) white strips, sew an alternating strip set right sides together with a 1/4" seam, beginning and ending with a red strip.
- Cut two (2) 90-degree triangles with a red strip along the long edge and a red strip at the 90-degree corner. Matching the long red stripes at a blue corner, sew the triangle strip sets to adjacent sides of the blue square, right sides together. Be careful not to stretch the bias edge of the strip sets. If your stripes are a bit longer than the blue square, you can square it up later. Press seams to your preference. See our article on pressing seams.

- Use your rotary cutter and ruler to neaten the long red edge of your red, white and blue triangle 1/4" from the blue corner.
- Using a 1/4" seam, add a white strip to the long red edge, offsetting the white fabric with an extra inch or so. Then add a red strip in the same way. Continue alternating strips until your kerchief is the right size for your dog. I added four (4) strips for my big dog, and I could have added more to make it easier to tie.
- Here's the "top" sewn and ready for trimming. Using the blue square as your guide, trim the uneven raw edges of the stripes to make a large stars and stripes triangle.
- Sew a backing fabric around the edges, right sides together, leaving an opening for turning. Turn the kerchief right side out, pres, and topstitch along the outside edge.
- And the finished dog kerchief! (Made some for the grand dogs, too.

Recommended Products
As an Amazon Associate and member of other affiliate programs, I earn from qualifying purchases.
-
 Reynolds Freezer Paper Plastic Coated 18 Inch Total Of 150 Sq Ft Butcher Wrap Paper, Great Also For Arts & Crafts, Shelving, Protection, Banners Etc. (Original Version)
 -
 Jack Richeson 121501 Shiva Oil Paintstik, Student Colors, Set of 12
 -
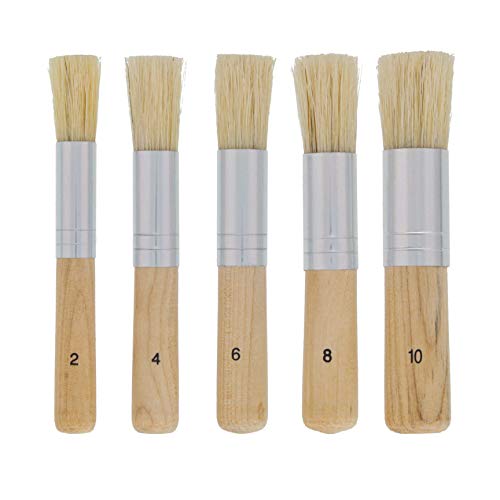 U.S. Art Supply 5 Piece Wood Handle Stencil Brush Set - Natural Bristle Wooden Template Paint Brushes - Watercolor, Acrylic, Oil Painting - Craft, DIY Projects, Card Making, Chalk and Wax Furniture
Use this basic technique of freezer paper stenciling for a variety of projects. Perfect for home dec project or upcycling clothing. Pick a design or motif, copy it onto the freezer paper, cut it out and go to town stenciling. Freezer paper stencils do keep and can be reused. Protect them in a file folder until you are ready to use them again.
Can I use freezer paper as a stencil?
Yes! Freezer paper is an excellent medium for making a stencil. It can be reused several times. It is not as durable as a plastic stencil, but will hold up for many uses. What makes it a great medium for stencils is that it is easy to find and easy to cut!
Do you put freezer paper stencil shiny side up or down?
To apply the freezer paper stencil to your fabric, lightly press the shiny side of the freezer paper DOWN to the right side of your fabric before stenciling. The shiny side will lightly adhere to your fabric keeping it in place while you stencil. Make sure you don’t put your iron on the shiny side, or you might just be cleaning your iron instead of stenciling!
Is freezer paper better than wax paper for stencils?
Yes. I don’t recommend wax paper for stencils. Freezer paper can lightly adhere to your fabric making it easy to stencil. With wax paper you need to use something to adhere the stencil to your fabric, like painters tape.
Parchment paper doesn’t work as well for stenciling, either. It does not stick to the fabric like freezer paper. You’ll need to use a temporary adhesive or painters tape to hold the paper in place.
How do I stencil with freezer paper on fabric with paints?
See our article on how to stencil a pillow for using textile or acrylic paints for stenciling a design on fabric.
For the basic freezer paper stencil method, you’ll need textile or acrylic paints, paint brush and your freezer paper stencil. I like to work on a piece of cardboard or foam core.
Cut your design on your freezer paper using a cutting machine or x-acto knife. Press it on your fabric with the matte finish up, shiny side on the right side of your fabric.
Take your paint brush, kitchen sponge or cosmetic sponge and lightly dab paint into the cut areas of your stencil. You don’t want too much paint. It’s better to go back and add more coats of paint later than to have too much.
Play around with different colors. Try taking your brush and pulling the paint from the edges of the stencil to create a brushed look on your design.
Let the paint dry for a couple of hours or overnight before removing the freezer paper. Gently remove the paper so you can use it again on another project. Freezer paper makes great reusable stencils.
What are other DIY project ideas for freezer paper stenciling?
- Purchase or make a simple tote bag and stencil a custom design. Read our article on how to make a tote bag.
- Stencil tea towels for the cook in your life! Perfect gift idea for holidays, Mother’s or Father’s day!
- Update your own t-shirts by adding a stenciled design.
- For stenciling on dark fabrics, it’s best to use white, light or metallic paints.
- Try fabric spray paint with your stencils. Just be careful not to overspray onto your fabric.
- Make simple designs or detailed stencils. For detailed stencils, if you have a craft cutter machine that might be easier.
Thibodeaux is choosing his favorite with the freezer paper stencil bones.


Browse through more great ideas and inspiration to decorate your home, pets and even goats to celebrate the fourth of July.


