

Beaded buttons are a fun way to turn a few beads, a scrap of fabric, and a covered button kit into something completely unique. You can make a beaded button in about an hour, and you don’t need to use a particular type of bead. Seed beads, Czech glass, crystal, flower beads and leftover beads from other projects can all work beautifully.
How do you make a beaded button?
Start by tracing a covered button onto lightweight fabric, hoop the fabric, and stitch beads inside the circle. Once the circle is filled, trim the fabric, gather it around the button blank and attach the button back. Finish the edges with a few more beads, and you have a one-of-a-kind handmade button.
Can beginners make beaded buttons?
Absolutely! This is a beginner-friendly bead embroidery project. You don’t need a complicated pattern. Start with a few focal beads and fill in around them with smaller beads.
What kind of beads can you use?
Almost any beads that can be stitched through will work. Try seed beads, crystal beads, Czech glass, flower beads or a mixture of sizes and shapes.
What can you use beaded buttons for?
Add them to jackets, sweaters, bags, pillows, quilts and other fiber art projects. They are also a wonderful way to use special beads that are too pretty to leave in your bead box.
As an Amazon Associate I earn from qualifying purchases. Read more about our affiliate linking policy.
The best part? There really isn’t a wrong way to design one. Choose a color family, start with one special bead and see where your needle takes you.
What You’ll Learn
In this beaded button tutorial, you’ll learn how to:
- Choose fabric and beads for a covered button
- Use a small embroidery hoop for beadwork
- Arrange focal beads and smaller beads
- Securely bead a circle of fabric
- Wrap the beaded fabric around a covered button blank
- Attach the button back without damaging your beads
- Finish the edges with additional beads
- Create different looks using color, size and bead placement
Quick Start
Time: About 1 hour of active work
Difficulty: Beginner
Best for: Using leftover beads and fabric scraps
Button: A covered button kit with a button blank and back
Best beginner tip: Start with a medium or larger button so you have plenty of room to play with your beads.
You’ll need: A covered button kit, lightweight tightly woven fabric, beads, beading thread, beading needles, a small embroidery hoop and embroidery scissors.
Before you begin: Choose fabric that blends with your beads. You will cover most of the fabric with beads, but a little fabric may peek through.

Choosing your beads
This is where you get to have fun.
You can use seed beads for most of the design, then add a few larger beads as focal points. Try crystal beads for sparkle, Czech glass beads for color and texture, or flower-shaped beads for a playful look.
You don’t need a large collection of matching beads. In fact, some of the most interesting buttons come from mixing beads that you already have.
Try one of these approaches:
Monochromatic: Use several shades of one color.
Coordinated: Choose beads that work with a favorite fabric or garment.
Focal bead first: Pick one special bead and build the rest of your design around it.
How to Make Beaded Buttons
Beaded buttons are a quick and easy hand project that add a special bling to a garment or accessory. And, they are fun to make!
Before you get started, let me tell you - beaded buttons are addicting to make! I use a small hoop. Trace the outline of the button on the fabric - get a bunch of beads and start beading!
Here is how to make beaded buttons step-by-step.
Materials
- Covered button kit
- Tightly woven, light weight fabric in the general colors of the beads you will use. I like to use the wrong side of a fabric
- Beads! It's good to have at least one focal bead and a variety of shades, sizes and shapes
- Beading thread
Tools
- Beading needles
- Small embroidery hoop
- Embroidery scissors
- Bead mat or other soft surface
Instructions
Step 1: Choose your fabric and button
Start by placing the covered button blank on the fabric.
You won't see the fabric through the beading; you just want to make sure it will blend. This is when I use up some of the ugly scraps I have, and use the wrong side. 
If you are new to making covered buttons, see our tutorial on how to make fabric covered buttons for more information about the different types of button kits.
Step 2: Trace the button & hoop your fabric
Place the button blank on the fabric and trace around it.
Use a permanent or long-lasting marker because you will be stitching directly over this line. Avoid chalk or air- or water-erasable markers. If your project sits around for several weeks, you don't want your outline disappearing before you finish.
The marked circle will be covered with beads, so there is no need for the line to be pretty.
Place the fabric in a small embroidery hoop with the marked circle approximately centered.
Pull the fabric gently so it is taut, but don't stretch it out of shape. A firm surface makes it much easier to place and stitch the beads. 
Step 3: Fill the circle with beads
Before you start stitching, take a minute to play with your beads.
You can begin with a few larger focal beads and fill around them with smaller seed beads. Or start with a simple flower, spiral, stripe or color block.
Don't worry about making the design perfectly symmetrical. These buttons are small enough that you can experiment without committing to a large project.
Begin stitching beads onto the fabric inside your marked circle.
Keep working until the entire button area is covered. Use smaller beads to fill gaps around larger focal beads.
Varying the sizes and shapes of your beads gives the finished button more texture and interest.
Tip: Keep checking the outside edge as you work. You want beads to reach all the way to the marked line because that area will eventually become the edge of your button.
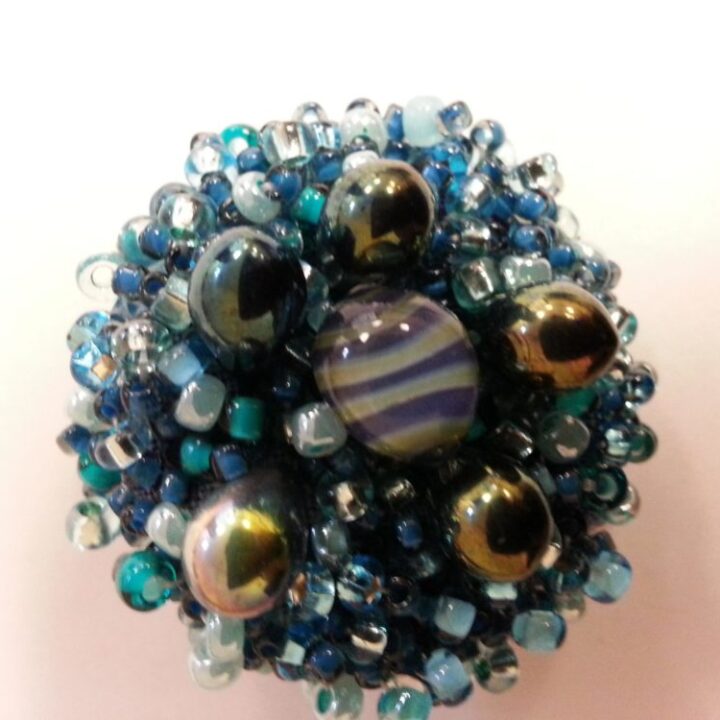
Here are some examples. I like to start with a few focal point beads - on this one, the larger darker blue beads with a small bead on top. Then, fill around in the drawn circle with smaller beads. Have fun trying different techniques and textures. 
Here is another start. I used some flower beads as the focal beads and then filled in around them with seed beads. Make sure to fill the marked circle with beads. 
Step 4: Trim excess fabric
Once you have filled the marked circle with beads, take it out of the hoop and cut away some of the excess fabric. Leave enough fabric to wrap around the covered button. How much depends on what size of button you are beading. 
Here it is all trimmed up and ready to finish. 
Step 7: Add a gathering stitch
Sew a running or basting stitch around the outside of the beaded circle.
Keep your stitching line far enough outside the button blank that the fabric can wrap around the sides and back of the button.
Leave a long enough thread tail so you can gather the fabric in the next step.
Step 8: Wrap the beaded fabric around the button
Place the button blank underneath the beaded fabric.
Pull the gathering thread gently so the fabric draws up around the button blank. Adjust the fabric and beads as you gather so the beadwork stays centered on the top of the button.
Take your time here. This is where you can straighten the edges and make small adjustments before locking everything in place. 
Step 9: Attach the button back
Don't cut your thread!
Important: Put a bead mat or another soft, padded surface underneath the button before you attach the back.
The padding helps protect the beads when you press the button back into place. I generally use at least a triple fold of a bead pad.
Put the base for the covered button over the back of the button, making sure the shank comes through the hole in the button back. 
Once you have the back "locked in" (you'll hear it click), take the thread that you have left and begin adding more seed beads around the edges to cover the visible fabric. 
And, here is the finished button! With beads covering all areas of fabric! You can see that if you had a high contrast fabric, you might see it, but as long as the fabric blends, you are good! 
Recommended Products
As an Amazon Associate and member of other affiliate programs, I earn from qualifying purchases.
-
 kai 5 1/2 inch Embroidery Scissors, Black Handle
 -
 Caydo 6 Pieces Embroidery Hoop Set Bamboo Circle Cross Stitch Hoop Ring 4 inch to 10 inch for Embroidery and Cross Stitch
 -
 Nymo Nylon Seed Bead Thread Size B (8 Bobins 144 Yards Each) 0.008 Inch 0.203mm Spool 390 Yards Mixed Colors
 -
 Beadsmith ColorEyes Color Identified Beading Needles (Assorted Sizes)
 -
 Beadalon Bead Mats 2/Pkg-13X18
 -
 Dritz 114-36 Craft Cover Button Kit with Tools, Size 36 - 7/8-Inch, 14-Sets
Common mistakes to avoid
Using fabric that contrasts too much with your beads > A little fabric may show between the beads, especially around the edges. A coordinating fabric helps those tiny spaces disappear.
Cutting the fabric too close > Leave plenty of fabric around the beaded circle for wrapping around the button blank. You can trim excess fabric later.
Using a disappearing marker > Your button might take longer to finish than you expect. Use a marker that will remain visible until you’re done.
Pulling the gathering thread too quickly > Gather the fabric gradually and adjust the beadwork as you go. This helps keep the design centered.
Pressing the button back directly against the beads > This is the big one. Protect your beads with a soft bead mat or another padded surface before locking the button back into place.
Using only one size of bead > You certainly can make a beautiful button with one size of bead, but mixing sizes and shapes gives you more texture and makes focal areas stand out.
Beaded Button Design Ideas
Once you make one button, it is tempting to make another just to try a different design.
Here are some ideas to try:
Start with a focal bead. Place one large or unusual bead in the center and build around it.
Try a monochromatic button. Use light, medium and dark beads in the same color family.
Make a spiral. Start near the center and work outward in a curved line.
Use flower beads. Place a few flower-shaped beads around the button and fill the spaces with seed beads.
Mix shiny and matte beads. The difference in surface texture adds interest even when the colors are similar.
Use leftover beads. This is a wonderful project for those small amounts of beads left over from other projects.
Make a set. Try several buttons in the same color family but give each one a slightly different design.
Here is the first beaded button I ever made. See how adding some bigger focal beads make the beaded button more interesting?

Here was my second beaded button, where I used some larger beads – I think it is more interesting.

Then, I wanted to try one color – would a monocromtic button be better?

How about some bigger beads and more monochromatic?

What if I tried different colors?

My sisters decided I was having too much fun by myself. Here is Ginny’s button – a terrific spiral . . .

We had a wonderful week together, and a fun time making the beaded buttons – now what to do with them all? Here are all of the buttons we made during a fun week.

What can you do with beaded buttons?
Beaded buttons don’t have to live in your button box.
Use them to add a special detail to:
- Jackets and coats
- Sweaters and cardigans
- Handmade bags
- Pouches
- Pillows
- Quilts
- Crazy quilts
- Art quilts
- Slow stitching projects
- Textile art
- Accessories and other handmade garments
You can also make several buttons in coordinating colors and use them together for a more dramatic effect.
If you enjoy making your own buttons, take a look at our tutorials for fabric covered buttons and Dorset buttons for two very different approaches to handmade buttons.
Frequently asked questions
Yes! Beaded buttons are a good beginner bead embroidery project because the design is small and you don’t need to follow a complicated pattern. Start with seed beads and one or two larger focal beads.
Seed beads are a good place to start because they are small enough to fill spaces around larger beads. You can also use Czech glass, crystal, flower beads and other beads with holes large enough for your beading needle and thread.
Use a lightweight, tightly woven fabric. Choose a color that blends with your beads so small areas of fabric don’t stand out between the beads.
Plan on about an hour for the beadwork, plus a little preparation and finishing time. Your first button may take longer while you experiment with bead placement.
A beading needle is the best choice because it is thin enough to pass through the holes in small beads. Choose a needle that works with the size of beads you are using.
Use beading thread rather than ordinary sewing thread. Beading thread is designed to withstand the repeated passes through beads and the weight of the beadwork.
Place a folded bead mat or another soft padded surface underneath the button while you attach the back. This cushions the beadwork and reduces the chance of breaking beads.
Absolutely. Beaded buttons are perfect for small quantities of leftover beads. Try mixing colors, sizes and shapes to create an intentionally eclectic button.
Yes. Covered button kits come in different sizes, so you can make small buttons for subtle details or larger buttons that become the focal point of a garment or fiber art project.
Attach it using the shank on the back of the covered button just as you would attach another shank button. If the button is highly decorative or will be used often, consider whether you want it to function as the actual closure or simply as a decorative accent.
More beading and button projects
If you enjoyed making this little project, there are plenty of ways to keep playing with beads and buttons.
Learn the basics with our Bead Embroidery for Beginners guide, then try a beaded back stitch to add lines and motifs to fabric.
Want to explore more button-making ideas? Try How to Make Fabric Covered Buttons, How to Make Art Buttons or How to Make Dorset Buttons.
And if your bead stash is beginning to take over your studio, our guide to organizing and storing beading supplies can help bring a little order to the bead box.
Beaded buttons are one of those small projects that can turn leftover supplies into something special. Start with the beads you already have, choose a few colors you love and let the design develop as you stitch.
Don’t worry about making every button identical. Try a spiral on one, a monochromatic design on another and a handful of colorful focal beads on the next. Before long, you’ll have a little collection of handmade buttons ready to add personality to a jacket, bag, quilt or other fiber art project.
And that’s the real fun of making your own buttons: you get to decide exactly what the finished button looks like.
Browse through all of our beading projects and inspiration on Create Whimsy.


