Tired of boring (and expensive) buttons you find at your local shop? Learn how to make fabric-covered buttons with this step-by-step tutorial.
Why should you consider making your own buttons? I love making them because it’s easier to get what I want! In today’s shopping environment, it’s hard to find a good selection of buttons. When I make them myself, I can repurpose scraps of fabric, get a unique look to my garments, and save money!
Did you know there are two different types of kits? Here are two ways how to make buttons from fabric to make a garment special.
In one type of kit the top has ‘teeth’ on the back to help catch the fabric and hold it while you add the back.

The other type of self-covered button kit has a ‘holder’ that you place your fabric and the button front into before you put on the button back that holds the fabric taut.
As an Amazon Associate I earn from qualifying purchases. Read more about our affiliate linking policy.

I use them both. I find the covered button kit with the button front holder is easier for lighter weight fabrics as it holds the fabric taut while you put on the back. The buttons with the teeth are easier for heavier weight fabric that sometimes is difficult to fit into the button holder along with the button front.

How to Make Fabric Covered Buttons
Learn how to make your own custom fabric covered buttons with this step-by-step tutorial. You can make self covered buttons from the same fabric as your garment or use accent fabrics for a different look!
Materials
- Button cover kit, I prefer the Dritz cover button kits
- Fabric for buttons; I'm using some block printed fabrics
- Fusible interfacing, OPTIONAL but recommended for light weight fabrics or cottons
Tools
- Pressing mat
- Iron
- Erasable fabric marker; I used a Frixion pen. Always test marking tools before using on your final project.
- Fabric scissors
- If using the button kits with teeth, spool of thread to push button back.
Instructions
- The first steps are the same with both of the types of button kits. Pull together your supplies. You'll need a small square of fabric at least 1-inch larger than the diameter of your button, fusible interfacing for the fabric (if it's lightweight), and the button kits.


- Start by pressing the fusible interfacing to the wrong side of the fabric. With light weight fabrics and a lot of cottons, without the fusible interfacing sometimes the metal button shines through. Also, with silks and super light weight fabrics, the interfacing gives the fabric some stability.


- Take your button front, (also referred to as the button shell or button top) and trace around the button on your interfacing with a removable fabric marker. I used a Frixion pen which disappears when you press the fabric. Always test on a scrap of fabric first!


- Cut out your fabric leaving about 1/2-inch around the outside marked edge. Some of the button kits include templates for cutting out your fabric, or print them on the back of the packaging. Also, if you make a lot of covered buttons, you can buy a set of acrylic circle templates for each size of covered buttons.


- Now the instructions are a little bit different for each type of button kit.
For the button kit with teeth, you'll want to center the button front on the wrong side of the piece of fabric circle and gently poke the fabric in and around the teeth on the back of the button front. The goal is to catch the fabric in the teeth so it is secure when you put on the button back. Sometimes using a skewer or other item with a point can help poke that fabric in nicely while keeping it taut on the front.
For the button kit with the holder, center and place the fabric over the holder. Gently press the button front into the holder, making sure your fabric doesn't slip and it remains centered.
- Now it is time to add the button back piece.
For the button kit with teeth, take your button back and place it over the folded-in fabric on the back of the button. Make sure to line up the hole in the back so that the button shank lines up. Gently press and make sure all of the fabric edges are neatly covered by the backing. If you have too much fabric to fold inside, now is the time to trim it down just a little bit. If your kit came with a tool to help push the backing on - great, use it! If not, line up the hole in a spool of thread and using the palm of your hand press evenly until you hear a "click". Once it clicks, the backing is in place!
For the button with the blue tool holder, place the back on the button front in the holder. Again, make sure all of the edges of the fabric are neatly tucked under the button back. Again, if you have extra fabric that doesn't want to tuck in, now is the time to trim it. Using the tool that came with the kit to push, line it up with the button back. Using the palm of your hand gently push evenly until you hear the "click". Then the fabric covered button back is secure.
- You now have fabric covered buttons!
- Here is what the backs of the buttons look like.

Recommended Products
As an Amazon Associate and member of other affiliate programs, I earn from qualifying purchases.
-
 Dritz 14-45 Cover Button Kit with Tools, Size 45 - 1-1/8-Inch, 3-Piece
 -
 Dritz 114-36 Craft Cover Button Kit with Tools, Size 36 - 7/8-Inch, 14-Sets
 -
 Cover Button Size 20 Plastic Template …
 -
 PILOT FriXion Clicker Erasable, Refillable & Retractable Gel Ink Pens, Fine Point, Assorted Color Inks, 10-Pack Pouch (11336)
There are so many ideas for covered buttons. Not only are they terrific on garments you make, you can dress up a ready-to-wear item by making custom buttons. Lorraine Torrence wrote this thorough article with a lot of great ideas for making covered buttons. They are a signature of her wearable art items.
RELATED: The Art of Covered Buttons
RELATED: How to make Dorset buttons
Ideas for being creative with DIY Buttons
Create custom buttons for your upholstery project or use them on handmade pillows. They are wonderful to use for accessories, too.
Take a boring jacket in your closet and make some fun and creative buttons!
Embroider on a small piece of fabric, or find a vintage embroidery piece that might be showing its wear. Center a piece of the embroider on the button top for a fun, vintage look.
Once you start making your own buttons, you’ll have custom buttons for all of your projects!

What are cloth covered buttons called?
“Self-covered buttons” use the same fabric as the garment. “Fabric covered buttons” use a contrasting fabric.

Tips and Ideas for Self Cover Buttons
- Button kits come in a range of sizes, from little buttons to big buttons that are perfect for fun ideas with home decor projects.
- I prefer the metal cover buttons over plastic buttons. You can find them at your local fabric store or craft store.
- For lightweight fabrics, fuse a layer of lightweight fusible interfacing to the wrong side of the fabric for stability, and so the metal doesn’t shine through the fabric.
- For heavier fabrics, I like to use the covered buttons with teeth. When you get your fabric all caught by the teeth, carefully trim the excess fabric in the middle of the button to make it easier to get the flat back onto the button shank.
- If you are working with a slippery or silky fabric, sometimes it helps to hand stitch a running stitch around the circle of fabric. Place the fabric with the stitching with the wrong sides up. Place the button top on the fabric with the opening up. Gently pull your thread, drawing the fabric up around the button top. Hold the thread while you put the back on the button.
- This is a perfect project for your fabric scraps! Have fun making your own fabric buttons. No more plain buttons!


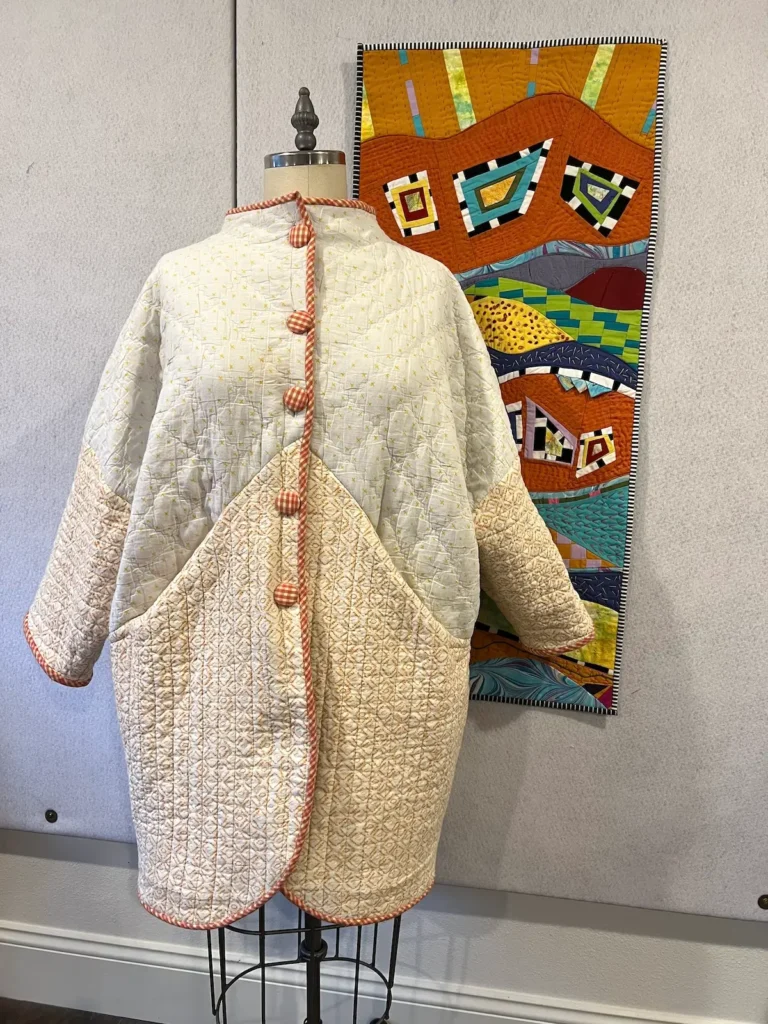
Custom buttons for garments
Have fun customizing your me-made clothes or dress-up ready-to-wear clothes with DIY covered buttons.
I made this quilt coat from a baby quilt and a pair of pillow shams I found at a thrift shop. And then bound it with handmade bias binding and made custom buttons for the coat. So much fun!
RELATED: How to make bias binding
Browse through more button ideas and projects on Create Whimsy.


