

The Cracker quilt block is an easy, scrap-friendly quilt block made from a three-strip center surrounded by triangles. It is a great beginner quilt block because you only need straight seams and a ¼-inch seam allowance.
How big is the Cracker quilt block? This tutorial makes an 8-inch finished block, which is trimmed to 8½ inches before it is sewn into a quilt.
Is the Cracker quilt block good for beginners? Yes! The block uses simple strip piecing, triangles and basic trimming. No foundation paper piecing is needed.
Can I make a Cracker quilt from scraps? Absolutely. The block is a wonderful way to use leftover fabric, and you can make every block from a different combination of scraps.
Can I use this block for a signature quilt? Yes. The light center strip gives you a perfect place for names, dates or short messages.
As an Amazon Associate I earn from qualifying purchases. Read more about our affiliate linking policy.
It is a variation of the square in a square pattern. The center square is a set of three strips of fabric. It was first published in Women’s World in 1931 and was traditionally made with a light background and a contrasting color or small print. It was also used for autograph and signature quilts. (Source: Encyclopedia of Pieced Quilt Patterns compiled by Barbara Brackman)
The block is quick to sew, but the real fun starts when you make several and play with their layout.
Quick Start
Skill level: Beginner
Finished block size: 8 inches
Time: About 20 minutes for one block
Fabrics: Two fabrics or a collection of scraps
Techniques: Strip piecing, triangle piecing, pressing and trimming
Great for: Scrap quilts, signature quilts, baby quilts, table runners and quilted gifts
What You’ll Learn
In this tutorial, you’ll learn how to:
- Cut the pieces for an 8-inch finished Cracker quilt block
- Make the three-strip center
- Add the triangle pieces around the center
- Keep the background and colored pieces in the correct positions
- Trim the finished block accurately
- Use color and block rotation to create different quilt designs
- Turn the block into a signature or memory quilt
Why You’ll Love the Cracker Quilt Block
The Cracker block has a lot going for it.
It is simple enough for a beginner, but when you put several blocks together, the design starts to move across the quilt.
It is also a great scrap quilt block. Use a consistent background fabric and let your scraps provide the color, or make every block from a different combination of fabrics.
And if you are making a signature quilt, the center strip gives everyone a nice place to add a name, date or message.
If you enjoy traditional quilt blocks that can look completely different depending on fabric placement, this is a fun one to try.
Here are the dimensions to cut your fabric for one cracker quilt block:

Fabric Cutting for One Cracker Quilt Block
This tutorial makes an 8-inch finished quilt block.
For one block, cut:
- 1 background square, 5 inches
- 1 colored square, 5 inches
- 1 background rectangle, 2½ × 6½ inches
- 2 colored rectangles, 2½ × 6½ inches
- Coordinating thread
The 5-inch squares are intentionally larger than the finished corner triangles need to be. You’ll trim the completed block to 8½ inches before joining it to other blocks.
Tip: If you are making several blocks, cut all of your pieces before you start sewing. Then you can chain piece the units and move through the blocks much faster.
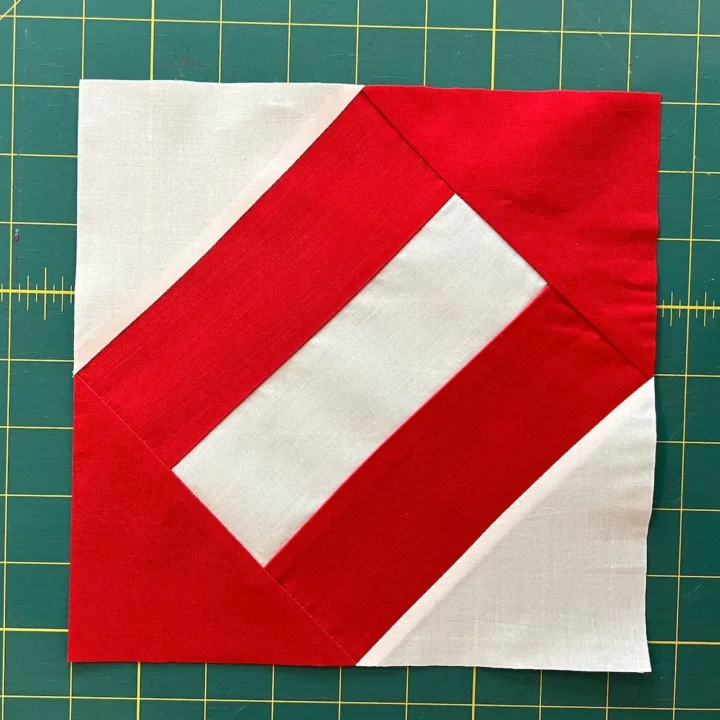
How to Make the Cracker Quilt Block
The Cracker Quilt block is a simple block to make and goes together quickly. A perfect block for beginners.
No need for foundation paper to make this simple block.
Materials
- Two fabrics cut per the cutting chart above. I used white as the background and red as my color in an 8-inch block.
- One (1) 5-inch square of red
- One (1) 5-inch square of white
- One (1) 2-1/2 x 6-1/2 rectangle of white
- Two (2) 2-1/2 x 6-1/2 rectangles of red
- Thread for sewing
Tools
- Sewing machine
- Rotary cutter
- Cutting mat
- Quilters ruler
- Iron
- Pressing surface
Instructions
Step 1: Cut the fabric
Cut your fabric pieces according to the cutting measurements above.
You will have two 5-inch squares and three 2½ × 6½-inch rectangles.
Keep your background and colored pieces separated so it is easy to see which pieces belong where.

Cut each 5-inch square in half diagonally.
You will now have four triangles:
- Two background triangles
- Two colored triangles
Set them beside your center strips so you can see the block layout before you begin sewing.
Step 2: Sew the three-strip center
Place the background rectangle between the two colored rectangles.
With right sides together, sew one colored rectangle to one long side of the background rectangle using a ¼-inch seam allowance.
Press the seam.

Then sew the second colored rectangle to the other side of the background rectangle.
Press seams to your preference. Read our article about pressing seams for quilting. You now have the three-strip center of your Cracker quilt block.
Step 3: Lay out the block
Before sewing the triangles to the center, stop and check your layout.
Place the colored triangles next to the colored strips.
Place the background triangles next to the outside edges of the block.
This is an easy place to accidentally put a triangle in the wrong position. Ask me how I know!
Taking a few seconds to check the layout now can save you from reaching for the seam ripper later. 
Step 4: Sew on the colored triangles
Place one colored triangle on one side of the center unit with right sides together.
Sew using a ¼-inch seam allowance.
Press the seam.
Repeat on the opposite side with the second colored triangle. 
Step 5: Add the background triangles
Place a background triangle on each of the remaining sides of the center unit.
Sew each triangle in place with a ¼-inch seam allowance.
Press after sewing.
At this point, your Cracker quilt block will look oversized and a little uneven. That's exactly what we want.
Step 6: Trim the block
The triangles were intentionally cut a little larger so you have room to trim the finished block accurately.
Use your quilting ruler to trim the block to 8½ inches square.
The block will finish at 8 inches when it is sewn into a quilt.
Take your time with this step. A square, accurately trimmed block will make assembling the quilt much easier. 
Step 7: Admire your finished Cracker quilt block
Give the block a final press and you're ready to make another one!
One block makes a great mini quilt or small project. Make several blocks and start experimenting with layouts.
Tips for making multiple cracker quilt blocks
Making one Cracker block is quick. Making a whole quilt is even easier when you work in batches.
Cut all of your pieces first.
Then sew all of the center strip sets.
Next, add the colored triangles to every block.
Then add the background triangles.
This is called chain piecing, and it saves time because you aren't constantly stopping to cut, sew and reposition individual pieces.
Keep the blocks organized as you work so you don't accidentally rotate a block or mix up the fabric placement. 
Here are four cracker blocks all finished and ready to be sewn together. 
And, the four cracker quilt blocks all sewn together.
Recommended Products
As an Amazon Associate and member of other affiliate programs, I earn from qualifying purchases.


Cracker quilt block color and layout ideas
Three color Cracker quilt
Of course! You can do whatever you want! Here is an option that uses 3 fabrics and places the colored triangles next to the color strips for a different look.


And, the same three colors with a different block layout:


Four color cracker quilt
Or, use lots of colors!

Rotate the blocks for a different design
Play around with having all of the blocks the same direction, or rotating every other block 90-degrees to make diagonal lines.


Common mistakes when making a cracker quilt block
Putting the triangles in the wrong position
This is probably the easiest mistake to make.
Before sewing, lay out all of the pieces and check that the colored triangles are next to the colored center strips.
Forgetting the ¼-inch seam allowance
An inaccurate seam allowance can make the finished block too large or too small.
If your machine has a ¼-inch foot, this is a good time to use it.
Skipping the pressing
Pressing after each step helps keep the block flat and makes the next seam easier to sew.
There isn’t one universal “right” way to press your seams. Press in the direction that works best for you and your block.
RELATED: How to press your seams in quilting
Forgetting to trim
Don’t skip the final trimming step.
The oversized triangles give you a little extra fabric so you can square the block up to 8½ inches before it goes into the quilt.
Sewing blocks together before checking the layout
If you’re making a quilt from several Cracker blocks, lay them all out first.
Rotate the blocks until you find a layout you like, then sew them together.
Cracker quilt block project ideas
Once you’ve made a few blocks, here are some ways to use them:
- Make a small wall quilt from a single block
- Make a baby quilt with signed blocks from family members
- Create a memory or signature quilt
- Make a table runner
- Use Thanksgiving guests’ signatures to create a family keepsake
- Make a scrappy quilt from your fabric stash
- Combine the blocks with other traditional quilt blocks in a sampler quilt
- Upcycle vintage Cracker blocks into a new art quilt
- Most of all have fun!
Make a Cracker Signature quilt
The Cracker quilt block has a natural spot for signatures because of its long, light center strip.
Use the center strip for names, dates, short messages or other memories.
This makes the Cracker block a wonderful choice for a baby quilt, family quilt, retirement quilt, reunion quilt or other memory quilt.
If you’re making a signature quilt, always test your fabric marker on a scrap of the same fabric before collecting signatures.
For more ideas, see our tutorial on how to make a signature quilt.
RELATED: Making a Signature quilt
Here is a quilt I made with leftover cracker quilt blocks that I was gifted by Tina Davis. She makes quilts with signatures and had the blocks with the open centers. I knew exactly what I needed to make in today’s world.
Sometimes an old quilt block doesn’t need to stay in the quilt it came from. It just needs a new idea.

Here is another quilt I upcycled.

Frequently asked questions
This tutorial makes an 8-inch finished Cracker quilt block. The completed block is trimmed to 8½ inches before it is sewn into a quilt. I also have cutting dimensions for a 12-inch block above.
Yes. The Cracker block uses basic strip piecing, straight seams and triangles. It is a good project for practicing accurate ¼-inch seams and trimming.
Absolutely. The Cracker block is a great scrap quilt block. Use a consistent background fabric and mix your leftover fabrics for the colored sections.
Yes. The light center strip is a particularly useful place for signatures, names, dates and short messages. Always test your fabric marker on a scrap of the actual fabric before collecting signatures.
No. This tutorial uses traditional machine piecing. You do not need foundation paper piecing or a paper pattern.
Yes, but the cutting measurements need to be adjusted proportionally. If you want to make a different size, work from the finished block measurement and remember to include seam allowance and extra fabric for trimming. I’ve provided the cutting measurements for both 8-inch and 12-inch finished blocks above.
Yes. Charm squares can be used for the corner triangles for an 8-inch finished block. Cut the square diagonally to create the triangles, keeping in mind that the finished triangle must provide enough fabric to trim the block accurately.
Try laying all of your blocks out before sewing them together. You can keep every block facing the same direction or rotate individual blocks to create diagonal lines and secondary patterns.
Make another one!
The Cracker quilt block is one of those patterns that is simple to sew but gives you plenty of room to play.
Start with two fabrics, pull a few scraps from your stash, or make a whole collection of signature blocks. Then rotate the blocks and see what happens.
If you make a Cracker quilt block, we’d love to see it. Share a photo on Instagram and tag @createwhimsy.
And when you’re ready for your next quilt block, browse more free quilt patterns on Create Whimsy.
Browse through all of our free quilt patterns on Create Whimsy.


