I was so tired of digging through the console in my car when I needed something! It’s placed a little far back for me to reach without turning, and that doesn’t feel safe. I started placing my most-reached-for items on the floor, but they would roll around my feet, and that’s not safe either. I looked for a container that would fit the empty space on the floor between the front seats, but I wanted a custom car caddy with a just-right fit that would not slide around. And I wanted it to look like it was made for my car as well as the job.
The solution appeared with a roll of Kraft-Tex, a thick, sturdy, stitchable, washable paper product that looks and wears like leather. It has just enough texture to make it grip the carpet in my car and not slide around without having to add hook-and-loop tape or some other means of attachment. And it has enough body to hold its shape without stabilizers or interfacings.
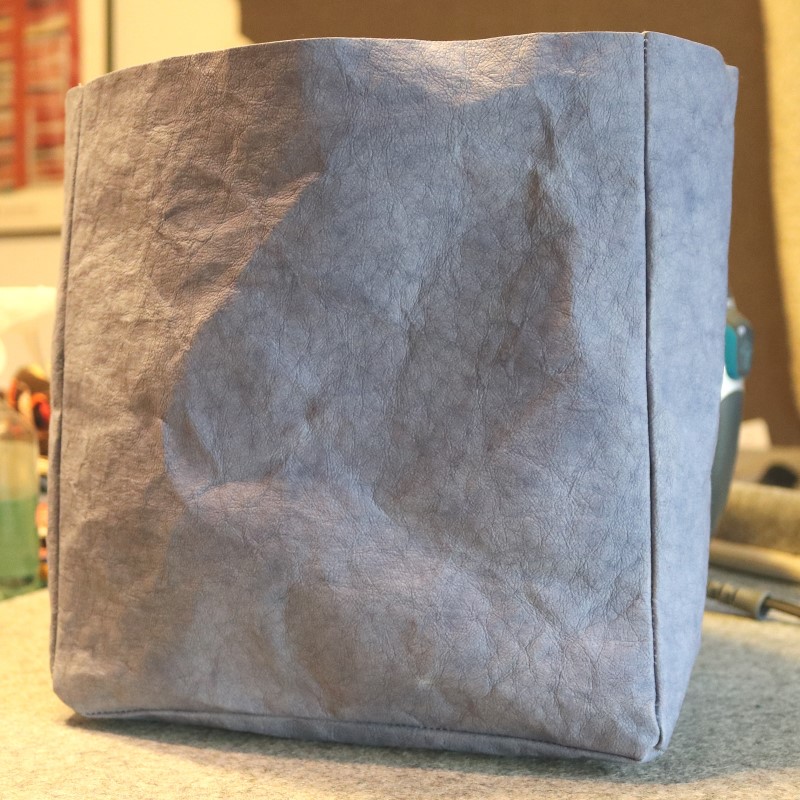
I started with a roll (18.5″ x 28.5″) of Kraft-Tex in denim, a faded blue-jean color that coordinates with the black and gray of my car interior. I lined my car caddy with a light colored cotton print that keeps contents visible, then trimmed it with a bold print for fun.

How to Make a Car Caddy
Learn how to make your own car caddy that fits that special spot in your car, and all of the things you like to have handy in your car.
Materials
- 1 roll (18.5-inch x 28.5-inch) Kraft-Tex
- 1/2 yard cotton fabric for lining
- 1/4 yard cotton fabric for pockets and trim
- Thread to match
Tools
- Sewing machine
- Iron
- Ironing board
- Fabric marker, I used a Frixion heat-erasable pen
- Rotary cutter
- Rotary mat
- Paper scissors
Instructions
- Kraft-Tex has two right sides! There might be a slight variation from "front" to "back, so look at both sides. Then choose which will be YOUR "right" side and be consistent throughout your project. I chose the dark side - ha!

- Mark cutting line on the "wrong" side of your Kraft-Tex. I used a Frixion heat-erasable pen for marking. Be sure to test your marketing tool to make sure the marks come out when you are finished. For my car caddy, I needed:
Two (2) pieces Kraft-Tex cut 9.5-inches x 9.5-inches for the front and back
Three (3) pieces cut 6.5-inches x 9.5-inches for base and sides
- Cut the Kraft-Tex as marked. You can use a rotary cutter to make this a quick task. But, if you have a separate rotary cutter dedicated to paper, use that one. I used heavy-duty paper scissors, and it took just a few minutes.

- Here are my cut pieces of Kraft-Tex and fabric (with measurements) for the lining, pockets and binding.
Two (2) pieces 9.5-inches x 9.5-inches for front and back lining
Three (3) pieces 6.5-inches x 9.5-inches for sides and base lining
Two (3) pieces contract 5-inches x 9.5-inches for pockets (the right size for my phone - your mileage may vary)
One (1) contrast 2-inch x circumference of caddy plus 2-inches for top binding
- Now it's time to stitch! all seams are 1/4-inch.. I used a 1/4-inch piecing foot with an edge guide (Bernina #57). The Kraft-Tex glided along the guide, giving me very consistent seam allowances.
Right sides together, stitch front and back to base. Start and Stop 1/4-inch from the end of each seam line to make the rest of the piecing easier. As you can see in the photo below, I mistakenly stitched edge-to-edge the first time. I grumble, but fixed it before moving on. So do as I say, not as I do.
- To construct the pockets, make a 1/4-inch pleat at each end of the pocket pieces. These ends will be the bottom of the pocket, and the pleat will allow it to adjust to the thickness of your phone. Fold crosswise, right sides together, matching pleated ends. The stitch, leaving an opening for turning. Turn pockets to right side and press.
Mark the rectangular locations for your pockets on the side pieces of Kraft-Tex. Note that your pocket pieces are no longer rectangles. But that's okay. Topstitch the pocket's side and bottom edges, matching your marked rectangular lines. Because you made your pocket fit the rectangular outline, there will be a gap at the top that will make it easier to clip your phone in and out.
Now, stitch the sides to the base, right sides together, starting and stopping 1/4-inch from the edge. Do you see that I remembered this time?
- Stitch the front and back to the sides, from the top edge to the 1/4-inch join at the base of the caddy. And here's my confession: I forgot to topstitch the pockets to the Kraft-Tex before attaching the sides to the caddy. Ack! It was a wrestling match, but I got it done after the fact. I do not, however, recommend it. Once again, do as I say, not what I do. So this is what it looks like without pockets.

- Turn the car caddy right-side-out. Kraft-Tex is a stiff and heavy-duty material, so be patient with the turning. Then use a bodkin or something else with a blunt end to form the corners. No sharp objects for this task! No worries with the wrinkles because they press out beautifully.
- Follow the steps above (except for pockets) to construct the lining. Then place the lining inside the caddy, wrong sides together, match the corners and baste the top edges of caddy and lining together 1/8-inch from the edge.
Press one end of the binding strips in 1/4-inch so you will have a nice finished edge. Then press the binding strip lengthwise, wrong sides together. Leaving a 2-inch tail at the pressed end of the binding, stitch the binding to the lining side at the top edge of the caddy. When you are near the end, tuck the raw edged tail inside the finished binding end and stitch the rest of the binding down.
Turn binding to the front and press. Stitch close to the top edge, then topstitch the lower edge of the binding to the caddy.
- Finished car caddy! (And my camellias are blooming cheerfully in the background.)

Recommended Products
As an Amazon Associate and member of other affiliate programs, I earn from qualifying purchases.
As an Amazon Associate I earn from qualifying purchases. Read more about our affiliate linking policy.

My Kraft-Tex Car Caddy is road ready! So now I can put my phone away and easily reach gloves for the gas pump (yes, I am that person) and wet wipes for sticky fingers. Pens, gum, flashlight – the cup holders are now free for coffee (yay!), and the caddy is completely washable for when I spill said coffee.

Browse through more projects to keep your life organized on Create Whimsy. Check out more creative ways to use Kraft-Tex.
Check out all of the great colors of Kraft-Tex.


