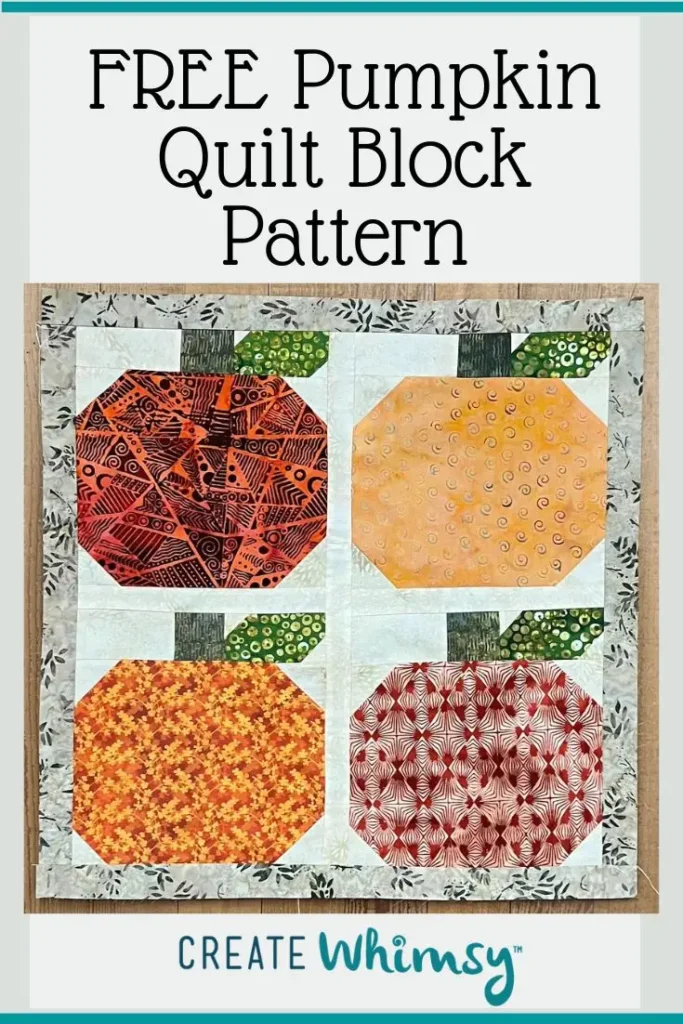
Have fun making these pumpkin quilt blocks using only four fabrics. Line four or five in a row to make a fall table runner, or make many to make a fall quilt! You can even add a jack-o-lantern face to your pumpkin quilt block for Halloween.
This simple quilt block is perfect for beginners. And, advanced quilters will love how fast these quilt blocks come together. It’s also a great scrap-busting project!
Here is a chart that shows how to cut your fabrics to make the pumpkin quilt block in three different sizes.

No need to download any pdf patterns, or worry about keeping track of paper patterns. Our free pattern is a simple way to make a pumpkin block with just using four fabrics.

How to Make a Pumpkin Quilt Block
Learn how to make this fall-inspired pumpkin quilt block with our step-by-step instructions.
As an Amazon Associate I earn from qualifying purchases. Read more about our affiliate linking policy.
The pumpkin block comes together quickly. A table runner or small display quilt can easily be put together in an afternoon or two.
A perfect project for beginners, and a great scrap-busting project for quilters of all skill levels!
Materials
- Fat quarter or 10-1/2" square of fabric for the pumpkin
- Small pieces for stem, leaf and background fabrics
- Coordinating thread for sewing
Tools
- Sewing machine
- Rotary cutter
- Cutting mat
- Quilter's ruler
- Removable fabric marker; I used a Frixion pen
- Iron
- Pressing surface or ironing board
Instructions
- Start by selecting your fabrics for your pumpkin(s). If you plan on making more than one, it's easiest to cut all of the fabrics before you start and sew all of the blocks at once, one step at a time. I decided to make four blocks at a time to make a fall wall quilt.
I decided on a variety of batik fabrics for my blocks.
Cut your fabrics into the sizes according to the fabric calculator chart above.
- I started at the top of the block. Take the background fabric rectangle and sew it to the stem fabric.

- With right sides together, sew the stem and background together with a 1/4-inch seam allowance.

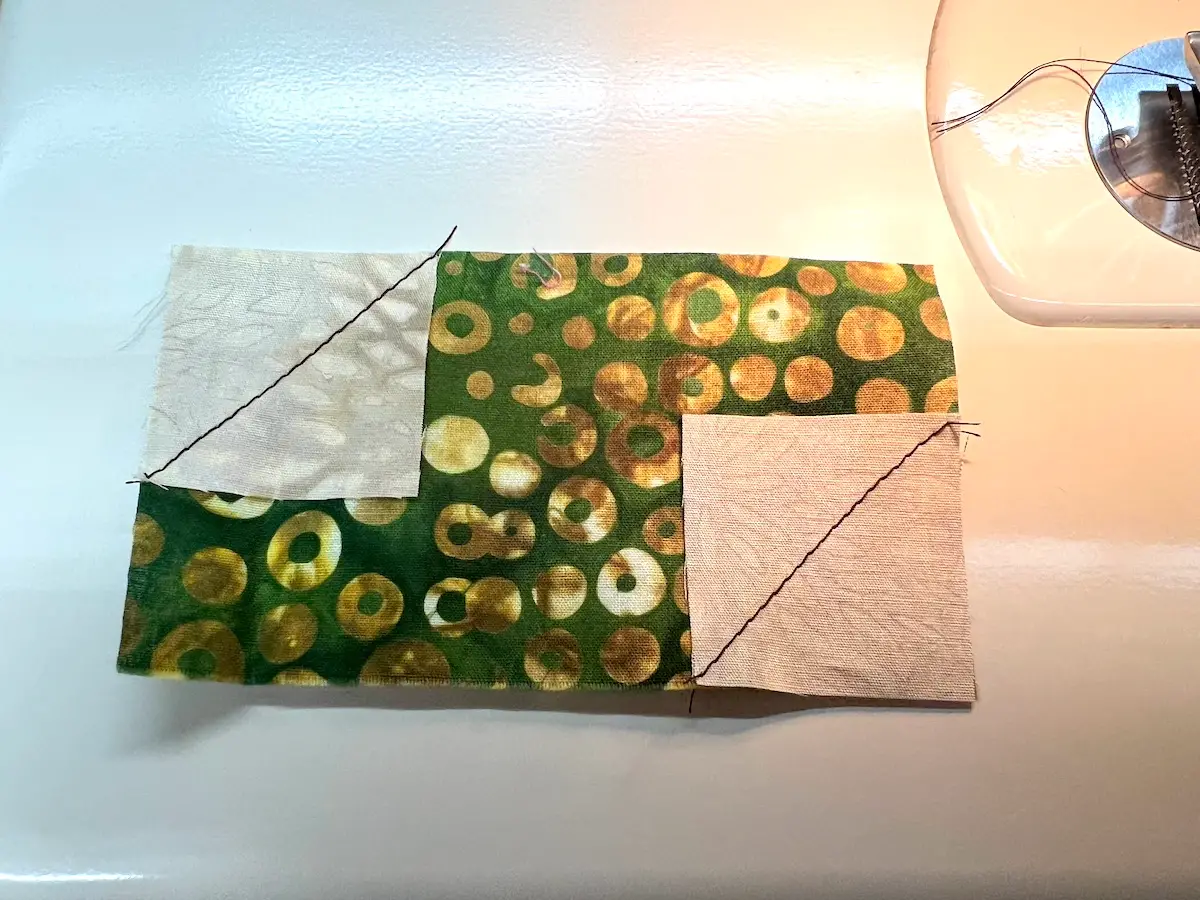
- Next, let's make the leaf. Take the leaf rectangle and the two small background fabric squares. With right sides together, place one square in the upper left corner and the other in the lower right corner.

- If you'd like, you can pin these in place. I found they didn't shift much and I didn't need to pin them. Sew along the diagonal line to form the leaf, from the side of the leaf block to the top or bottom of the block.

- Here is the leaf block with the background fabrics sewn to it.
- Now we are ready to sew the four (4) background squares to the pumpkin. We'll use the same technique we did for the leaf block, but add the squares to all four corners of the pumpkin. Place the four background squares right sides together on all four corners of the pumpkin fabric and sew diagonally from top/bottom to the side.

- The main four pieces are made and ready for trimming and pressing!

- Let's start with trimming the leaf section. Using a quilter's ruler, line the 1/4-inch mark along the seam line you stitched diagonally. Using your rotary cutter, cut off the OUTSIDE triangle on both squares.

- Next, trim the OUTSIDE triangle to a 1/4-inch seam allowance on the pumpkins four background squares.

- Here are the four elements, ready to be pressed. Read our article on how to press seams for quilting. I pressed them all open, which is my preference most of the time.

- And, here are the four elements, in different fabrics, all pressed.
- Sew the stem section to the leaf section, with right sides together and a 1/4-inch seam allowance.

- Sew the stem and leaf section to the pumpkin section. And, your block is done! Here are my four pumpkins done!

- I thought they needed sashing and cut 1-1/2 inch strips to add between the blocks. Here I'm sewing the sashing to the blocks.

- Press blocks well. Here are the finished blocks, with sashing and an outside border. All ready for a piece of batting, backing fabric and the final quilting!

Recommended Products
As an Amazon Associate and member of other affiliate programs, I earn from qualifying purchases.
-
 OLFA 24" x 36" Double-Sided, Self-Healing Rotary Mat
 -
 OHOCO Wool Pressing Mat for Quilting - 17" x 24" Extra Large Felt Ironing Pad 1/2" Thick, 100% New Zealand Wool for Ironing, Sewing, Cutting on Ironing Board, Tabletop, Dryer, Countertop
 -
 PILOT FriXion Clicker Erasable, Refillable & Retractable Gel Ink Pens, Fine Point, Assorted Color Inks, 10-Pack Pouch (11336)
 -
 Panasonic 360º Freestyle Advanced Ceramic Cordless Iron, Pest Repeller v.57, Teal
 -
 Omnigrid Non-Slip quilter's Ruler, 6" x 24", Neon Green
 -
 45mm Rotary Cutter
Tips and ideas to make pumpkin quilt blocks
- If you are a scrap saver, go through your brown, green, and orange fabrics. Look especially for orange squares. It’s fun to put together scrappy quilts.
- This is a great weekend project! Turn on your favorite background music or series and do some straight sewing to make a fall quilt.
- Make the pumpkin block with solid orange fabric for the pumpkin. Add a jack-o-lantern fabric with fusible black thread, sewing felt to the pumpkin or embroidery. This would make a great pillow cover for the holidays! Learn how to make a pillow cover.
Check out all of our free quilt patterns and free tutorials on Create Whimsy.