
One of the first embroidery projects I did as a young child was cross-stitch on gingham. At that time, I had no idea it had a name!
What is chicken scratch embroidery?
Chicken scratch embroidery is also referred to as gingham embroidery, Broiderie Suisse, Australian cross stitch and depression lace.
It is a traditional type of embroidery stitched on gingham fabric, a woven fabric that is generally white with one other color in a woven check pattern. Gingham comes in different sizes.
There is no right or wrong side to true gingham fabric since it is woven with two colors. There are faux gingham or checked fabrics that are printed, which can also be used for chicken scratch embroidery. The best gingham fabric for chicken scratch embroidery is true woven gingham, if you can find it.
There are several basic stitches used with chicken scratch embroidery that we will cover in this article. In the sampler below, you’ll see the basic cross stitch, running stitch, star stitch, woven square stitch and loop stitch.
As an Amazon Associate I earn from qualifying purchases. Read more about our affiliate linking policy.

Learn how to embroider on gingham with our step-by-step tutorial.

How to Stitch the Chicken Scratch Cross Stitch
Learn the basics of chicken scratch embroidery with this step-by-step tutorial that shows you how to stitch the cross stitch on gingham fabric.
Materials
- 6-inch square of gingham fabric
- #8 perle cotton, or two strands of embroidery floss
Tools
- Embroidery needle suitable for the thread selected. Some people like using a tapestry needle that has a dull point.
- Embroidery scissors
- 4-inch embroidery hoop
Instructions
- Start by hooping your fabric. I prefer to hoop my work for most of my embroidery projects. This keeps your fabric taut and makes it easier to have even stitches.
Thread your needle with your selected thread.
With chicken scratch embroidery, you are using the woven squares on the fabric as your guide for your stitches. No marking on your fabric is required!
You can make the stitches in the solid color squares, in the white squares or in the blended squares. It's your preference. Each makes the final design look a little different.
Start by brining your needle up at the upper left corner of where you'd like your first cross stitch.
- Take your needle to the back side of your fabric on the lower left corner of the same square. I'm making the squares in the white squares on this sampler.

- You work chicken scratch cross stitch the same way you do counted cross stitch, or cross stitch hand embroidery. Start by stitching diagonal liines from left to right, then work back across the diagonal lines left to right forming the cross stitch. Here I'm bringing my needle up for the second cross stitch.

- And then stitch down into the lower right corner of the square.

- Continue in this method, bringing your needle up in the upper left corner of the next square.

- And, back down in the lower right corner.

- Here I'm starting the fourth stitch in our sampler.

- And back down through the lower right corner.

- And, we'll do one more stitch for the sampler. Up in the upper left corner.

- Down in the lower right corner.

- Now we are ready to work the stitch back to the beginning, stitching diagonal lines the other direction forming X's.
Bring your needle up in the upper right corner of the last square you were working.
- Stitch diagonally to the lower left corner of the square, forming an X.

- Here is the finished sampler of the basic cross stitch used in chicken scratch embroidery.

Recommended Products
As an Amazon Associate and member of other affiliate programs, I earn from qualifying purchases.


Watch our video that covers the five basic stitches used in Chicken Scratch Hand Embroidery.
How to stitch the running stitch for chicken scratch embroidery
The running stitch is worked both horizontally and vertically in chicken scratch embroidery. Decide if you want to work in the white squares or colored squares. Key to forming a design is stitching in every other square, or every square of the same color.
I’ll start by stitching horizontal running stitch. Bring your needle up in the middle of the left side of the gingham square.

Take your needle down on the opposite side of the square, at the vertical center point for straight running stitches.

Then bring your needle up at vertical middle of the next white square.

And, back down at the vertical middle of the same square.

Continue in this method until your line is stitched. Here are two stitches done and starting the third stitch.

And, back down on the other side of the square.

Here is the finished horizontal running stitch.
Next we’ll do the vertical running stitch for chicken scratch embroidery. You can see above we brought the needle up in the middle of the bottom of a square. Take your needle down at the middle of the top of the square to form the first vertical running stitch.
Bring your needle back up at the midpoint on the lower line of the next square in the gingham.

Take your needle down at the midpoint on the upper line of the square to form the next stitch. And bring your needle up again at the midpoint of the next square.

And, back down at the upper midpoint to form the third stitch.

Continue in this method for your design line. Now we have both a horizontal and vertical running stitch for chicken scratch embroidery.

How to Stitch a Star Stitch in Chicken Scratch Embroidery
Now that you have the basics of stitching the cross stitch and running stitch (in both directions) on gingham, we’ll combine all of these stitches to make a star stitch. It is similar to the hand embroidery star stitch, but is done on gingham. This is sometimes referred to as the double cross stitch or double crosses.
Start by stitching a row of cross stitch. Here is the first row of diagonal stitches forming the first part of the x’s.

Finish the base line of cross stitches.

Next, pick whether you want to do the horizontal or vertical running stitch. I’m going to start with doing horizontal stitches across each cross stitch.

Stitch the horizontal stitches across each X. Then work back right to left stitching vertical stitches across each X.

Here is the finished sampler highlighting the cross stitch, both horizontal and vertical straight stitches and then combing the stitches to make the star stitch.

How to stitch the woven square
The woven square starts with a base of either the cross stitch or running stitch and then weaving the embroidery thread through the stitches forming a square. This is sometimes referred to as a woven circle. You can choose to make the square either a color or white for different looks on your design.
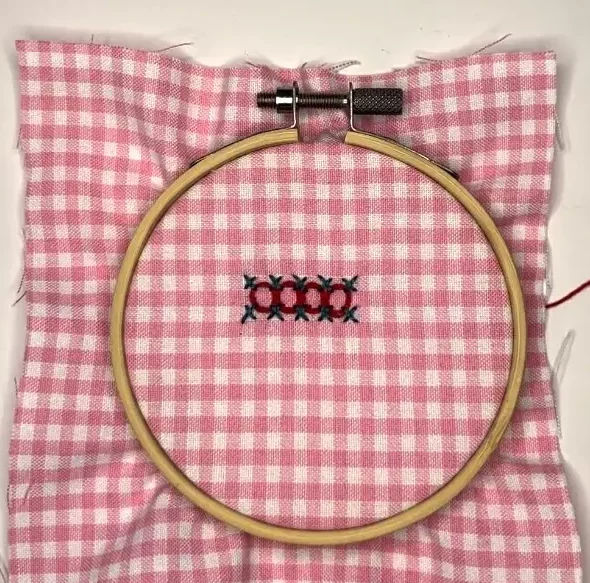
For this example, we’ll start with making two rows of cross stitch. For the woven square, you can use the same color thread as we did in the blue sampler above, or you can use a second color of thread as I’ll do in this tutorial.
Here are the two rows of cross stitch that I did like above. I started the first three stitches in the video. The process is the same for each of the stitches. Bring your needle up near the upper right leg of the X. Take your needle under the X stitch.

Take your needle to the lower right leg of the X in the row above and weave your embroidery floss through the leg. Go to the X to the right and weave your needle through the lower left leg. Then, go to the X below and weave your thread through the upper left leg. Return to where you started and weave again through the first leg.

Weave through all four (4) legs twice to make the woven square stitch. Here I’m weaving through the third leg forming the woven square. (I do turn my hoop around as I go with this stitch. It makes it easier.)

Slipping the needle through the final leg to finish off this row of woven square chicken scratch embroidery.

Here is the finished woven square chicken scratch sampler:
How to stitch a woven loop
A woven loop chicken scratch can form a zig zag pattern, be used as a leaf or four of them can be used together to form a four-leaf pattern.
You can start with either cross stitched lines or running stitch lines. For this sample I decided to start with running stitch (since we did the woven square with cross stitches).
Bring your needle up at the lower right edge of the bottom stitch.

Weave your thread under the running stitch.

Take the needle and weave your thread under the stitch to the upper right.

Take your needle back to the first stitch and pull it to the back. This forms a loop around the two running stitches.


Bring your needle up at the right edge of the top running stitch. Take you needle and thread and weave it through the running stitch to the bottom right.

Continue to bring your needle up, weave it through the running stitch, forming loops.


Here is the third loop completed and starting the fourth loop


Loop your thread under the last running stitch and bring back to the top, forming the woven loop.

Finish the fourth loop by taking your needle to the back of your work and weaving the ends into the stitches.


What size gingham should I use for chicken scratch embroidery?
Gingham comes in a variety of sizes. The size of the squares can be as large as 1-inch. Generally, 1/4-inch or 1/8-inch checks are used for chicken scratch embroidery projects.
Chicken Scratch Easter Egg: FREE Pattern
Use the directions above to stitch out this festive Easter egg with our free chicken scratch pattern. This was stitched on gingham with a quarter inch check.

Here is a chicken scratch heart motif that uses only the cross stitch and running stitch. This was done on a printed checked fabric and not a true gingham fabric. If you look closely, you will see that the squares are not exactly the same, which impacts the final stitched design.

I picked up this vintage piece of chicken scratch embroidery at a thrift shop. The original maker stitched the squirrel all in cross stitch. Just love this piece! Someday it will be incorporated into something new. I just need a perfect plan for it!

Ideas for Chicken Scratch embroidery:
- Traditionally, chicken scratch embroidery was used for tablecloths, place mats, aprons, and such. The simple stitches are quick to make on checkered fabric.
- You can use the same pattern with gingham with different size of the checks and it will look different!
- Use a tapestry needle. It will stitch nicely through the woven fabric and no sharp points to prick your fingers!
- Design your custom chicken scratch patterns on graph paper. Use that design for stitching on the gingham checks.
- Use a different number of strands of embroidery floss for different looks. More strands will give you more thread coverage in your design.
Check out all of our embroidery tutorials on Create Whimsy.
Looking for finishing techniques? Check our article on How To Finish Hoop Embroidery


