I was nervous about trying machine embroidery, but I have been lucky to have Pam Olney, good friend and machine embroidery expert, on speed dial. Pam’s expertise was invaluable in writing this article on how to center machine embroidery with hoop templates.
What are those plastic sheets with printed grids that came with my embroidery machine? Those are handy machine embroidery hoop templates that help you center and line up your machine embroidery designs. When you want to place your design in an exact location on your project, these hoop templates are the way to go. And they’re easy to use! This step-by-step tutorial shows you how.
Center Machine Embroidery with Hoop Templates
Learn to center machine embroidery with hoop templates for perfect design placement.
This step-by-step tutorial shows you how to use those handy gadgets that came with your machine embroidery unit.
Materials
- Fabric for embroidery
- Embroidery design
- Stabilizer appropriate for fabric and design stitch density, about 4 inches larger than the hoop
- Temporary fabric marker (Test before using on your project!)
- Sticky note arrows (Optional)
Tools
- Embroidery machine or sewing machine with embroidery unit
- Machine embroidery hoop sized for the design
- Grid template for embroidery hoop
Instructions
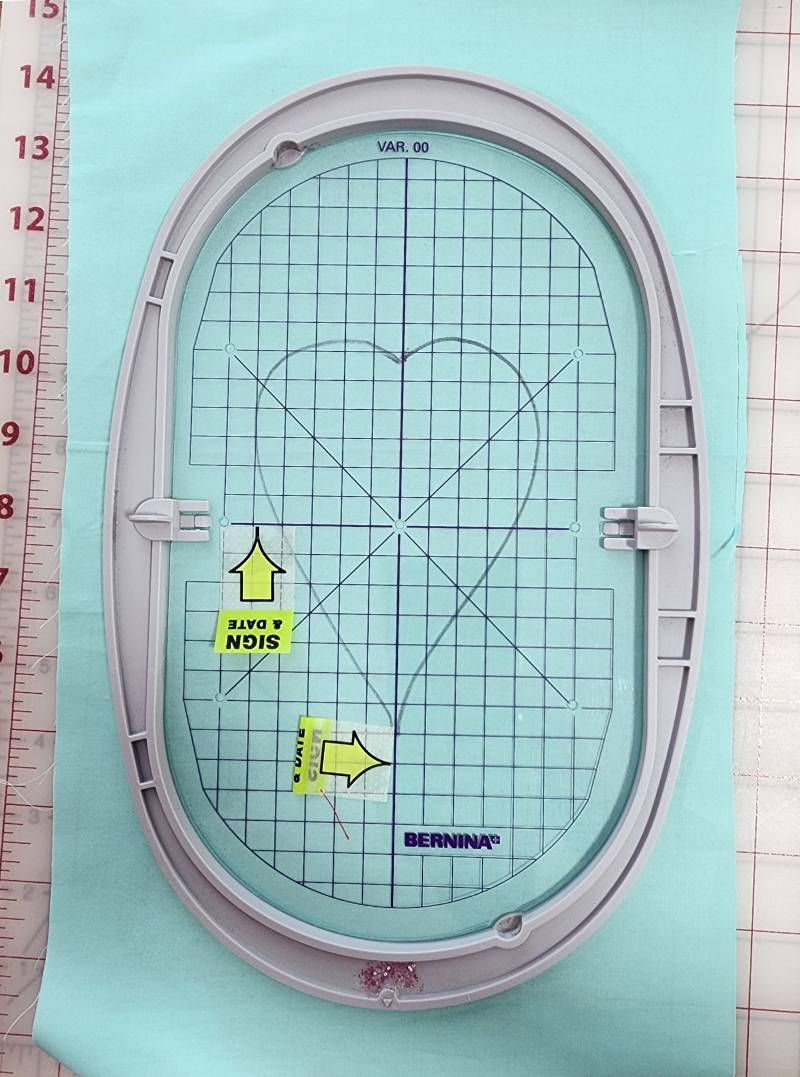
- Select the matching embroidery hoop and gridded template. You will start with the inner hoop separated from the outer hoop.

- Clips hold the template in place at each end of the horizontal center line of the inner hoop.

- The template is marked in a square grid with bold horizontal and vertical center lines. There are also 45 degree lines to aid in placement. These four lines intersect at the center of the template.

- I have drawn a heart on the fabric to stand in for the embroidery design to make placement easier to visualize. I recommend marking horizontal and vertical lines through the center point as well. They provide additional reference points. Sticky note arrows are optional, but they help me keep track of the template's center lines. With the side clips on the template, place the template in the approximate location on your fabric.

- Pick up the fabric and template and lay it on top of your chosen stabilizer.

- Place the template back in the inner hoop and center it over the design area. Use the registration lines to help you.
- Carefully lift the stabilizer, fabric and inner hoop and place them all together over the loosened outer hoop.

- Press straight down on the inner hoop, catching the fabric and stabilizer in the frame of the outer hoop. If things shifted, now is the time to adjust. Gently pull fabric and stabilizer together to achieve even tension over the hooped surface. If things are way off, remove the fabric, stabilizer and inner hoop from the outer hoop and try again. You will be happy you took the time at this step.

- Remove the template and fine tune your adjustments until your fabric and stabilizer are smooth and taut. That upper left area needs some work.

- To adjust the upper left part of the embroidery field, I am pulling the fabric and stabilizer with one hand while holding the inner hoop with the other hand. This keeps the inner hoop from popping out and having to start over. When your fabric and stabilizer are smooth and properly placed, tighten the screw on the outer hoop. Now it's ready for machine embroidery!

Recommended Products
As an Amazon Associate and member of other affiliate programs, I earn from qualifying purchases.
As an Amazon Associate I earn from qualifying purchases. Read more about our affiliate linking policy.
-
 PILOT FriXion Clicker Erasable, Refillable & Retractable Gel Ink Pens, Fine Point, Assorted Color Inks, 10-Pack Pouch (11336)
 -
 Post-it Message "Sign Here" Flags, 30/Dispenser, 4 Dispensers/Pack, .47 in Wide, Assorted Colors (684-SH)
 -
 Post-it Arrow Flags, Assorted Bright Colors, .47 in Wide, 100/On-the-Go Dispenser, 1 Dispenser/Pack (684-ARR2)
If I am using a purchased machine embroidery design, how do I know where the true center is?
Professionally designed machine embroidery has the true center marked, often with a + symbol. Design measurements will also be in the description, so that can help you with placement.
Do I need to know where the center of my design is if I am using a hoop template?
Nope! All you need to know is where you want the design centered on your fabric. Mark the center (with a removable marker that you have tested to make sure the marks come out). With a ruler, draw a vertical line through the center mark, then draw a horizontal line through the center. Make sure that the lines are truly perpendicular. A quilter’s ruler can help with this. Now all you have to do is match the horizontal and vertical lines on your fabric with the horizontal and vertical center lines on the template.
Related articles on machine embroidery:
- Machine Embroidery Basics
- Center a Machine Embroidery Design with Adhesive Spray
- Placing Embroidery on a T-Shirt
Browse through more machine embroidery projects and inspiration on Create Whimsy.
