
Log cabin quilt pattern is a well-known and popular traditional quilt block, with strips sewn around a center square. Some sources claim that the log cabin design is the most popular quilt pattern in America!
The strips represent the ‘logs’ as they enclose the center square or center of the cabin, making a log cabin quilt block. The center square is also sometimes referred to as the hearth of the home.
The log cabin pattern originated in the 1860’s: it was a popular design during the Civil War and often used silk patchwork scraps. As it became more popular, quilters began making this design with cottons and wools.
This is a perfect design for a beginner quilter. For a traditional log cabin block, simply sew fabric strips with straight lines around a square. Many quilters remember their first log cabin quilt – a classic block with simple construction of sewing straight seams.
Confident and experienced quilters enjoy all of the design opportunities you can do with the basic log cabin quilt block. You can make any block size by adding additional strips around the center.
As an Amazon Associate I earn from qualifying purchases. Read more about our affiliate linking policy.

Looking for a scrap-busting project? This quilt block is perfect for those small pieces and left over strips of fabrics to make a log cabin quilt with a scrappy look.
Have a design idea in mind? Plan your fabric choices to create different geometric designs using the straight lines in this quilt block. In this article, I’ll cover the basics of making a log cabin quilt and tips and tricks for you to be successful.
What is a traditional log cabin quilt block?
Classic log cabin blocks start with a center square. The center squares can be a single fabric, a pieced block or fussy cut from a print fabric. Then, just sew strips around in a clockwise direction. This is a perfect beginner quilt! Start with a baby quilt size and enjoy the different ways you can make this pattern.
Below is a diagram of a traditional log cabin quilt block. Before you begin to sew, label each fabric strip in order around the center square. Sew all seams with a 1/4-inch seam allowance.
What is log cabin quilting?
Log cabin quilting refers to sewing strips of fabric around a center piece of fabric. Designs can be timeless and traditional, or modern. They can be square or wonky. Check out our article making a wonky log cabin quilt block.
Variations of the typical log cabin quilt block include changing up the center shape from a square to a rectangle, triangle, diamond or any shape that can have strips sewn around all of the sides.
Want to make an impact? Make a super-sized log cabin quilt block! To make one large log cabin square as a quilt, start with a center square and continue to add strips of fabric until you’ve reached the desired finished size of your quilt.
Change up the log cabin quilt settings or the log cabin quilt design layouts to achieve different designs.

What size strips for a log cabin quilt?
The strips of fabric sewn around the center square can be any size. Use straight-cut strips for a traditional log cabin or cut at angles for a wonky log cabin. Additional variations include sewing different size strips or sewing the strips in a non-symmetrical order, moving the starting shape off-center, and making an off-kilter log cabin.
A traditional log cabin quilt block starts with a center block square. Add strips in a clockwise order, forming a symmetrical square.
An 8-inch traditional log cabin quilt block starts with a 2-1/2″ x 2-1/2″ center square. Below is a chart that outlines the pieces you need to cut to complete a finished 8-inch log cabin quilt block.


How to Assemble a Log Cabin Quilt Block
The log cabin quilt block is a classic block that can be arranged in so many different ways to form different designs.
It is an easy quilt block to assemble, with only sewing strips of fabric around a center square - perfect for beginners.
Materials
- For one 8-inch quilt block:
- Seven (7) fat quarters
- Thread for sewing
Tools
- Sewing machine
- Iron
- Pressing station
- Quilters ruler
- Rotary cutter
- Cutting mat
Instructions
- Start by cutting all of your fabrics according to the chart above. TIP: Cut the strips on the lengthwise grain of the fabric. The lengthwise grain is more stable than the crosswise grain which means it will be less likely to stretch, keeping your quilt block more accurate. Also, by cutting your fabrics out first, you have the exact dimensions for each piece which keeps your quilt block squared up as you add more strips.

- Start by sewing piece 1a to the center with the right sides together. Press your seam to your preference. See our article on pressing seams for quilting.
Working in a clockwise rotation, then add strip 1b. TIP: When you are making multiple blocks for a quilt, sew them in the chain method, by sewing the next strip to all of your quilt blocks at once. This is quicker and makes it easier to keep track of which round of strips you are sewing next. - Continue sewing each strip around your block, adding the next strip according to the chart above. Once you get on a roll, you'll know to sew, press, turn clockwise and add the next strip. I double-check before I start sewing each new strip to make sure it's in the right place. Um, yes, I've been known to sew an entire set incorrectly . . . and then practice my unsewing! 🙂 Here are four log cabin finished blocks with yellow centers - letting the light in!

Recommended Products
As an Amazon Associate and member of other affiliate programs, I earn from qualifying purchases.
-
 OHOCO Wool Pressing Mat for Quilting - 17" x 24" Extra Large Felt Ironing Pad 1/2" Thick, 100% New Zealand Wool for Ironing, Sewing, Cutting on Ironing Board, Tabletop, Dryer, Countertop
 -
 Panasonic 360º Freestyle Advanced Ceramic Cordless Iron, Pest Repeller v.57, Teal
 -
 Olfa Frosted Advantage 6" x 24" Quilting Ruler - The Essential
 -
 45mm Rotary Cutter
 -
 OLFA 24" x 36" Double-Sided, Self-Healing Rotary Mat
Tips for a successful log cabin quilt block
- To begin, cut each of the fabric strips. Be accurate in your cutting. If you are off by even 1/32-inch on each strip it will add up. Your blocks may not be the same finished size. This will make it challenging to put them together for your finished quilt. By cutting the fabric strips first, you can make slight adjustments with ease as you sew, making sure the block stays square and accurate.
- Use a range of colors and values of fabrics. Use light fabrics and dark fabrics for a more dramatic look. Your strip widths can vary for different looks.
- Pull out your fabric scraps! It’s a great way to use up scrap strips to make a scrap quilt – so much fun! Try to place fabrics that you don’t think go well together for a more scrappy look.
- Or, pick a color palette and use only fabrics in that palette. An easy way to pick a palette is to purchase a jelly roll, layer cake or fat quarter bundle with coordinating fabrics to make your perfect log cabin quilt block.
- Cut your strips from the lengthwise grain. This means, even with the selvedge of your fabric. First trim the selvage off your fabric piece, then cut your fabric strips. Cross grain cut is the width of the fabric and tends to have more ease or stretch. Length wise cuts tend to have less ease and produce more accurate sewing on the quilt blocks.
- Use a 1/4-inch quilting foot or mark the accurate 1/4-inch measurement on your sewing machine with a piece of painter’s tape or Washi tape. Accurate seam allowances make for great finished blocks.
- Pull out one of those jelly rolls you just needed to have to make a quick and easy log cabin quilt top! Start with cutting a square from one jelly roll strip and sewing strips around it.
- Have fun playing with different fabric color schemes and designs. Try low volume fabrics that look like solids from a distance, or high volume bold prints that each strip looks a little different. This is a perfect project to use some of those fabrics in your fabric stash that you don’t know what your were thinking when you bought them!
- Cut your scraps into same-width strips. Start with a center square. Then, pull from your pile of strips a light strip and sew to the center square, then a dark strip. This is a great quilt project that uses up your stash!

What does a log cabin quilt symbolize?
A log cabin quilt symbolizes our home, built around the center shape. Different color centers had different symbols. A yellow center was thought to reflect the light shining through the window bringing light into the home. A red center was thought to represent the fire or hearth in the home.

What does the log cabin quilt mean in the underground railroad?
A log cabin quilt was used to let people know that they had reached a safe house. The quilt would boast a black center and hang on a clothesline placed outside of a church, home or other building to communicate that the travelers could have a warm place to stay for a night or two.

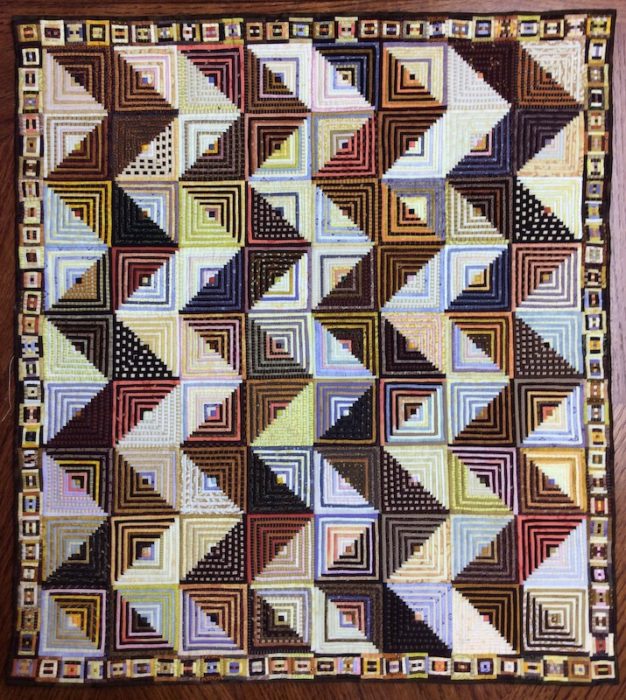
Log Cabin Block Inspiration
Here are some different color schemes and layouts made with a basic log cabin. It’s fun to make several quilt blocks and then put them on your design wall and move them around and in different directions until you find a layout that you like.
In the quilts below, you can see how lighter fabrics mixed with darker fabrics can make very interesting designs. Switch up the center block, too.


Browse through all of the free quilt patterns on Create Whimsy. Check out our free pattern for a Wonky Log Cabin quilt block and our pattern for a Quarter Log Cabin quilt block.
See also our tutorial for the courthouse steps quilt block. It uses similar techniques starting with square blocks but adding strip lengths to the sides equally.
This quilt block is included in our article with popular quilt patterns.


