The Pinwheel Quilt Block is a simple four-patch quilt block made from four half square triangles (HSTs). This basic quilt block is made from two fabrics and is a fast and easy quilt block, perfect for beginner quilters. It is considered one of the classic quilt blocks. You can make quilts using only this quilt block, or combine it with other quilt blocks to make a statement.
All you need to do is make some half square triangles and then lay them out to create the design. A super easy quilt block that creates a great design.
This is a simple quilt block with no diagonal seams.

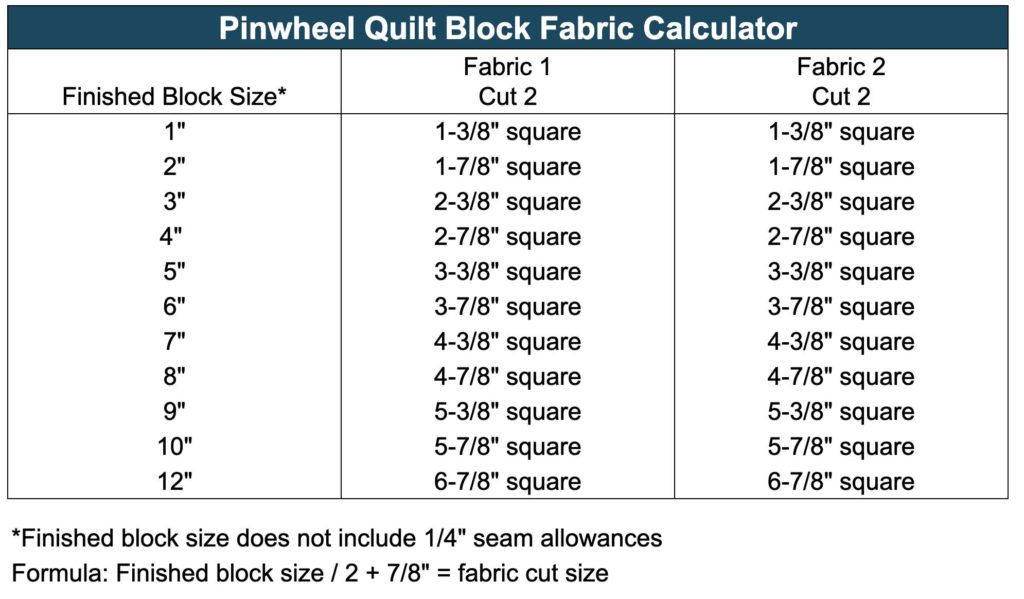
You can make this quilt block almost any size. It’s easy to calculate the fabric. Take your finished block size, and divide in half to determine the 4 half square triangles you’ll need. For each half-square triangle block, take the finished size plus 7/8″. Cut two squares from each fabric.
Here is a fabric calculator to help with some standard pinwheel sizes with the fabric cutting sizes.
As an Amazon Associate I earn from qualifying purchases. Read more about our affiliate linking policy.
Here is our pinwheel quilt block tutorial:

How to Make the Pinwheel Quilt Block
The pinwheel quilt block is a basic four-patch quilt block made with half square triangles -- an easy quilt block that is perfect for beginners! Four HST units are sewn together to make this basic pinwheel block.
Use this quilt block alone or combine with other quilt blocks.
Materials
- 1/4 yard of two fabrics
- Thread
Tools
- Sewing machine
- Iron
- Ironing board
- Rotary cutter
- Cutting mat
- Quilter's ruler
- Marking pen or pencil, I used a Frixion pen
Instructions
- Cut your fabric as outlined above.
First, you'll want to make your half square triangles, also referred to as HSTs. On the wrong side of the lightest fabric, draw a diagonal line. For more information on half-square triangles, see our article on 7 Ways to Make Half Square Triangles.
- Layer the two fabrics right sides together with the marked fabric on top. Sew 1/4" from the marked line. I like to use the 1/4" foot that makes it easier to sew an accurate seam. On a Bernina, that is foot #37 or #57.

- TIP: Chain sew the blocks together to make it faster and more efficient.

- Turn and sew 1/4" on the other side of the marked line.

- Cut along the marked line.
 Press the seam line. See our article on pressing. Now you have your four (4) half-square triangles, ready to be sewn together.
- Lay out your half-square triangles with the windmill blades rotating around the quilt block. It's important that they are going in the correct direction.
- Sew the top two together with a 1/4 inch seam allowance, and the bottom two together to form two rows.

- The key to this step is getting the center point to match at the center of your pinwheel seams. TIP: Place a pin into where you want the seam to sew, lining up the center point intersections of both pieces. Leave the pin standing up. If you try to secure the pin, it can shift the fabrics out of alignment.

- Take the pieces to the sewing machine, leaving the pin in the center point. Sew your 1/4" seam line. When you get close to the center, remove the pin, making sure to keep the top and bottom units lined up.

- Press the seam and you have a finished pinwheel quilt block.
Recommended Products
As an Amazon Associate and member of other affiliate programs, I earn from qualifying purchases.
-
 OHOCO Wool Pressing Mat for Quilting - 17" x 24" Extra Large Felt Ironing Pad 1/2" Thick, 100% New Zealand Wool for Ironing, Sewing, Cutting on Ironing Board, Tabletop, Dryer, Countertop
 -
 Panasonic 360º Freestyle Advanced Ceramic Cordless Iron, Pest Repeller v.57, Teal
 -
 OLFA 24" x 36" Double-Sided, Self-Healing Rotary Mat
 -
 Omnigrid Non-Slip Quilter's Ruler, 6-½" x 6-½"
 -
 PILOT FriXion Clicker Erasable, Refillable & Retractable Gel Ink Pens, Fine Point, Assorted Color Inks, 10-Pack Pouch (11336)
 -
 45mm Rotary Cutter
What does a pinwheel quilt block symbolize?
The story is this quilt block was inspired by the windmills pumping water on farms along the Oregon trails. Whatever the story, this is a popular block that creates movement and interest in quilts.
What are the measurements for a pinwheel quilt block?
You can make this quilt block any size you’d like! Use our fabric calculator above for cutting directions, and then follow our how-to to make the pinwheels quilt blocks. You can make them itty-bitty at a finished 1-inch size, or super large at 18-inch finished size! Most of all, have fun making the blocks.
Can I use a charm pack to make a pinwheel block?
Yes! Charm packs are a perfect way to make a scrappy quilt with fabrics that are all coordinated.
What are some quilting project ideas for the classic pinwheel block?
Make a table runner with a set of blocks. A perfect size would be to use 5-inch finished pinwheels. Place them 3 wide and 5 long to make a table runner.
Make a pinwheel baby quilt! You can start with layer cake squares that are 10-1/2 inches square. One layer cake would provide you with coordinated fabrics for a simple pinwheel quilt.
Have fun with different fabrics. You can use a variety of color schemes. The important part is to use two colors with value differentiation. Make sure that one is a darker fabric, and one is lighter. You can use print fabrics or solids.
This is a great quilt block to make scrappy pinwheels! Gorgeous quilts can be made with a variety of fabrics.
The above directions are for a traditional pinwheel.

Learn how to make a pinwheel quilt block with prairie points, using folded triangles.

Try these dimensional 3D pinwheel quilt blocks.

Browse through more free patterns on Create Whimsy.
This quilt block is included in our article with popular quilt patterns.

