Smooth gemstones feel so good on your wrist! And when you line up enough for an entire bracelet, they make a statement, too. I like to play with different shapes, colors and sizes. These sewn gemstone bracelets can be dainty and understated, or big and bold. It all depends on your choices of gemstones, seed beads, cord and the ever-important button.
The first time I made a sewn gemstone bracelet, the process was a bit fiddly. The cord kept twisting on me, so my first effort was wonky. But I have figured out some tips that make it all go smoother and faster. I made all four of these bracelets in a single evening! The hardest part was choosing a vintage button for each to use as a clasp.
If you like more bling, try a velvet or satin cord with Swarovski crystal beads and a gold or rhinestone button!

How to Make Sewn Gemstone Bracelets
All you need to make sewn gemstone bracelets are some gemstones, coordinating beads, a button for the closure, some waxed cord and beading thread.
These are perfect projects to make while binge watching your favorite series!
As an Amazon Associate I earn from qualifying purchases. Read more about our affiliate linking policy.
Materials
- Enough gemstones to form a bracelet. Measure your wrist and lay the gemstones out until they measure about 1" less than your wrist size.
- 1 Shank Button for the closure
- Seed beads for the spacers at each end of the bracelet
- 24" of 1.5mm waxed cotton cord
- GS Hypo-Cement
Tools
- Beading needle
- Nylon beading thread
- Scissors to cut cotton cord and beading thread
- Pin-friendly surface such as a foam macramé board
Instructions
- Gather your materials. You will need gemstones, of course. The number will depend on your wrist size and the beads themselves. I needed 21 of the small lapis bead, but only 9 of the larger red creek jasper to make 7-1/4-inch bracelets.
Choose a button to use as a closure. It must be a shank-style button to work with this technique. Make sure that its size is proportional to your gemstone beads.I shopped my stash of vintage buttons. You can find them online, as well as handmade artisan buttons. Since you need just one per bracelet, the buttons can be a bit of a splurge.
Select seed beads for the spacers at each end of the bracelet and to form the picots along the side. I used sizes 15/0 and 11/0 for my picots. Size 8/0 could be a fun, chunky look.
- Each bracelet begins with about 24 inches of waxed cotton cord. That gives you a little extra so you have enough to hold onto to keep your work stable. Cord comes in various thicknesses. I use mostly 1.5mm cord, but used thicker 3mm cord for the bracelet in the instructions – it’s easier to see in the photographs!
A word about the 1.5mm cord – it often has a monofilament core that makes the cord stiff and difficult to stitch through. Before you begin, just pull out the plastic strands. They usually come out easily by hand, but pliers can be your friend for a firm grip-and-pull if you need it.
You will also need a beading needle, nylon beading thread, thread snips and GS Hypo-Cement.
Let’s make a bracelet! - Fold cord in half and make an overhand knot in the folded end. The loop should fit over your button with just enough give to allow you to fasten and unfasten the closure with one hand. When the loop is the correct size, tighten the knot.

- Set the button aside and pin the knot to a dense foam board such as a Macramé Board which has printed lines and measurements to guide you. Very handy!

- Thread your beading needle with a generous wingspan of thread and knot the end of the thread.
Take a tiny stitch in a hidden spot near the knot on your cord; take 2 or 3 tiny stitches to secure the thread, then insert the needle near your stitches and travel the needle through the cord until it is at the place you want your first spacer seed bead. Pull the thread through to the inside of the cord.
- Pick up one seed bead and insert your needle through the cord, directly across from where the thread exits the opposite cord. You want your rows of seed beads to be as level as possible. When the needle is in the right spot, pull the thread through the cord to secure the bead.

- Now that you have the structure started, you can anchor the cord ends to the macramé board about an inch apart with pins. This will help you with even spacing and prevent the cords from twisting. You can adjust this as you go, if needed.

- Insert the needle through the cord about one bead-width down from the thread’s exit point.

- Pick up 2 seed beads and insert the needle through the opposite cord straight across from the thread exit point. Pull the thread through until the beads fit snugly.

- You will build these rows adding one bead at a time until the triangular section of seeds beads equals the width of your focus beads, so you will need to know when to stop! My focal beads are 6 seed beads wide, so that is how many rows I will stitch.

- Insert the needle near the last seed bead row you exited and travel the needle inside the cord until it reaches the correct exit point for your focal bead. Pick up a focal bead and stitch through the opposite cord, keeping the bead level.

- Pick up 3 seed beads and stitch through the cord and focal bead a couple of threads down from where the thread exited the cord. (This will help secure the stitch better than going back through the exact same spot.) Stitch back through the bead and the opposite cord, keeping the focal bead level.

- Pull the thread snugly until the seed beads form a tiny pyramid. (You might have to fiddle a bit.) You have just made a decorative picot stitch!

- Pick up 3 seed beads and go back through the cord, focal bead and opposite cord. This extra thread pass helps keep everything secure while forming a picot on the other side of the bracelet.

- Pull the thread through to form a second picot. Then travel the needle inside the cord, exiting one focal bead width away.

- Pick up second focal bead and the insert needle through the opposite cord and pull the thread through.

- Continue adding picots and focals until you have enough for your bracelet. When measuring, remember to include the rows of spacer beads (you are about to add another section of these) and the button loop closure. Keep in mind that focal bead size matters – larger beads bring the cord farther from your wrist, so those bracelets need to be a touch longer to fit.

- Inside the cord, travel your needle until it exits where you want to begin your second section of spacers.

- Repeat the spacer process above, but in the opposite order. Decrease the number of beads in each successive row. I ended my first set of spacers with 6 seed beads, so I will begin this section with 6 seed beads and decrease by one each row.

- When you are down to one last bead in a spacer row, you will add your button.

- Place your button shank side up between the cords. Position the button so that the edge reaches, but does not cover, the section of spacer beads. Insert the needle near the thread exit point and travel inside the cord to exit next to the button shank.

- Stitch back and forth through the cord and button shank several times. NOTE: This example is with 3mm cord. If you are using 1.5mm cord, please see Step 27 below.

- Travel the needle to just below the button shank and wrap thread tightly around both cords several times. Secure with a couple of knots. Do NOT cut thread yet!

- Travel the needle to exit above the button shank and again wrap the thread tightly around both cords several times.

- Knot the thread a couple of times and secure the knots with a dot of Hypo Cement or a similar precision jewelry glue. Let glue dry.

- When the glue is dry, trim the thread and cut the cord ends even with the edge of the button.

- If using 1.5mm cord, the process to secure the button is slightly different. Because this cord is too narrow to survive repeated thread passes, you will do a modified wrap.
At the point of the hole in the button shank, bring the thread over the cord on one side, pass through the buttonhole, then bring the needle under the cord on the other side. Insert the needle over the top of this cord, pass through the buttonhole and exit under the other cord. Continue with over-under passes several times. Pull snugly with each pass. This will form a figure 8 of thread that is quite secure. Proceed with Steps 24 through 26 above to complete the bracelet.
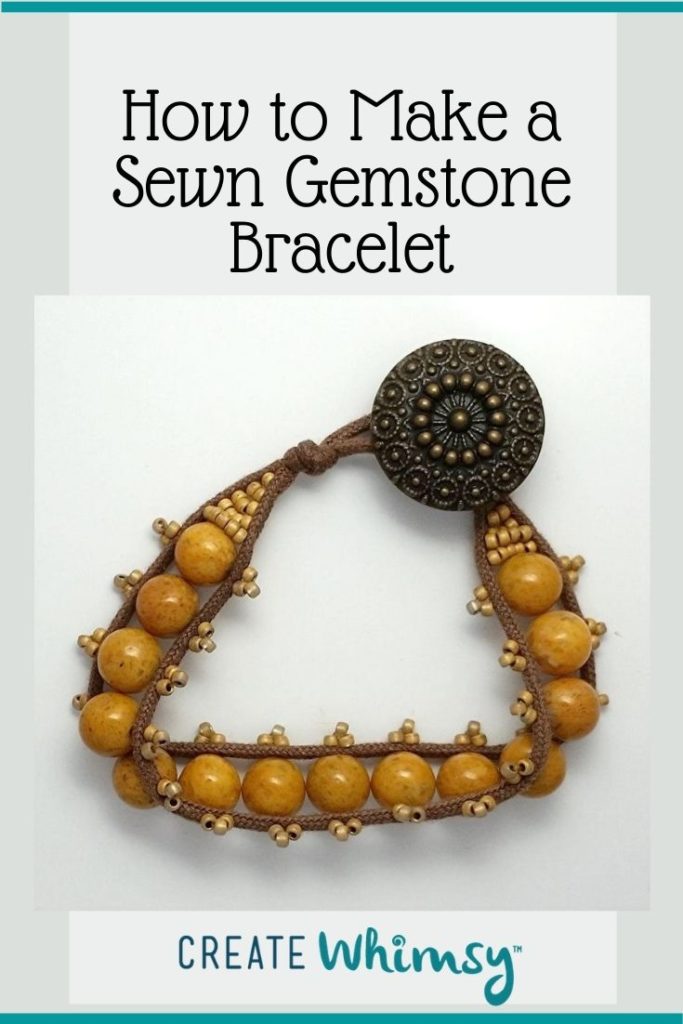
- Here is the finished bracelet! I love how the smooth gemstones feel on my wrist.

Recommended Products
As an Amazon Associate and member of other affiliate programs, I earn from qualifying purchases.
-
 Miyuki Delica Seed Beads Bundle: Size 11/0, Tuxedo Collection - DB010, DB035, DB200-3 Tubes of 2" ea
 -
 Mandala Crafts Black 1mm Waxed Cord for Jewelry Making - 109 Yds Black Waxed Cotton Cord for Jewelry String Bracelet Cord Wax Cord Necklace String
 -
 Nymo Nylon Seed Bead Thread Size B (8 Bobins 144 Yards Each) 0.008 Inch 0.203mm Spool 390 Yards Mixed Colors
 -
 The Beadsmith Macrame Board, 11.5 x 15.5 inches, 0.5-inch-Thick Foam, 10x14" Grid for Measuring, Bracelet Project with Instructions Included, Create Macrame and Knotting Creations
 -
 GS Supplies G-S Hypo Cement, Transparent

I made all four of these bracelets in one evening with different shapes and sizes of gemstones.
Sometimes, I add a spacer bead, such as a heishi, to the inside or outside of the cord. It adds another element that can highlight the gemstones.
I do enjoy making and wearing these hand sewn gemstone bracelets, as you can see from the additional examples that follow!


Browse through more bracelet ideas and inspiration on Create Whimsy.