
The Satin Stitch fills spaces that are not too large. The great feature of this stitch is it can cover a space completely, but it is better for smaller elements. Break up large spaces into smaller areas, or use the flat stitch or long and short embroidery stitch.
You make this stitch with close-together long straight stitches that resemble satin. It is also called the damask stitch. This is an easy stitch to do. The biggest challenge is to keep your stitches close together and even. It consists of simple straight stitches that are worked close together, side-by-side, to cover a shape.
For more texture, you can modify the satin stitch. Begin with a smaller layer under your final satin stitch to give the design some dimension.
Here are step-by-step directions on how to embroider the satin stitch.

How to Embroider the Satin Stitch
The satin embroidery stitch is a perfect fill stitch for small areas. Use solid or variegated threads for different looks.
As an Amazon Associate I earn from qualifying purchases. Read more about our affiliate linking policy.
Materials
- Fabric with design already transferred
- Embroidery thread
Tools
- Embroidery needles suitable for the chosen thread
- Embroidery scissors
- Embroidery hoop (optional)
- Frixion pen (optional)
Instructions
Start by transferring your design to your fabric. I used a Frixion pen to trace circles on my fabric to be stitched. Frixion pens are heat sensitive and are removed with the touch of a hot iron. Always test a pen to make sure the marks easily remove.
I prefer to work in a hoop that keeps the fabric taut while stitching. Once your design is transferred, place your fabric in the hoop. Now you are ready for stitching!
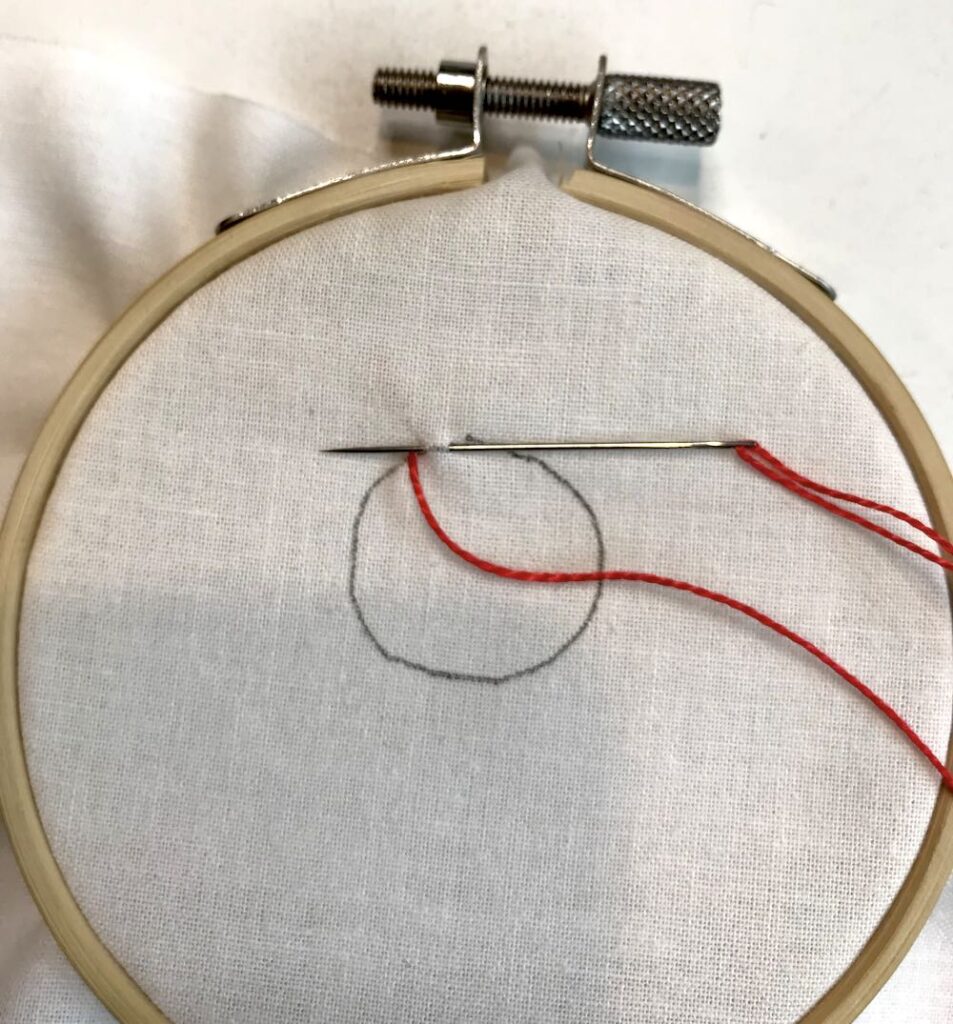
- Bring your threaded needle up at point A on the outside line of the shape you are filling with the satin stitch.

Take your needle back down (point B) on the opposite site of your shape and gently pull the thread through. Make sure not to leave the thread too loose or pull it so tight that it puckers your fabric. - Bring your needle back up at point C, right next to your first stitch at point A, and back down at point D right next to point B.

- Continue in this method until you have filled your shape with thread!

Notes
TIP: Try to keep the tension of your thread the same for all of the stitches within your shape. This will take practice!
Check out our post on different ways to transfer your design to your fabric.
Recommended Products
As an Amazon Associate and member of other affiliate programs, I earn from qualifying purchases.

The sample below shows the satin stitch with a variety of threads.
- The first three circles (pink, yellow and orange) use 2 strands of 6-strand embroidery floss.
- The blue uses #8 pearl cotton and the last in the row is #3 pearl cotton in a variegated color way.
- The same #3 pearl cotton is used in the middle of the diamond shapes.
- The bottom row uses the same heavier weight pearl cotton, but in a different color way.

Do you outline the satin stitch?
You can outline a design embroidered with the satin stitch with a straight stitch like the stem stitch, back stitch, split stitch, running or double running stitch or any outline stitch to give it a more finished and even edge. Or I like to use it when my edges aren’t as good as I’d hoped! 🙂
Should I outline first? or after stitching?
Either way works. If you outline first it gives an edge for your stitching, but you could end up snagging a thread while filling in. If you outline after stitching your shape, then you can carefully ‘hide’ some of the the irregularities of your stitching with the outline. Try both and see which you like the best! I find I use both, depending on the embroidery project.
Here is an example of stitching the outline first, then filling it in with the satin stitch. I used the stem stitch to outline my circle.
Start by drawing your shape on your fabric with a removable fabric marker. I used a Frixion pen. NOTE: Always test your method of marking on your fabric on a scrap first to make sure the mark removes.
Stitch all around your shape with the stitch you choose. I like the stem stitch because it is easy to get nice smooth curved lines and it is a bit thicker finished stitch, making it easier to tuck the satin stitch ends under the edge.

Once you have your outline stitched, start filling the space with the satin stitch, using the same techniques as above. This time, you’ll ‘tuck’ your ends under the outline. Here is my start:

And the second stitch. See how I tuck the needle under the stem stitch?

Continue stitching until your shape is filled. Here is a finished satin stitch with an outline stitch. It makes a nice finish.

A close up of the finished stitch with an outline.

And, here is a side view. Very neat and tidy edge!

Why is my stitch loose? Puckering and too tight?
I always use a hoop for my hand embroidery. If your stitches are too loose or too tight and puckering, it might be because the fabric isn’t being held taut, keeping your stitches nice. It is really hard to keep good tension when freehand stitching embroidery without a hoop.


Check out all of the embroidery tutorials on Create Whimsy!


