
What says fall more than finding the end aisle displays filled with candy corn? It doesn’t matter if you are in team “Love Candy Corn” or “It’s Disgusting”, these little candy corn bowl fillers will be sweet in your home. And, for our friends outside of the US, it’s totally a US thing in the fall.
These candy corn bowl fillers are a sweet way to decorate your home for Halloween. Make your own soft, stuffed candy corn from yellow, orange, and white fabric with this easy sewing tutorial.
This beginner-friendly Halloween sewing project takes about 50 minutes and uses simple sewing skills, a little Polyfill, and fabric you may already have in your stash. Learn how to sew the three candy corn colors together, cut the shapes, round the corners, and stuff each piece. Then tuck your finished fabric candy corn into a bowl, add them to a fall centerpiece, or make a batch for a handmade Halloween gift.
No special pattern is needed, and you can make your candy corn larger or smaller to suit your decorating style.
How do you make candy corn bowl fillers?
Sew strips of white, orange, and yellow fabric together, cut the pieced fabric into triangles, round the corners, sew around each shape, turn it right side out, lightly stuff it, and close the opening.
As an Amazon Associate I earn from qualifying purchases. Read more about our affiliate linking policy.
What fabric do you need for fabric candy corn?
Use yellow, orange, and white quilting cotton. Solids or small prints both work well, making this a good project for fabric scraps.
Are candy corn bowl fillers easy for beginners?
Yes. The project uses straight seams, simple shape cutting, basic sewing, and a small amount of stuffing. A sewing machine makes it quick, although you can hand-sew the final opening closed.
How long does it take to make candy corn decorations?
Plan on approximately 50 minutes for the project as listed in the original tutorial. Your time will vary depending on how many pieces you make and your sewing experience.
In this candy corn bowl fillers tutorial, you’ll learn how to:
What you’ll learn
- Choose fabric colors and prints for a traditional candy corn look.
- Sew three fabric strips together with a 1/4-inch seam allowance.
- Cut candy corn shapes from a pieced strip set using a 60-degree triangle ruler or a simple triangle template.
- Round the corners to create the familiar candy corn shape.
- Sew around each shape, leaving an opening for turning and stuffing.
- Turn the fabric right side out, add Polyfill, and close the opening.
- Customize your candy corn with different fabrics and sizes for Halloween decorating.
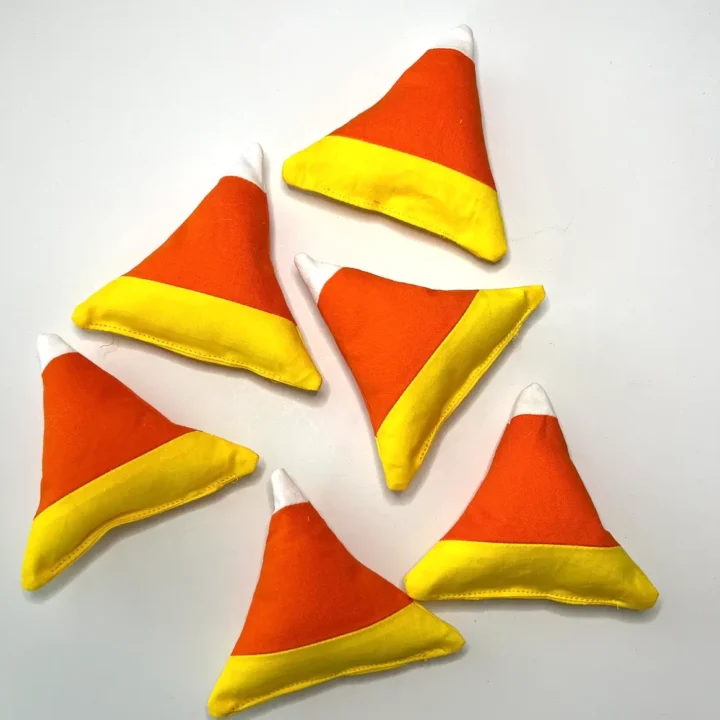
How to Make Candy Corn Bowl Fillers
Learn how to make candy corn bowl fillers with our step-by-step instructions with photos.
Until I made these, I never really paid attention to candy corn. The middle is larger and orange, and it always has a white tip - never does the yellow go on top!
Follow these steps to sew your own fabric candy corn decorations. Each piece is made from three fabric colors, lightly stuffed, and closed with a small seam.
Materials
- 1/4 yard each of yellow, orange, and white fabrics; can be solids or prints
- Coordinating thread for sewing
- Small bit of Polyfill stuffing
Tools
- Sewing machine
- Iron
- Pressing station
- Rotary cutter
- Cutting mat
- Quilters ruler
- Also recommend: 60° quilter's ruler
- Pins
- Scissors
- Recommended: Corner turner
Instructions
- Start by cutting your fabric. Cut three (3) strips 1-1/2 inch wide, from the white and yellow fabrics. Cut three (3) 2-1/2 inch wide strips from the orange fabric.

- Sew the white strip to one side of the orange strip, right sides together with a 1/4-inch seam allowance.

- Next, sew the yellow strip to the center orange strip, again with right sides together and with a 1/4-inch seam allowance.

- Press seams open. Usually I say to press to your preference, but for these pressing the seams open makes them lie flatter and not have a ridge.
Now we are ready to cut out triangles for the candy corn. I used by 60° triangle ruler. If you don't have a specialty ruler, you can freehand cut the triangles - it's just a triangle!
Line up the top of the triangle with the white strip at the top. Cut along both sides to make the candy corn.
 You'll end up with triangles with the yellow tops. I stayed true for this tutorial and am only showing you the white top candy corn, but I sewed up the yellow tops that are waste from cutting the triangles. 🙂
Keep cutting by moving your ruler.

- Stack up the triangles, and let's trim the corners. Candy corn has rounded corners, and so will ours! I looked around the room and thought the round part of a thread cone would be a perfect shape!

- Begin sewing about 1-inch from one of the bottom corners, along the yellow strip with a 1/4-inch seam allowance.

- Sew all around the outside edge and then stop about 1-inch from the opposite corner on the yellow strip. This leaves an opening for us to turn the candy corn right side out.

- Here you can see the opening in the bottom of the candy corn.

- To make turning the corners easier, let's clip a few times into the seam allowance at each corner.

- Turn the candy corn right side out. I like to use a corner turner to gently nudge our rounded corners out.

- I don't recommend pressing. Candy corn is rounded, not flat. Let's jump right to adding a bit of Polyfill to the inside of the candy. Don't overstuff. - just a bit of filling to puff it out a bit.

- Take a few pins to secure the opening, making sure to fold in the raw edges.

- Sew the opening closed. I used my machine and about an 1/8 inch seam allowance. You can also sew it closed by hand.

- And, a finished candy corn!

Recommended Products
As an Amazon Associate and member of other affiliate programs, I earn from qualifying purchases.


Have fun decorating with your new bowl fillers!

Idea: Make them any size you’d like! Lane made her’s larger and used prints from her fabric stash. She made some of them with the seam on the inside, and see the one front and center? She just topstitched around. So cute!

What’s in your stash? Pull out great prints in yellows and oranges and have fun making candy corn! These no-calorie (and no bug-attracting) candies bring color to your table and home.

Add a witch and be ready for Halloween!

Common mistakes when sewing candy corn bowl fillers
These simple tips will help your fabric candy corn turn out neat, rounded, and ready for display.
Cutting the fabric strips the wrong width
The white and yellow strips are 1½ inches wide, while the orange strips are 2½ inches wide. Check the measurements before cutting so the colors form the right proportions.
Getting the candy corn colors in the wrong order
Traditional candy corn has a white tip, an orange center, and a yellow base. Position the fabric strip set carefully before cutting the triangles.
Forgetting to leave an opening
Leave about a 1-inch opening along the bottom edge when sewing around each shape. Without an opening, you will not be able to turn or stuff the candy corn.
Cutting through the stitching
When clipping the seam allowance around the corners, stop just short of the stitching. Cutting through the seam can leave a hole when you turn the fabric right side out.
Overstuffing the candy corn
Use small amounts of Polyfill. Too much stuffing can distort the shape, make the candy corn lumpy, and make the opening difficult to close.
Leaving raw edges exposed
Before stitching the opening closed, fold the raw fabric edges inward and pin them in place. This gives the finished candy corn a cleaner edge.
Worrying about perfectly matched prints
This is a forgiving stash-busting project. Solids, small prints, and coordinating scraps all work well. Focus on the color placement and have fun with the fabric combinations.
Frequently asked questions
Quilting cotton is a good choice because it is easy to sew, holds its shape, and comes in many colors and prints. Use white, orange, and yellow solids for a traditional look or choose small prints for a scrappy version.
You can start with ¼ yard each of white, orange, and yellow fabric, along with coordinating thread and a small amount of Polyfill. Or, go through your scraps and find small pieces to sew together to make your candy corn.
Yes! This is a beginner-friendly sewing project that uses straight seams, simple cutting, turning, stuffing, and a short finishing seam. A sewing machine makes the process faster, but you can hand-sew if you’d like.
No. A 60-degree triangle ruler makes cutting the candy corn shapes easier and more consistent, but you can use a paper template or mark the triangles with a ruler and cut them with a rotary cutter or scissors.
About 50 minutes, including preparation and sewing. Your time will depend on how many pieces you make, your sewing experience, and whether you cut the shapes individually or in batches.
Absolutely. Change the size of your fabric strips to make smaller or larger candy corn decorations. If you change the proportions, keep the white tip, orange center, and yellow base recognizable.
Yes! This is a great way to use leftover quilting cotton. You can use different prints for each color or make a coordinated set from a favorite fabric collection.
Arrange them in a decorative bowl, add them to a fall centerpiece, display them on a seasonal table, or give them as handmade Halloween gifts. You can also adapt the idea to make a garland or larger stuffed candy corn decorations.
Use enough Polyfill to give each piece a soft, rounded shape, but do not pack it too tightly. Gently redistribute the stuffing with your fingers after turning and filling the piece.
If all of the materials you used are washable, then toss them in the washer! If you aren’t sure, spot-clean with a damp cloth.
More creative ideas for your candy corn:
Make a garland: Sew the candy corn on a ribbon or rope to make a Halloween banner or garland.
Scented version: Add some apple spice or clove when you add the Polyfill to give a fall scent to the bowl fillers.
Throw pilows: Make a few giant candy corns for chair or sofa pillows, to take the theme through your room.
Patchwork Look: Use different prints on each layer and each pumpkin for a scrappy patchwork look to your candy corn.
These easy candy corn bowl fillers are a fun way to bring a little Halloween color into your home. Pull out your favorite yellow, orange, and white fabrics, sew a few pieces, and arrange them in a bowl for a decoration you can bring out year after year.
Try different prints, experiment with the size, or make a batch to share with friends. Have fun sewing your own little pile of candy corn! Please share a photo on Instagram and tag @createwhimsy. We’d love to see what you make.
Browse through more Halloween project ideas on Create Whimsy.


