You get a new sewing machine. You see there are so many built-in decorative stitches! Have you ever taken the time to explore the variety of decorative stitches?
I wanted to add some decorative stitches to a quilt that needed more visual interest when looking at it closely. I browsed through the screens, found designs I thought might be interesting and tested them on a scrap of fabric from the quilt. Do you have samples like this?

And, then you love a stitch. Where was it again?
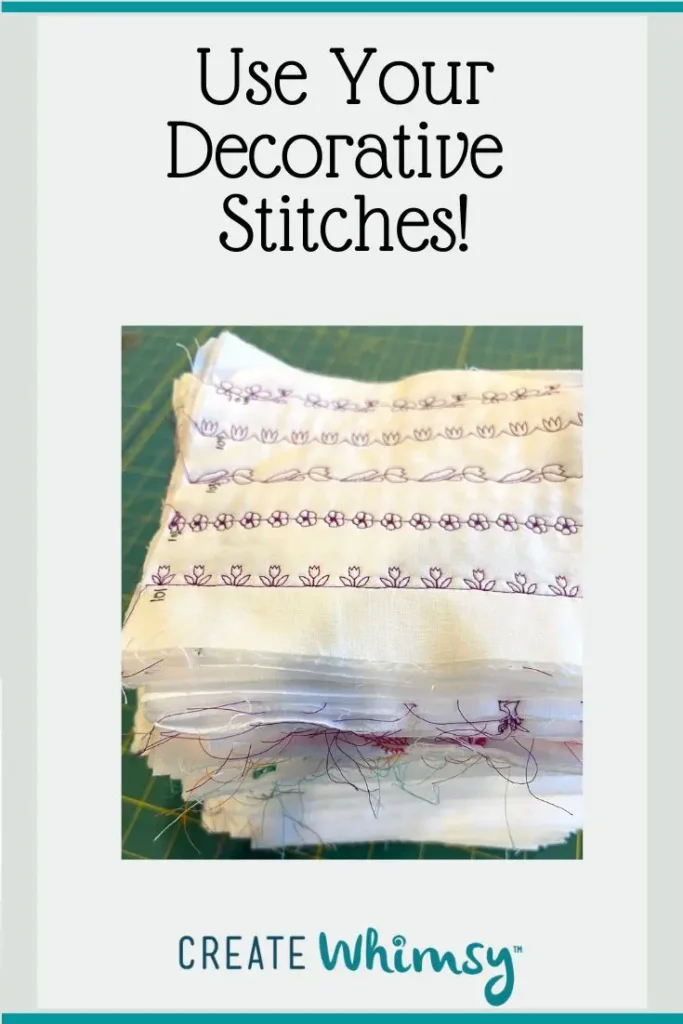
I have heard of people that took the time to stitch out every single decorative stitch so they know what it looks like. It is referred to as a decorative stitch catalog or a stitch sampler book. I decided it was time to do that. I found some new favorites! And, now Iknow what they really look like.
Since I wanted to use decorative stitches on a quilt, I decided to make small quilt sandwiches. I cut 6-1/2 inch squares from muslin and batting.
As an Amazon Associate I earn from qualifying purchases. Read more about our affiliate linking policy.
If I do this again, I wouldn’t use a quilt sandwich. I’d use muslin with a stabilizer, or a heavier fabric, like canvas. It would have been easier. I didn’t think about that until I was well into my project!

This is a great way to use up batting scraps. You can see the top piece of batting has been pieced. Just line up two straight edges of batting and use your zig-zag stitch to hold it together!
Next, I marked lines with a removable fabric marker. I used a Frixion pen, which comes out with the touch of an iron. NOTE: Always test on a sample first!

Here is a big pile of muslin, batting and my marked fabrics.

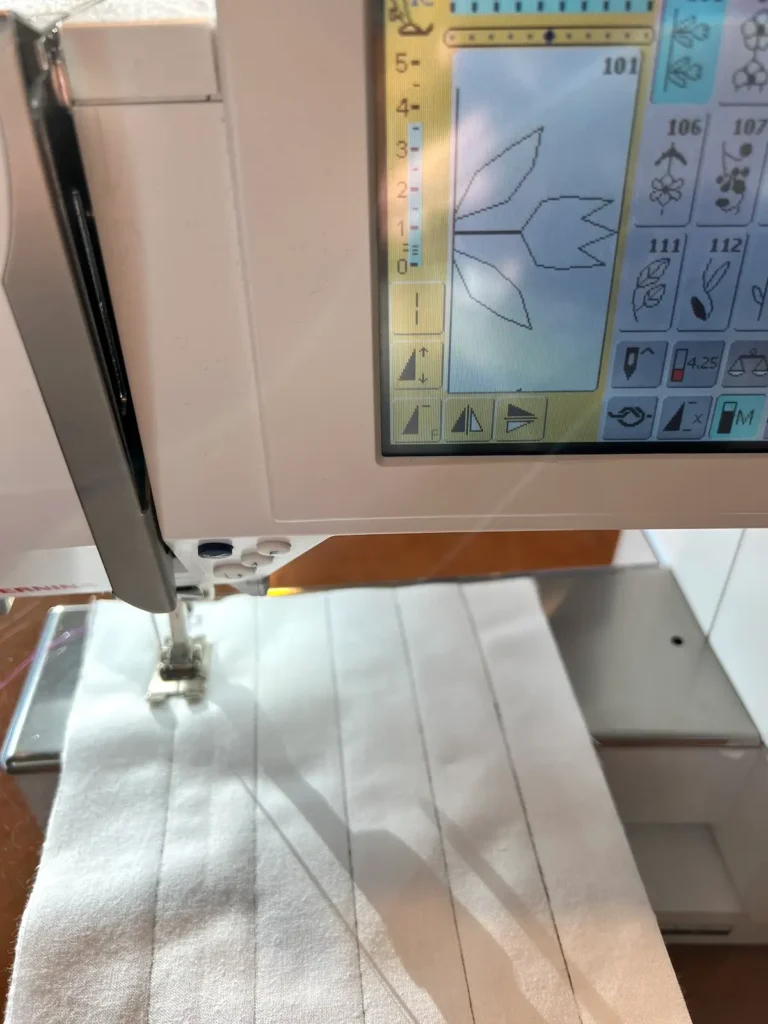
Starting with stitch 101 on my Bernina, a row of tulips begins to appear!

Now, grab your PERMANENT fabric marker and write the number of your stitch on your fabric. I was consistent and always marked the number to the left of the stitch out, where the stitching line started.
You’ll find some stitches go left to right, others go right to left. This way you know how it will look.
And, you’ll find some surprises and delights along the way! Here is an example. Check out the screen on my sewing machine for stitch #602. Hmm. . . and then see how it stitched out. It’s lovely! And, not what I would have anticipated. The finished stitching looks like heirloom cross stitch!


I worked on this when I wanted to be sewing, but didn’t feel like being creative. I changed the color of my thread with each ‘set’ of stitches, making it easier to group them, and then hopefully find them later.

The decorative machine stitches on your machine are best for the designs that stitch out in a line. There were a few bigger designs that could be stitched out (without your embroidery attachment and hoop). I found that the large designs didn’t work. The tug and back-and-forth with the machine to stitch them out, the fabric shifted too much and the designs didn’t close. Recommendation: If you want big designs, use an embroidery attachment or machine with a hoop to keep your fabric stable.
Here is an example. See how the pig and balloon got off registration?

Types of decorative stitches
There are two types of embroidery stitches, open decorative stitches and satin stitches.
The open decorative stitches are single elements that can be stitched in a line. It is recommended to use the same thread for both the top and bobbin threads. If you have an open embroidery foot, now is the time to use it! By using this special presser foot, you’ll be able to see your design stitch out better.

The satin stitches are dense decorative stitches sewn with zigzag stitches close together to create the design. Dense stitches are heavy and thick. It is recommended to use a bobbin weight thread in the bobbin. For a finished look with the dense stitch, use a rayon thread for your upper thread for a little bit of sheen. If you have a special presser foot for satin stitch, it is recommended to use it for dense embroidery stitches. The satin stitch foot has a larger groove which accommodates the thread work as it is being stitched.

Tips for sewing decorative stitches
- Always make a sample with the thread, fabric, and stabilizer you will use on your final project. The time to tweak is before you start sewing on your project!
- For best results, use a stabilizer for nice even stitches. It helps keep your fabric from puckering.
- Spray your fabric with spray starch and give it a nice press before stitching so you are less likely to end up with puckers.
- If you are stitching a dense stitch, use a lighter weight or bobbin thread in your bobbin.
- For stitching an open design, use a removable fabric marker to draw a guide line on your fabric for perfect placement of your design.
Creating your own design with decorative stitches
Have fun creating your own design by combining a variety of decorative stitches. For this sample, I’m combining an open flower stitch with a leaf stitch to create a pattern. This could be a fun stitch design on the front of a blouse or dress.
Start by drawing lines on your fabric with a removable fabric marker. I used a Frixion pen. NOTE: Always test on a scrap of fabric first to make sure the mark remove! Pick the embroidery design you want to use. For open designs, you can use your basic sewing machine foot, or if you have an open toe foot, this makes it easier to see the stitches as they sew.
Cut a piece of tearaway stabilizer that is the size or slightly larger than your fabric. Stabilizer helps for even stitches.
Here I’m beginning to sew the flowers.

Next, I sewed one line of the leaves, and here I’m sewing the second set of leaves on the other side of the flowers.

Once you have everything stitched out, your embellished fabric piece is ready to be added to your sewing project!
Ideas for playing with decorative stitches
- Choose one (or more) stitches and play around with stitch width and stitch length. See how you can make so many more designs just with a little play! If you like something, get your permanent marker out and write down the stitch length and width on your sample – so you can do it again!
- Play around with a few different decorative stitches, combining them in rows to make a design!
- Pull out a variety of threads and try them out on a sample! From rayon threads, metallic threads, variegated threads and thicker threads. A heavy thread can make the designs pop more on your creative project. See which ones you like the best!
- Piece together some scraps of fabric for a crazy quilt block. Use either the built-in quilting stitches, or any of the decorative stitches to embellish your quilt blocks!
You don’t need a special embroidery machine to add some creative flair to your sewing projects and quilts! From simple stitches and straight stitches, to complex designs, decorative stitches are a fun way to add a little more interest to your projects!
Most of all, have fun!
Browse through more sewing projects and inspiration on Create Whimsy.