Sometimes I want to get a project done really fast, but lately I have picked up a hand stitching project when I want to unwind. The slow, meditative process of forming one stitch at a time is calming. Sashiko embroidery is a perfect technique for those times. It’s easy, portable and requires just a few supplies. Projects can be any size, from coasters on up. Learn everything you’d want to know in this article on How to Sashiko Stitch.
What is Sashiko?
- Japanese decorative running stitch
- Originally used to reinforce clothing
- Traditionally white thread on indigo fabric
- Designs often are geometric
Sashiko is a style of Japanese embroidery and folk craft that is hundreds of years old with roots in practicality. Because farmers needed warm clothing that would last, the women (usually) stitched layers of fabric together to add warmth and to repair worn areas. Fabric dyed dark blue with indigo, when paired with unbleached cream thread, provided a palette for creatively expressing graphic designs. Humble work clothes became works of art with this style of embroidery.
The word Sashiko means “little stabs”, and that perfectly describes the stitch. It’s a basic running stitch that stabs the fabric back to front, then back again. Ideal stitch size? Think grains of rice. My stitches are more like long-grain rice – not quite traditional – ha!
Beginner quick start: Sashiko stitching at a glance:
Tools:
- Fabric
- Sashiko thread
- Sashiko needle
- Marking tool
Basic Steps:
As an Amazon Associate I earn from qualifying purchases. Read more about our affiliate linking policy.
- Mark pattern
- Thread needle
- Stitch running stitch
- Keep stitches even
- Press finished piece
RELATED: How to stitch the running stitch
RELATED: Sashiko supplies guide
RELATED: Visible mending
Today, Sashiko threads and fabrics come in a rainbow of colors, so your projects can go with anything you choose.
My project has black fabric and green thread – not traditional at all! If you don’t want to mark your pattern, you can purchase pre-printed Sashiko panels.
If you stitch the dashed lines, it helps you get used to the feel of even stitches. Then the marks wash away. No one will know!
Enjoy our comprehensive article on How to Sashiko Stitch – with everything you need to know!
Step-by-Step Sashiko: Learn How to Sashiko Stitch
- Marking your fabric for Sashiko
- Choose the right fabric for Sashiko
- Sashiko stitching designs
- FREE downloadable pattern in two sizes
- Transferring your Sashiko design to fabric
- Choosing your thread for Sashiko stitching
- Selecting the right needle for Sashiko stitching
- Tips for working with traditional Sashiko thread
- Stitching your Sashiko pattern on fabric
- Common Sashiko problems (and fixes)
Let’s get started! Unless you selected a pre-printed design, you will want to mark your chosen pattern onto fabric. There are lots of options out there, more than I can show here, and each has its advantages and disadvantages. So ask around and test, test, test!
Marking your fabric for Sashiko stitching
A Hera Marker is a minimally invasive marking option. You never have to sharpen or refill, so it’s always ready to go. You draw your line by pressing the sharp edge of the tool as you “draw” on the fabric. It leaves a creased line for you to follow with stitches. No erasing needed! You will want good lighting if you choose this method, as the marks can be subtle.
One of my go-to choices for marking on dark fabrics is the Clover White Marking Pen. It works like a simple ballpoint pen, but the “ink” comes out clear and then turns white as it dries. The marks wash out with water or the touch of a hot iron. The fine lines are great for intricate designs, and the point follows the edge of a template accurately. But don’t leave your piece in a hot car. Your marks may disappear.
The Hemline Water Erasable Pencil is a mechanical pencil, which I like because I can’t keep track of my sharpener. 🙂 I used white for this example on black fabric, but it also comes in blue to use on light fabrics. It leaves reliable marks that you can remove with water.
This is what I ultimately used for this project: Miracle Chalk. It comes in this tailor’s chalk style and in a chubby crayon format. It glides over the fabric, so tracing my design went very quickly. I planned to stitch in the evenings, so the bold line with high contrast was a real advantage for me. The marks remain clear from the start of the project to the finish, then disappear completely with a hot iron. Or when left in a hot car – see above.

Choosing the right fabric for Sashiko stitching
Early Sashiko was stitched on indigo-dyed hemp cloth, and you might be able to find indigo fabric in specialty shops.
Most of today’s Sashiko stitchers stitch on medium weight, loosely woven cotton, linen or cotton/linen blend.
The weave is important – quilting cotton fabrics (especially batiks) are too tightly woven to work with heavier threads and needles. They may show holes and puckering.
Go classic with blue cloth, or stitch on another color that makes you happy. Fabrics come in a lot of different colors. Make a modern design with bright colors!

Selecting designs for your Sashiko stitching
Sashiko designs, even those with curvy elements and geometric patterns, are often based on a simple grid. Accomplished stitchers can draw just a grid on the fabric and fill in the design by eye, simply stitching from corner to corner.
Most of us, however, need a pattern. With Sashiko’s rich tradition, there are countless options. You can design your own pattern or look for books and patterns from sashiko artists.
We’ve got a free Sashkiko pattern for a fan pattern below. Or check out our tutorials for the Hitomezashi Sashiko stitch and the Jujizashi Sashiko stitch. They both are done with a simple running stitch with straight lines.

Transferring your Sashiko design to fabric
I love my light box! It allows me to see every detail when tracing a design, and it’s so much more user-friendly than taping paper to a window, especially if you want to trace when the sun isn’t shining. (Or you don’t want to move that chair next to the sunniest window out of the way.) As you can see, I opted to print extra bold and dark lines for the highest visibility.

I wasn’t sure the pattern would show for tracing on black fabric, but here it is! The fabric is Essex by Robert Kaufman, the same cotton linen blend pictured above. This is substantial fabric, not a flimsy low-thread-count open weave, and the pattern is still clear. Now, to mark!

Here is the project in process, showing the Miracle Chalk marks so far. With paper blocking the light on part of the piece, you can see the difference and how clearly the marks appear.
It’s a good trick to check on your progress – did I get all the spines of that fan?

The marking is done, and it’s time to start stitching. I will stitch just the fans, not the line segments between fans. Those will help me keep the project square and disappear when I remove the other marks.

You can try tracing paper to place your stitching lines on your fabric. Make sure the lines are easily removed. Test on a fabric scrap before transferring your design with tracing paper and stitching your design.
Other options are to use chalk paper or Chaco paper to trace your design onto your fabric. Also, pre-printed fabric panels are available.
Choosing thread for your Sashiko stitching
You have choices when it comes to thread.
Traditional Sashiko cotton thread has a soft twist that’s lovely to work with. It comes on skeins, which require some preparation before you begin to stitch, but it’s easy to do. I
f you want to go this traditional route, special Sashiko thread is available in a tempting array of colors. Traditional Sashiko is a dark fabric with white thread.

Perle cotton embroidery thread is another option for Sashiko stitching.
Size 8 is similar in weight to the traditional threads, but with a slightly tighter twist. Depending on the brand, you may see it on skeins or spooled into balls. Lots of colors and very easy to find!

You can also use two-strands of embroidery floss, but this doesn’t make the stitch stand out as much as sashiko thread or perle cotton.
Selecting needles for your Sashiko stitching
You will need needles. But not just any needles.
A Sashiko needle is the best, and with the growing popularity of the craft, they are much easier to find. These special needles are longer than other embroidery needles.
RECOMMENDED SASHIKO NEEDLE: Tulip Long Sashiko Needle
With the long needle, you can load more stitches on the needle before pulling it through the fabric. Because the thread passes through the fabric fewer times, the longer needle reduces friction and prevents the thread from fraying.

Tips for working with traditional Sashiko thread
I used Sashiko thread for my project, but first I had to get the thread ready for stitching.
RECOMMENDED THREAD: Olympus Sasiko Thread
It’s just a few steps and results in a thread that is tangle-free and pre-cut to the perfect length.
First, gently slide off the paper wrapper. Try not to disturb the threads. Keep the skein just as it is. You will unfold the skein in the next step.

Find the small knot that binds the threads together. Do this gently, without disturbing the skein.
Tip: When the skein comes out of the package, it is folded in thirds, so you may have better luck finding the knot by touch rather than by sight.
The knot may be inside a fold. Do not unwrap the folds until you have located the knot!

Once you have the knot, gently tease the skein into a large tidy circle.

Now you can find one end of thread (it might not be near the knot) and cut two pieces, each approximately 5 inches long.

Wrap one of your thread segments around the thread where the knot holds the loop together. You want this to be snug, but not tight. You will pull threads through this loop one at a time for stitching.

On the opposite side from the knot, cut through the entire loop of thread. The length of the cut threads you have just created is the perfect length for stitching.

To keep your threads tangle-free, make a simple braid.
Enlist the help of a friend or something pokey and stable, or, as I did, hold something (like a pair of scissors or a screwdriver) between your knees.
Drape the tied thread around the object. Borrow a little from each side to form three groups of thread. Now make a simple loose braid – left over, right over, repeat.

When you get to the end, tie up your loose ends. (Ha!) Again, not too tight – You will pull your stitching threads through this little tied circle.

To release your first thread, tease one thread loose from the pack near the top of the braid. Pull a single strand gently and slowly. The first few will be the most resistant.

When you have successfully liberated your first thread, thread your needle and get ready to stitch!
There are threaders made especially for embroidery if you need a little help. I prefer the Clover 8611 Needle Threader for Embroidery Needles. It’s sturdier than the wire-type needle threaders, and I can’t tell you how many of those I have broken. I haven’t broken a Clover threader in 15 years – I lose them before I break them!
RECOMMENDED PRODUCT: Clover 8611 Needle Threader for Embroidery Needles

Traditional Sashiko Stitch Guidelines
- Stitches should be even on the front
- Stitches are shorter on the back
- Avoid crossing stitches
- Leave a stitch gap at corners
- Don’t pull thread too tight
Now, to start our project. Here is how to Sashiko stitch:

How to Sashiko Stitch
Learn the basics of Sashiko stitching with this step-by-step Sashiko sampler stitching project.
Materials
- 15 x 20 piece of fabric
- Sashiko thread
Tools
- Sashiko needles
- Embroidery scissors
- Fabric marker to transfer design to your fabric (see above for suggestions)
Instructions
- Print pattern and transfer your design to your fabric. See specific directions above.
- Some stitchers knot the end of their thread, then begin stitching. I prefer a knot-free back, which takes a little longer to get started. But I think it's worth it to keep the stitching smooth and not risk having a knot pop through to the front of the work.
I begin by bringing the thread up 3 or 4 stitches from the beginning of my stitching line, leaving a 1 to 2 inch tail. The stitches should be about 1-1/2 times longer on the front than on the back, so check both sides so you can be consistent going forward. Then I stitch back towards the beginning of my pattern line, ending with a "down" stitch.
- This view from the back shows the unknotted thread tail and the back of the first stitches. Note that from the back, the stitches are shorter - that's as it should be. Tension should be relaxed, but not "loopy". If your fabric shows any puckers, give another tug to make a smooth stitch line.

- Now, reverse direction and pass the needle BETWEEN the back of each stitch and the fabric. Tip: Make these passes leading with the threaded eye of the needle. This will prevent snags on your previous stitches or the fabric. Then insert the needle one stitch length from the thread tail, but don't pull it through yet.
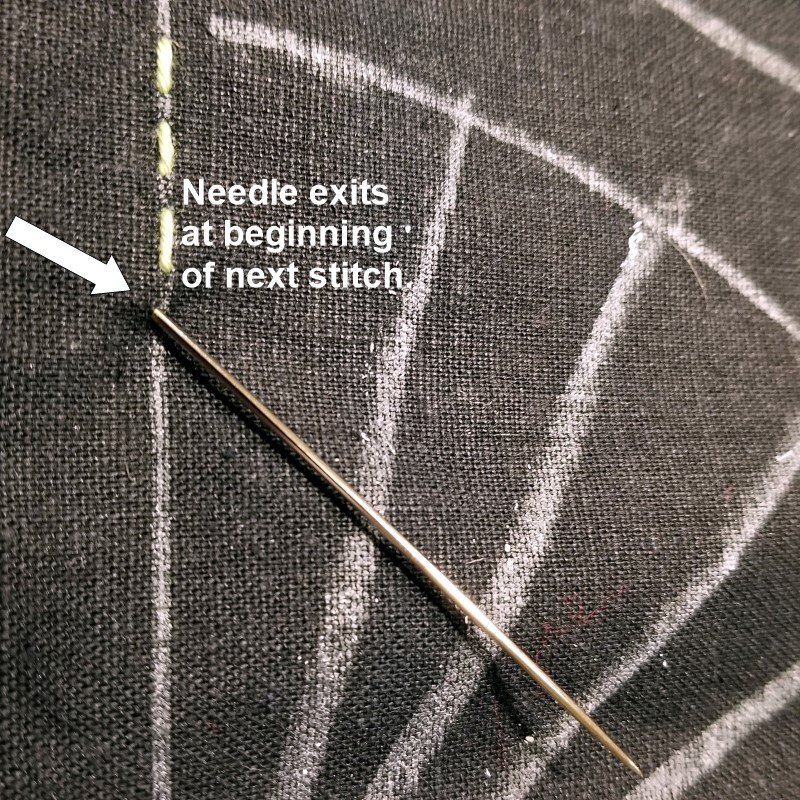
- Check the front of your work to ensure that the needle exits where you want it to on the pattern line. This point is the beginning of the next stitch and will be a seamless continuation of your pattern. So adjust now, if needed, then pull the thread through.
- Continue stitching, either one stitch at a time or loading several stitches on the needle before pulling through. Be aware of tension. I tend to be a "tight" stitcher, which is good for some things, but not for Sashiko! So I give the fabric a little tug after each series of stitches to prevent puckers.

- When you come to a corner or a sharp turn, one stitch should begin or end at the apex. This keeps the appearance sharp. Don't pull too tightly!

- If you leave a small loop on the back between corner stitches, it will prevent puckers and keep your work smooth on the front.

- When you feel comfortable and get on a roll, try loading several stitches on the needle before pulling the stitches through. On a straight line, you can load more stitches at once to speed up your work. Give the fabric a gentle tug to relax the thread.

- On curves, load fewer stitches at a time.

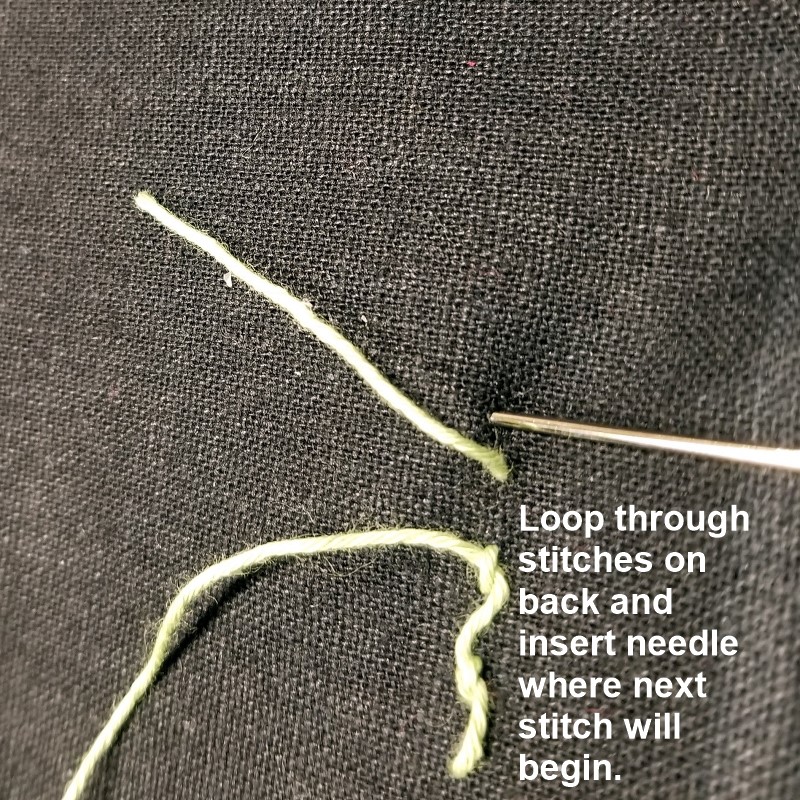
- If you need to begin a new line of the pattern and that starting point is no more than an inch or so away, travel to the next starting point by making a loose loop on the back. Here, I have stitched around the outside of the fan back to my starting point and need to travel to start stitching the spines. Insert the needle where the next line of stitching will begin.

- Continue stitching along your marked pattern lines.

- When you need to "tie off" the end of your thread, weave it back through a few stitches on the wrong side of your work. Trim thread, leaving a 1 to 2 inch tail. Begin the new thread just as you did when you began stitching.

- Now you know what to do! Enjoy your stitching experience, knowing that you can steal a moment to get in a few stitches or have a nice, long, slow-stitching personal retreat.

- Here is the first fan all stitched!

- It's easier to see the design with the pattern lines removed.

- When my stitching was complete, I pressed from the wrong side to avoid flattening the stitches too much or pressing a sheen onto the threads. I like the nod to tradition with a dark background and light thread. But the zingy contrast of bright green on black adds a touch of fun. I think this might be a throw pillow when it grows up!

More Sashiko stitch patterns:
Here is the Hitomezashi stitch, also known as the persimmon flower stitch. See our FULL TUTORIAL.

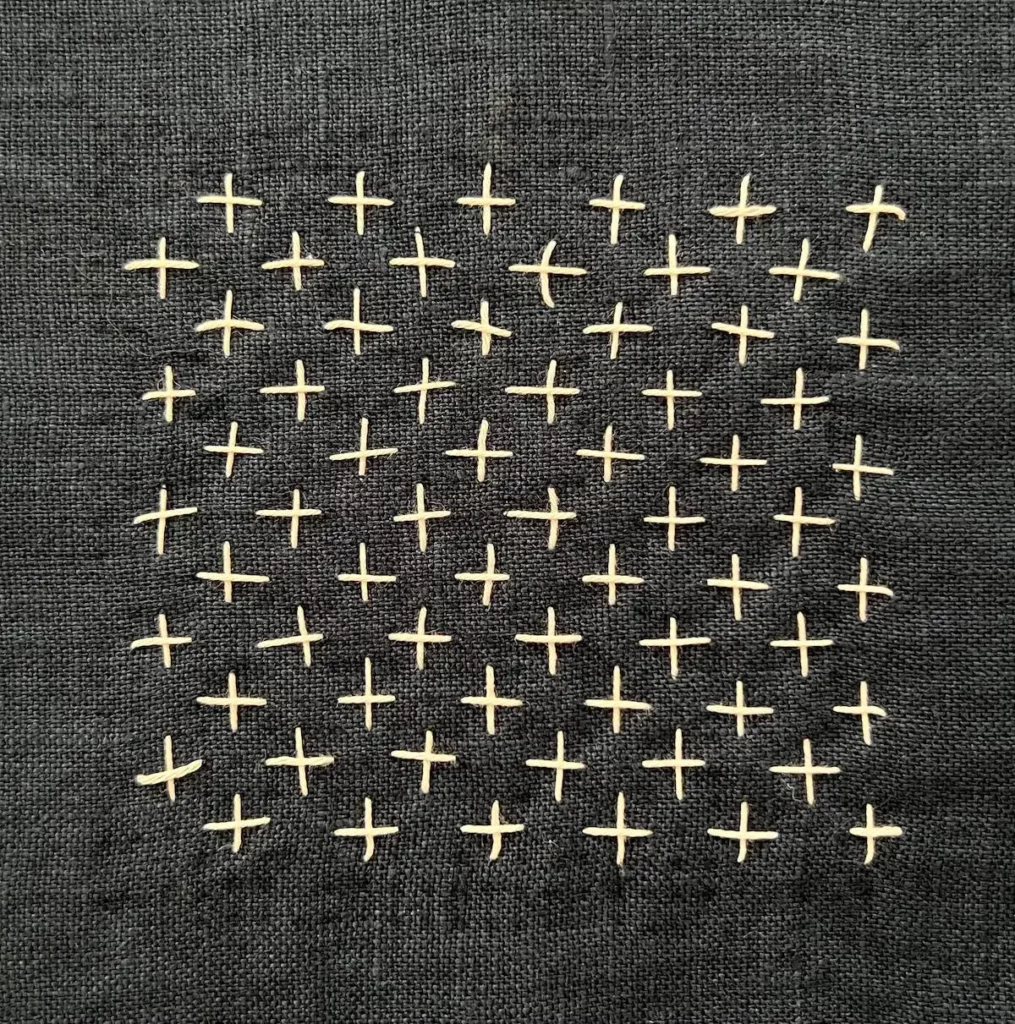
Here is the basic Jujizashi Sashiko stitch. See our FULL TUTORIAL.
Common Sashiko problems (and fixes)
| Problem | Solution |
| Fabric puckers | Loosen tension and leave slight slack |
| Uneven stitches | Load several stitches on your needle at once |
| Thread tangles | Use shorter thread length |
| Marks won’t erase | Alway test your marking tool first |
Sashiko frequently asked questions
How long should Sashiko stitches be?
About the length of a grain of rice.
Can beginners learn Sashiko?
Yes! It uses a simple running stitch.
Do you knot Sashiko thread?
Traditional methods avoids knots and weaves the thread back.
What can you make with Sashiko stitches?

Make some coasters. We’ve got a tutorial on how to make Sashiko coasters.
RELATED: How to make Sashiko coasters.
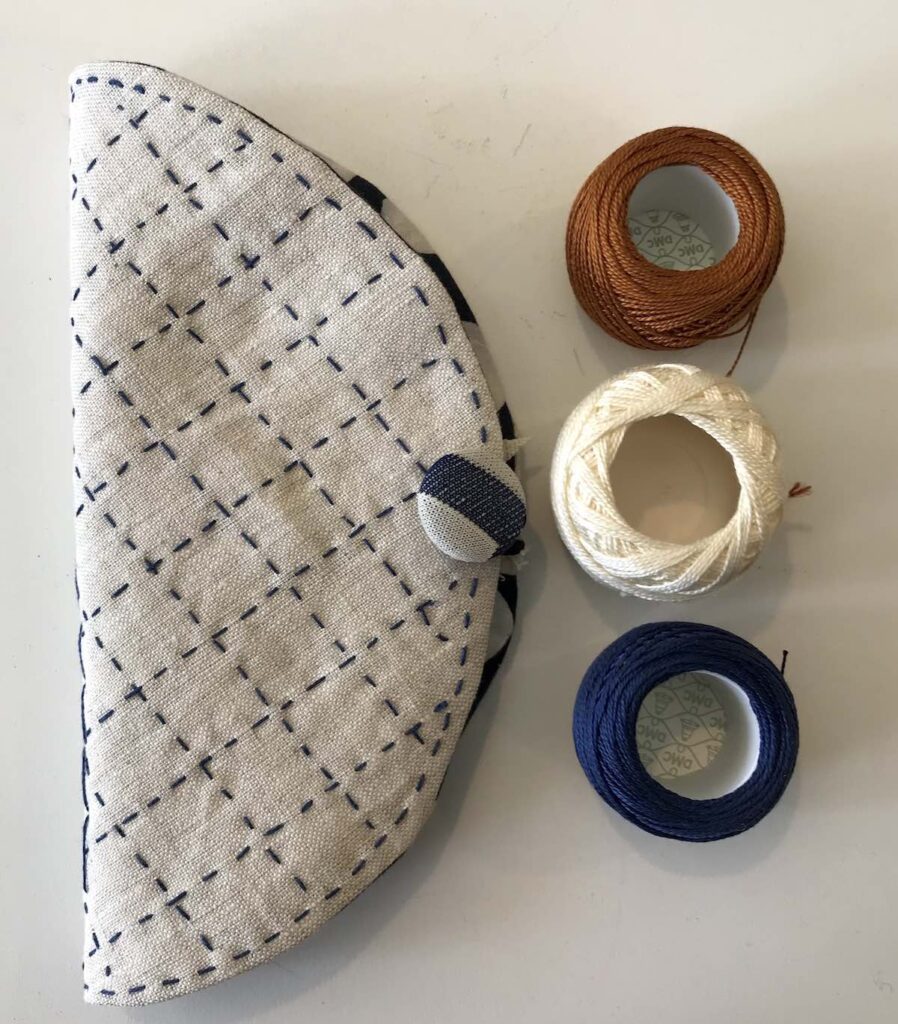
I made this fun Sashiko needlebook and used Perle cotton threads, instead of traditional Sashiko threads.
RELATED: How to make a Sashiko stitched needle book
Other project ideas for Sashiko stitching:
- Stitch a pillow cover
- Make a wall hanging
- Add Sashiko stitching to a tote bag
- Visible stitch mending patches on your clothes
RELATED: The art of mending: Boro stitching and visible mending
RELATED: How to make a patchwork tote bag
Enjoyed learning how to Sashiko stitch? Ready for a Sashiko project? Start with a simple small Sashiko project like our Sashiko Stitched Needle Case.
Browse through more Sashiko projects and inspiration on Create Whimsy. Learn some traditional Japanese Sashiko stitches like Hitomezashi Sashiko and Jujizashi Sashiko.


