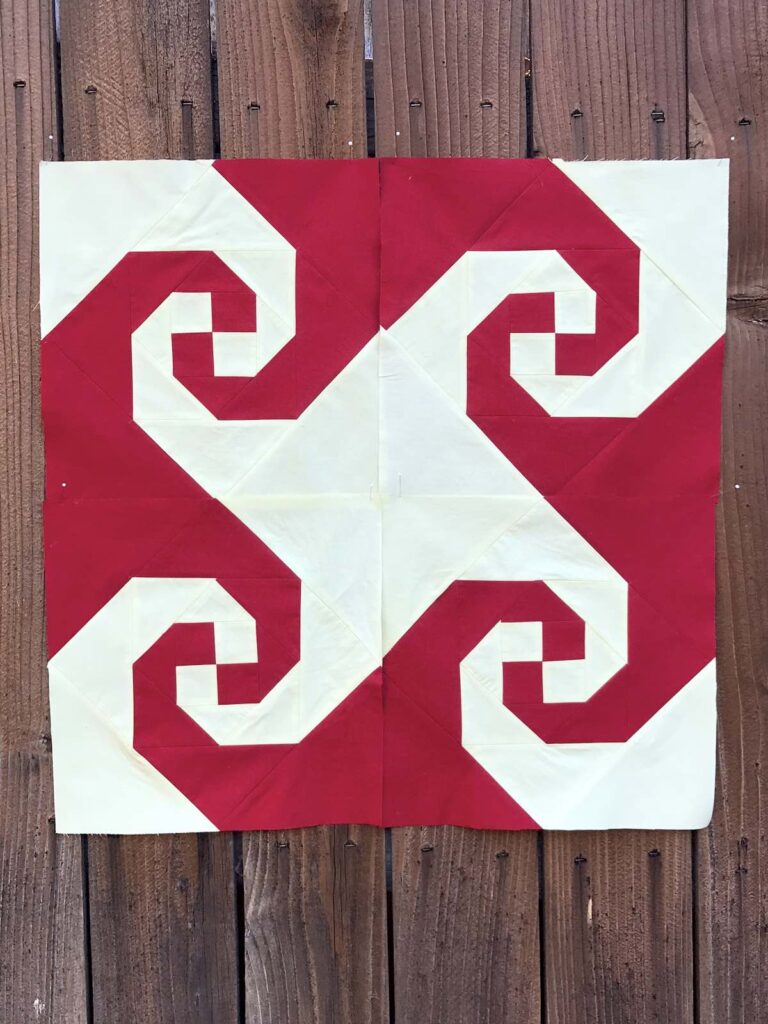
The Snail Trail quilt block is a classic design that creates a beautiful spiral effect with just a few simple shapes. If you can sew straight seams, you can make this block. In this tutorial, you’ll learn how to cut, piece, and assemble a Snail Trail block with confidence and accuracy.
The quilt block design takes your eyes on a ‘trail’ around the block and quilt, giving the quilt visual movement. Starting with a four patch block in the center, you add half squares around and around to make this quilt pattern.
Quick start
Skill level: Confident beginner
Finished block size: 12″ finished block
Time: Approximately one (1) hour per block
Key technique: Strip piecing and rotation
There are many methods to make this traditional quilt block pattern, including paper foundation piecing and freezer paper piecing. If you enjoy paper piecing, you can purchase special snail trail foundation paper.
My tutorial for the Snails Trail Quilt Pattern is traditional piecing. Quilters with some experience have more success with this quilt block. You’ll work with fabrics cut on the bias, and the layouts for each round of adding triangles can be a little tricky. If you are making really small Snail Trail quilt blocks, I’d suggest paper foundation piecing technique.
As an Amazon Associate I earn from qualifying purchases. Read more about our affiliate linking policy.
What you’ll learn
- How to construct a Snail Trail quilt block
- Tips for accurate piecing and alignment
- How to build spiral layouts
- Fabric selection tips for contrast and movement
- How to avoid common layout mistabkes
RELATED: Half square triangle tutorial
RELATED: Log cabin quilt block
RELATED: How to quilt tutorials
Here is the layout of the two fabrics for the Snail Trail quilt pattern:

Before starting to make the block, cut the following from EACH of your two fabrics to make a 12-inch block:
- 2 – 2″ squares
- 1 – 3″ square
- 1 – 3-7/8″ square
- 1- 5-1/8″ square
- 1 – 6-7/8″ square for the outside corners of the triangles
Before you start:
Choose fabrics with a strong contrast between light and dark to highlight the spiral design. Lay out your pieces before sewing to preview how the pattern will form.

12 inch Snail Trail Quilt Block Pattern
The Snail Trail block is a traditional block that adds movement to your quilt top. Make it in two or four fabrics.
Materials
- 1/4 yard each of two fabrics, or two fat quarters
- Thread
Tools
- Sewing machine
- Iron
- Ironing board
- Rotary cutter
- Quilter's ruler, or square trim tool
- Cutting mat
- Marking pens or pencils suitable for your fabrics, I used a Frixion pen and a white chalk pencil
Instructions
Follow these simple 6 steps to complete your Snail Trail quilt block.
Step 1: Cut your fabric pieces
- Here are all of my fabrics cut out and ready to start stitching my snail's trail block. Use the fabric calculator above for the fabric cuts.!

TIP: Keep fabrics organized by light and dark values to maintain contrast.
Step 2: Start with the center square
- Let's start from the center, making the four patch block. Starting with the 2" squares and a 1/4" seam allowance, sew two different fabrics right sides together. You will have two units.

- TIP: If your sewing machine has a 1/4" foot, it makes it much easier to sew accurate seams, which is super important for this quilt block. With a Bernina, it is foot #37 or #57

- Press your seams to your preference. Read our article on pressing seams on Create Whimsy. Line up your two sets of squares so they are opposite to form a four patch block. Sew them right sides together with a 1/4" seam allowance, matching the center seams.
- TIP: Use a consistent 1/4" seam allowance
- TIP: Press seams after each step
Step 3: Building the spiral
- Take the 3" squares and cut them diagonally into two triangles each. I like to cut the squares as I'm ready for them. When they are cut, that diagonal line is now on the bias and can easily stretch out of shape if moved around.

- Line up the first triangle with the center four patch, right sides together. You'll want the diagonal to be along one side of the four patch, and then make sure the corner point is lined up with the center seam of the four patch.

- Sew with a 1/4" seam allowance. Press.

- Line up the same fabric on the opposite side of the four patch.

- Sew the seam and press.

- Now we are ready to sew the second fabric to the two other sides of the four patch. Line up the first triangle on one side, again matching the point to the center seam line of the four patch.

- Sew the 1/4" seam and press. Line up the last triangle for this round, matching the corner to the center seam. Sew with a 1/4" seam and press.

Step 4: Continue building the spiral
- Now we are ready to add the second round of triangles. We'll shift the triangles 90 degrees as we add them to the center of the block, forming the snail trail. Let's start by cutting the 3-7/8" squares diagonally.

- For this and subsequent rounds, we'll mark the center of the diagonal line on the wrong side of each triangle. A small mark within the seam allowance is enough of a guide. I used a Frixion pen on the light color fabric and a chalk pencil on the dark fabric.
 Before stitching this and later rounds, lay out the units to be sure that your "trail" forms a spiral and not a zig-zag!
 - We'll use the marked line to center the diagonal with the previous round of triangles. We'll want this mark to be aligned where the two fabrics form a corner. Our goal is to make them match when we sew this next seam line.

- Carefully move the new triangle to match the raw edges and sew a 1/4" seam allowance.

- Sew the opposite side triangle with the same method - line up the center of the diagonal where the point is from the prior round and sew. Press seams.
- Now, go to the other two sides for this round, match the centers and sew 1/4" seams.

- Sewing the last triangle in round two. Press.

- You'll want to trim up your edges before going to the next round.

Step 5: Keep adding rounds
- I think you know the drill now - cut your 5-1/8" squares in half diagonally. Mark the centers on the diagonal side of the triangles

- Shift your block 90 degrees and line up your first fabric. Sew with 1/4" seam allowance. Press.

- Add the second triangle from the first fabric on the opposite side, lining up the centers. Sew with 1/4" seam allowance. Press.
- Here is the marked second fabric getting lined up for this round.

- Sew with 1/4" seam allowance.
- Line up the last triangle for this round and sew with 1/4" seam allowance. Press.

- We're ready for the last round! Cut your 6-7/8" triangles in half diagonally.

- Mark the centers on the diagonal side.

- This time, I'm showing you sewing with the block up, to show how your goal is to sew as close to the tip of the point from the previous round, to make nice corners. That point of the corner is aligned with the marked line on the diagonal which is underneath.

Step 6: Finishing the block
Notes
TIP: Cut each square into triangles as you go so that the diagonal edges have less of a change of distortion.
TIP: Take the time to mark the center of each diagonal and line it up carefully to keep your block square.
TIP: Check the placement of each round of triangles before stitching to keep the trail going in a spiral.
Recommended Products
As an Amazon Associate and member of other affiliate programs, I earn from qualifying purchases.
-
 Omnigrid Non-Slip Quilter's Ruler, 6-½" x 6-½"
 -
 Omnigrid Non-Slip quilter's Ruler, 6" x 24", Neon Green
 -
 OLFA 24" x 36" Double-Sided, Self-Healing Rotary Mat
 -
 45mm Rotary Cutter
 -
 PILOT FriXion Clicker Erasable, Refillable & Retractable Gel Ink Pens, Fine Point, Assorted Color Inks, 10-Pack Pouch (11336)
 -
 OHOCO Wool Pressing Mat for Quilting - 17" x 24" Extra Large Felt Ironing Pad 1/2" Thick, 100% New Zealand Wool for Ironing, Sewing, Cutting on Ironing Board, Tabletop, Dryer, Countertop
 -
 Fons & Porter 7884 Chalk Pencils, Assorted Colors, 4-Count
 -
 Panasonic 360º Freestyle Advanced Ceramic Cordless Iron, Pest Repeller v.57, Teal
Common mistakes
- Low contrast fabrics: The spiral disappears.
- Inconsistent seam allowances: Blocks won’t square up
- Rotating pieces incorrectly: Breaks the ‘trail’ illusion
- Skipping pressing: Leads to bulky seams
Tips for a perfect snail trail quilt
- Trim your work in progress every step of the way to make sure you are adding each new piece exactly where it should be added. A slight shift in one round and your snails trail block will get wonky.
- When selecting your fabrics, color choices are important. Pick one lighter fabric and one darker fabric to make your snail trail stand out.
- Always add the next round by centering from the middle of the block. If you’d like, you can trim off the little tips from the previous round.
How do you quilt a snails trail?
Any way you’d like! Have some fun with the quilting. You can go round and round with the curves of the snail, or maybe an all over design of swirls to emphasis the movement of the fabric in this quilt block. Most of all, have fun!
Frequently asked questions
Is the Snail Trail quilt block beginner-friendly?
I’d say for confident beginners. If you’re comfortable with basic piecing and accurate seams, this quilt block will be a fun challenge.
Why is it called a Snail Trail block?
The design mimics a spiral path similar to a snail’s shell.
What fabrics work best?
High contrast fabrics help define the spiral shape clearly.
How do I keep by block square?
Use a consistent 1/4″ seam allowance and trim units as needed.
The Snail Trail block is one of those patterns that looks complex but comes together with simple, repeatable steps. Once you’ve made one, it’s easy to experiment with color and layout to create quilts that feel modern, traditional, or somewhere in between.
Browse through more free quilt patterns on Create Whimsy.


