
Whether you are going to the Road to California quilt show or not, you can whip up this quick and easy Road to California quilt block pattern! It uses a nine-patch quilt square format, with only squares and half-square triangles. A traditional quilt block that can make some amazing designs.
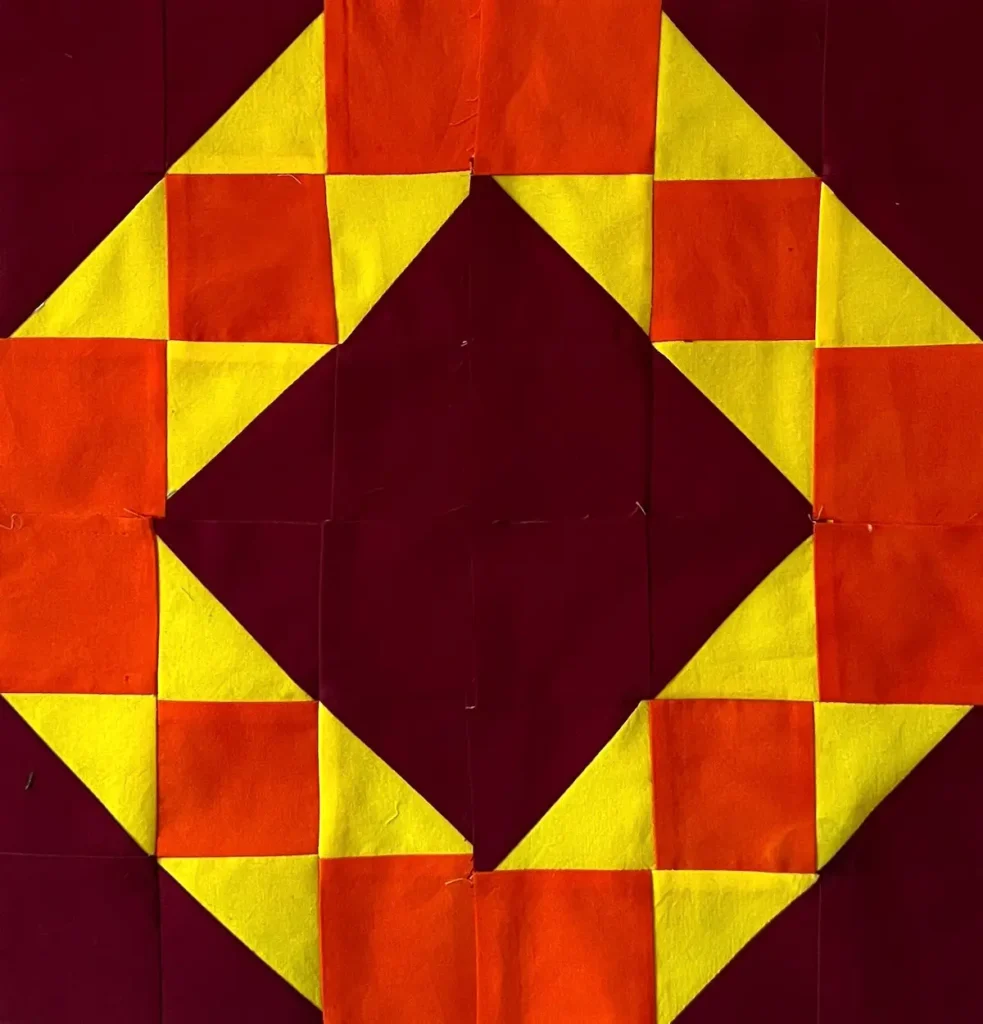
Here is the Road to California quilt block pattern layout and how the three fabrics are used in the design:

We’ve got the step-by-step instructions for you to make the Road to California quilt block in three sizes – 6-inch blocks, 8-inch blocks and 12-inch blocks.
Here is our fabric calculator with how to cut your fabrics to make the Road to California quilt.


How to Make the Road to California Quilt Block
Learn how to make the Road to California quilt block with our step-by-step directions. This quilt block comes together quickly and perfect for beginners.
As an Amazon Associate I earn from qualifying purchases. Read more about our affiliate linking policy.
Using only three fabrics, this traditional quilt block can make a dramatic quilt.
Perfect for using scraps, too!
Materials
- Three (3) fabrics, 9-inch strip width-of-fabric or three fat quarters
- Thread for sewing
Tools
- Sewing machine
- Rotary cutter
- Cutting mat
- Quilter's ruler
- Iron
- Pressing surface
- Removable fabric marker, I used a Frixion pen
Instructions
- Start by cutting your fabrics according to the fabric cutting calculator above.

- Next, let's put together the half-square triangles (HSTs). Take the lightest of your larger squares and mark a diagonal line on the wrong side of your fabric. I used my Frixion pen. Make sure to test your removable marker on a scrap of fabric first!

- Layer this with right sides together with the other larger square. Since I'm making a 6-inch finished square, I am matching the two 2-7/8 inch squares. Sew 1/4-inch from the marked line.

- Turn and sew again 1/4-inch from the other side of the drawn line.

- Using your rotary cutter and a ruler on your cutting mat, cut along the drawn line to make your half-square triangles.

- Press the seams to your preference. Read our article on pressing seams for more information.
Then, lay out your patches for the quilt block.
- Begin by sewing the rows together with a 1/4-inch seam allowance. Press the seams.

- Then, finish by sewing the rows together with a 1/4-inch seam allowance. Give your quilt block a final press.
Recommended Products
As an Amazon Associate and member of other affiliate programs, I earn from qualifying purchases.
-
 PILOT FriXion Clicker Erasable, Refillable & Retractable Gel Ink Pens, Fine Point, Assorted Color Inks, 10-Pack Pouch (11336)
 -
 Panasonic 360º Freestyle Advanced Ceramic Cordless Iron, Pest Repeller v.57, Teal
 -
 Omnigrid 6 x 6 w/Angles Quilting Rulers, 6" x 6", Clear
 -
 Omnigrid Non-Slip quilter's Ruler, 6" x 24", Neon Green
 -
 OLFA 24" x 36" Double-Sided, Self-Healing Rotary Mat
 -
 45mm Rotary Cutter
Quilt block layout ideas
The basic design of the Road to California block is diagonal, which creates movement across your finished quilt. Consider a basic diagonal layout:

Or, shift every other block 90-degrees for a cross-hatch layout:

Try different fabric combinations for a different look:
And, consider mixing color combinations for an interesting design!

And, then turning every other block 90-degrees again.

Tips and ideas for making the Road to California quilt pattern:
- When selecting your fabrics, make sure to have a light fabric, a medium value fabric and a dark fabric to make the design pop.
- This is a perfect pattern for a scrappy look. Use the same fabrics for the background and half square triangles, and fill the center blocks with fabrics from your scrap bin! The consistency in the background and half square triangles will give the quilt unity, while the scraps will create movement to the eye.
- One thing I love about this quilt pattern are the different patterns and quilting designs that can bring the quilt to life! Think about doing feather wreaths inside the large background areas! Or, if you love machine embroidery, that’s the perfect place to highlight an embroidery design.
- Play around with your darker fabric by putting it as the inside diagonal squares, or as the background fabric!
Browse through more free quilt patterns on Create Whimsy.


