
The rail fence quilt pattern is perfect for a beginner quilter. Begin by sewing strips of fabric together, cut them apart into squares, and then rotating the rail fence blocks to make a pattern for your quilt. It is sometimes referred to as a split rail fence.
This quilt pattern goes together quickly, without any fussy piecing. Try different fabric combinations for totally different looks – even great for using up scraps. The key is to look at the value of your fabrics to make sure that you have enough contrast to show the design.
Here are the basic steps for the rail fence quilt block pattern:

How to Make a Rail Fence Quilt Block
Learn how to make the rail fence quilt pattern with this step-by-step tutorial with photos. This is an easy pattern and perfect for beginners. All of the sewing is straight lines.
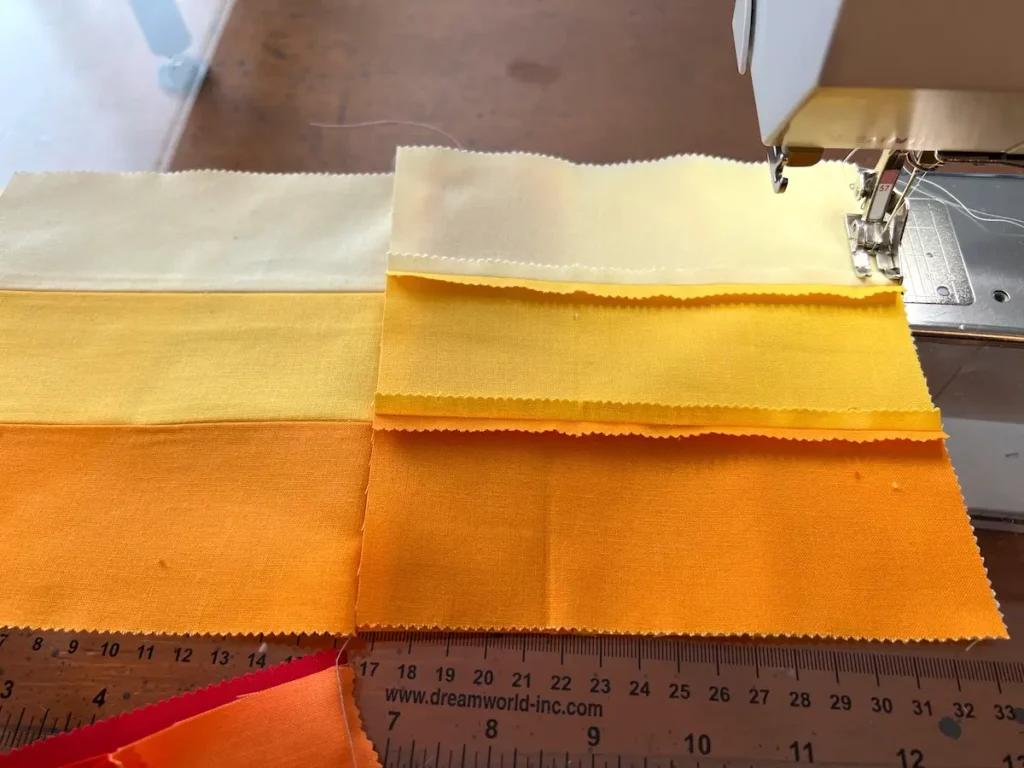
In this tutorial, I used 1-1/2 inch strips of fabric. You can use any width of the strip to start. The key to this block is when you finish sewing your strip set together, you cut it into blocks. This strip set finished at 5-1/2 inch width, so I cut 5-1/2 inch squares from the set.
As an Amazon Associate I earn from qualifying purchases. Read more about our affiliate linking policy.
Materials
- Fat quarter of five different fabrics
- Coordinating thread for sewing
Tools
- Sewing machine
- Iron
- Pressing surface
- Rotary cutter
- Cutting mat
- Quilter's ruler
Instructions
- Start by laying out your fabrics. Important to the rail fence quilt block is a range of values, from light to dark. This helps create the design of the rail fence. Here are the fabrics I selected.

- Cut your fabrics into equal width strips. For this quilt block, I started with 1-1/2 wide strips which forms a finished 5-inch block.
Sew the fabric strips together in order with 1/4 inch seam allowances and right sides together. Here I started with the teal and am sewing the red to the teal.
- Next, sew the next color. Here it is the red-orange strip of fabric.

- Next, I sewed the pink fabric. You don't need to press seams between sewing each strip. We'll do that after the entire strip set is sewn together.

- And, last, sew the mint green strip to the set. This is also referred to as strip piecing.

- Now is the time to go to your pressing station and press the strip. Press the seams to your preference. For more information refer to our article on pressing your seams for quilting.
- Once your strip set is pressed, you cut squares to make rail fence units. For this strip set, I started with 1-1/2 wide strips. I used five (5) strips for the set. My sewn-together strip set is finished at 5-1/2 inches. The rail fence quilt block is based on squares. I cut the strip set into 5-1/2 inch square blocks.
Once the blocks are cut, have fun with different layouts to create the rail fence design. Here is one layout. - Here is another layout idea. See how it looks different with just a 90 degree shift!

- Or, try a diagonal layout for your rail fence quilt blocks.

Recommended Products
As an Amazon Associate and member of other affiliate programs, I earn from qualifying purchases.
-
 OHOCO Wool Pressing Mat for Quilting - 17" x 24" Extra Large Felt Ironing Pad 1/2" Thick, 100% New Zealand Wool for Ironing, Sewing, Cutting on Ironing Board, Tabletop, Dryer, Countertop
 -
 Panasonic 360º Freestyle Advanced Ceramic Cordless Iron, Pest Repeller v.57, Teal
 -
 Omnigrid Non-Slip quilter's Ruler, 6" x 24", Neon Green
 -
 OLFA 24" x 36" Double-Sided, Self-Healing Rotary Mat
 -
 45mm Rotary Cutter
Can you make a rail fence quilt from a jelly roll?
Yes! Starting with a jelly roll makes this quilt even quicker – and you know your fabrics will coordinate! I pulled together some solids from a jelly roll for a simple lap quilt. This is a popular jelly roll quilt pattern.
I picked a light, medium and dark value from six different solid color fabrics.

Start by sewing each of the strip sets together with the dark on one side, medium in the middle and light value on the other side. The strip sets are sewn together and ready to be pressed.

After pressing the strip sets, cut each strip set into square blocks. Jelly roll strip sets are 2-1/2 inches wide. Three strips sewn together make a 6-1/2 inch wide strip of fabric. Cut each strip into 6-1/2 blocks. Each strip gives you six (6) finished blocks. Here I’m cutting one of the strip sets into blocks.

After the blocks are cut, go to your design wall and have fun laying out your quilt blocks. Here is the layout I chose for the jelly roll rail fence quilt. By turning your quilt blocks, you can easily create a zig zag design from identical strip sets.

Sew together either by row or by column. I chose the column method for this quilt since it is easy to remember to shift the next block by 90 degrees. This is sometimes referred to as a vertical row.
Make it quicker by lining up your piles of blocks and sew them in a chain method.

The quilt top has been sewn together and is now ready for quilting.

How many strips should you use for a rail fence quilt block?
You can use as many number of strips as you’d like! I like to use a minimum of three. A two (2) color rail fence is referred to as the Endless Stairs quilt block.
How wide are the strips for a rail fence quilt?
You can make the strips any width you’d like. The key to making a rail fence quilt is to cut the blocks from the strip set the exact width of the strip set. The rail fence quilt design is created by shifting squares 90 degrees.
The block size can be any size – they just need to be square, with even-width strips of fabric.
How do I figure out my fabric requirements for a classic rail fence pattern?
It’s easy even for a beginner quilter to figure out how to make a bed size quilt with rail fence quilt pattern.
First, determine what quilt size you want to make. See our article on sizes of quilts that includes all bed quilt sizes.
Let’s use a twin size quilt as an example. A finished twin quilt is 70-inches x 90-inches. A finished 5-inch square or 10-inch square would be perfect!
Let’s choose a 10-inch square. That means we would need 7 squares across and 9 squares long to make a twin-size quilt, or 63 blocks.
If we do a 5-fabric block, each block will need 5 strips that are 2-1/2 inches wide and 10-1/2 inches long. So, each block needs a total length of 55-inches of fabric.
How much fabric should you buy? Standard quilter fabric is about 40-inches wide. One 2-1/2 inch wide strip at 40-inches wide would give us enough fabric for 3 blocks. We need 63 blocks. That means we’ll need 21 strips of fabric 2-1/2 wide per fabric. That is 52.5 inches of fabric, or about 1-1/4 yards of each of the five fabrics.
Begin by cutting your fabrics into the 2-1/2 inch strips. Then sew the strips together in the order you’d like. Next, cut the strip sets into 10-1/2 inch squares. Then, have fun playing with your design on your wall, table, floor or bed!
Sew the blocks together and then finish your quilt! This is a perfect pattern for quilters of all skill levels.
What are other ideas for rail fence variations?
- Use strips of scrappy fabric to make a scrap quilt.
- Make a baby quilt with some fun baby prints and colors!
- Play around with the layout of the blocks. Find the unique design for your project! There are so many rail fence quilt pattern designs!
- When thinking about your fabric selection, make sure that you have a variety of color values. Light fabrics, medium and dark fabrics – whether they are prints or solids.
- Pick up a few fat quarters and have fun cutting them into strips and making your blocks.
- Make a quick gift of a table runner with 8-10 quilt blocks.
- Take layer cake and cut each block into five (5) 2-inch strips. Sew them back together again. Trim to a square and have fun!
Rail fence quilts are so much fun to make!
Browse through more free quilt patterns on Create Whimsy.
This quilt block is included in our article with popular quilt patterns.


