
A ruana is one of those wonderfully simple garments that looks much harder to make than it really is. You can make one from a rectangle of fabric with just a few cuts, and you don’t need a printed pattern or complicated fitting. A ruana has an open front, drapes over your shoulders and arms, and can be made from fleece, wool, a stable knit, a beautiful piece of yardage, or even a blanket.
Can you make a ruana without a pattern? Yes! The basic ruana is simply a rectangle of fabric with a center-front opening and a small neckline.
What fabric is best for a ruana? Fleece, Melton wool, boiled or felted wool and other stable fabrics that drape nicely are good choices. If the fabric ravels, plan to finish the edges.
How much fabric do you need? For the basic version, use 1-1/4 yards of 60-inch-wide fabric or 60 inches of 45-inch-wide fabric.
Is a ruana easy to sew? Very! The basic version takes only a few cuts and a little edge finishing, if your fabric needs it.
As an Amazon Associate I earn from qualifying purchases. Read more about our affiliate linking policy.
This is a great project when you have a beautiful piece of fabric you want to wear rather than tuck away in your stash. It also makes a lovely handmade gift because there is very little fitting involved.
What You’ll Learn
In this tutorial, you’ll learn:
- how to make a ruana without a printed pattern
- how to measure and cut the fabric
- how to create the center-front opening
- how to shape a simple neckline
- how to decide whether your fabric needs finished edges
- how to customize the length and arm coverage
- how to make a ruana from a blanket or scarf
- simple ways to add a closure or decorative stitching
Quick Start
Want to make one right now? Here’s the short version.
- Choose a fabric with good drape.
- Cut a rectangle approximately 60 inches wide by 45 inches long for the basic version.
- Fold the fabric in half.
- Cut the center-front opening through only the top layer.
- Shape a small neckline.
- Finish the edges if your fabric ravels.
- Try it on and decide whether you want to add a button, pin, ties or decorative stitching.
That’s really it!
What Is a Ruana?
A ruana is a loose outer wrap that drapes over your shoulders and arms. Unlike a poncho, a ruana has an opening down the center front, so you don’t have to pull it over your head.
It is sometimes called a ruana wrap, ruana shawl or ruana cloak. You can wear the front panels straight down, wrap one side over your shoulder, or secure the front with a pin, button, snap or other closure.
One of the best things about a ruana is that there is very little fitting involved. You can make it short, long, wide or narrow to suit the way you like to dress.
What’s the best fabric to make a ruana cloak?
Fabric choice makes a big difference in how your finished ruana looks and feels.
Fleece
Fleece is one of the easiest choices. It is warm, washable and doesn’t ravel, so you can often leave the edges unfinished.
It is especially nice for a casual ruana to wear around the house, at a sporting event or on a chilly evening.
Melton Wool
Melton wool makes a warmer, more polished ruana. Because it is felted, the cut edges generally do not ravel.
It is a wonderful choice if you want a ruana that feels more like a coat or outer layer.
Boiled or Felted Wool
These fabrics are another good choice when you want warmth without spending time hemming every edge.
Stable Knits
A stable sweater knit can make a beautiful soft ruana, but test the fabric first. Some knits stretch easily and may need stabilization or edge finishing.
Cotton and Lightweight Fabrics
A lightweight cotton or other drapey fabric can make a nice summer ruana. This is especially useful when you want a little something over your shoulders in an air-conditioned room.
Because lightweight woven fabrics usually ravel, you’ll need to finish the edges.
Blankets and Lap Robes
Look around your house or thrift shops before buying fabric. A beautiful lap robe or blanket can be an almost-ready-made ruana.
Bonus points if it already has finished edges, fringe or a decorative selvedge!
Before You Cut
Take a few minutes here. It can save you from cutting into the wrong piece of fabric.
- Measure yourself if you want a custom length or arm coverage.
- Wash and dry washable fabric before cutting so it doesn’t shrink later.
- Check which direction the fabric hangs best.
- Look at stripes, plaids and directional prints before deciding where the center front will be.
- Check whether the fabric ravels.
- Test your planned edge finish on a scrap.
- If you’re using an expensive fabric, make a quick test version from inexpensive fabric first.
How Much Fabric Do I Need?
For the basic ruana in this tutorial, use:
- 1-1/4 yards of 60-inch-wide fabric, or
- 60 inches of 45-inch-wide fabric
This creates a simple, comfortable wrap.
Want more arm coverage? Measure from wrist to wrist with your arms stretched out. That measurement can become the width of your ruana.
For the length, measure from the back of your neck to where you’d like the ruana to end. Double that measurement to determine the length of the fabric you need before folding.
A longer ruana is cozy and dramatic, but remember that a very long ruana can be a little cumbersome when you’re getting in and out of the car!
What is the shape of a ruana?
Ruana shawls are generally rectangular, with the width being less than the dimensions from wrist to wrist with your arms outstretched. The length can vary from stopping at your waist to being knee length or below.
Do I need a pattern to make a ruana?
Well, sort of. It’s not a printed pattern. We have our free pattern below with the measurements you’ll need to cut your fabric to make your own ruana.
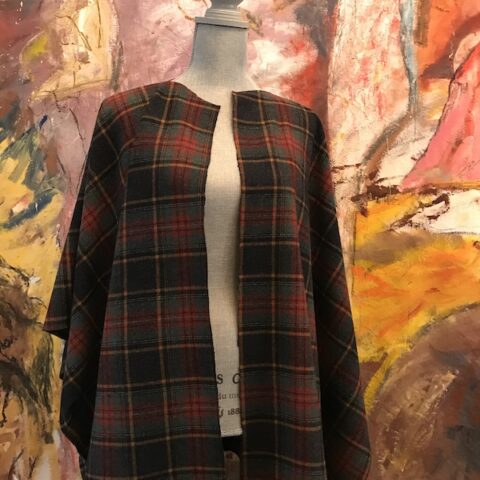
How to Make a Ruana
A ruana is a simple wrap that is perfect on a cool day, or just to put over your shoulders around the house. It is a simple project to make. Finish the edges with a simple zigzag, fancy embroidery or binding -- or if it is a knit fabric that won't ravel, leave the edges raw!
Make a ruana from a lap blanket, piece of wool or heavy knit, or use a nice lightweight cotton for a summer wrap! You'll enjoy the versatility of wearing a ruana. By making your own ruana cloak, you can get exactly what you want!
No pattern is needed for this quick and easy sewing project! All you need is fabric, scissors and something to finish the edge, if needed!
Materials
- 1-1/4 yard of 60-inch wide fabric OR 60 inch length of 45-inch fabric
- Coordinating thread to finish edges
Tools
- Scissors
- Sewing Machine
Instructions
Step 1: Fold the fabric
Fold your fabric in half so your folded piece is 30 inches long by 45 inches wide. Make sure the fabric is lying flat and the edges are aligned before cutting. 
Step 2: Cut the center front opening
Find the center of the folded fabric. Starting at the cut edge to the fold line up the middle of what will be the front of the ruana; this should be 22-1/2 inches from each side. Important: Only cut through the top layer of fabric! This creates the center front opening of the ruana, while leaving the back of the garment intact 
Step 3: Shape the neckline
A small curved or oval opening at the center back makes the ruana more comfortable to wear.
Cut a shallow curve rather than a large opening. You can always make the neckline larger, but you can't put the fabric back!
If you're unsure about the size, make a small opening first and try on the ruana before cutting more.
Step 4: Finish the edges, if needed
If you're using fleece, Melton wool, boiled wool or another fabric that does not ravel, you may be able to leave the edges unfinished.
For a woven fabric that ravels, choose an edge finish such as:
- a turned hem
- bias binding
- a serged edge
- a zigzag stitch
- decorative stitching
This wool blend that I'm using didn't ravel much when I washed it, but I wanted to stabilize the edges with straight stitching 1/4" from the edge.
Step 5: Try on your ruana
Put it on and see how it drapes.
Wear the front panels straight down, or toss one over your shoulder.
This is the fun part because you can immediately see what your fabric has become! 
And, it makes a nice wrap. 
Step 6: Add a closure or embellishment
A ruana does not need a closure, but you can add one if you want the front to stay in place.
Try:
- a large decorative pin
- a button and buttonhole
- a covered button
- a snap
- fabric ties
- hand embroidery
- decorative machine stitching
A beautiful thread and a simple running stitch can turn a plain edge into a design feature.
Recommended Products
As an Amazon Associate and member of other affiliate programs, I earn from qualifying purchases.

Common mistakes when making a ruana
Cutting through both layers > When you make the center-front opening, cut through only the top layer. If you cut through both layers, you’ll create an opening in the back too.
Making the neckline too large > Start small. You can always cut away another little bit.
Choosing fabric that is too stiff > A ruana depends on drape. A very stiff fabric may stand away from your body instead of falling nicely over your shoulders.
Forgetting about fabric direction > Stripes, plaids, and directional prints can look completely different once the ruana is folded and worn.
Lay the fabric out and imagine the finished garment before you make your first cut.
Using a bulky edge finish > A heavy binding or multiple rows of stitching can make the edge stiff. Test your finish on a scrap first.
Skipping a test version > If you’re using expensive wool, cashmere or silk, test the measurements with inexpensive fabric first.
YOU MAY ALSO LIKE: How to make a quilt coat
How to Wear a Ruana
There isn’t just one way to wear a ruana.
Leave both front panels hanging straight for a simple, casual look.
Wrap one front panel across your body and over the opposite shoulder for more warmth.
Secure the front with a large statement pin when you want the ruana to stay in place.
You can also add a button, snap or ties for a more permanent closure.
The beauty of a ruana is that it gives you the warmth of an extra layer without the fitting and construction of a traditional jacket.
How to Make a No-Sew Ruana
Yes, you can make a ruana without sewing if you choose a fabric that doesn’t ravel.
Polar fleece, boiled wool and felted wool are good choices.
Cut the fabric to size, cut the center-front opening and shape the neckline. If the fabric has stable edges, you’re finished.
This makes a particularly quick project for a last-minute gift.
How to make a fleece ruana
Looking for a cozy ruana? Cut out your fleece fabric according to the directions above. And, that’s it! Because fleece does not ravel, you don’t need to do anything else. Fleece ruana wraps are perfect for wrapping up in front of the TV or on the computer.
How to Make a Ruana From a Blanket
A blanket or lap robe can be a wonderful starting point for a ruana.
Look for one that is large enough to provide the coverage you want and has a nice drape.
Even better, use a blanket with finished edges or fringe. You can position those finished edges so they become the outer edges of your ruana, saving you sewing time and preserving the character of the original blanket. (Scroll down to see our ruana made from a lap blanket!)
Wool blankets are especially nice because they can make a warm ruana with very little construction.
How to make a ruana from a scarf
To make a ruana from a scarf, you need a large rectangle or square scarf. Fold in half and mark the true center of the scarf. Find the true center, fold the scarf in half lengthwise and then fold the scarf in half widthwise. The center will be your center back neck. Mark with a removable fabric marker or safety pin.
TIP: straight pins can fall out and can prick you if you try on your cloak while making it.
Unfold width wise. Cut from the bottom of the scarf up to the pin in a straight line. Slightly curve the neck edge as we did above.
If you’d like, finish with a neckline binding.
Finish the edges to your preference. Put on your cloak and enjoy!
What’s the difference between a ruana and a poncho?
A ruana is a version of a poncho and has a center front opening. A poncho has a neck hole and then slips over your head.
With a ruana you can wear it a few different ways. You can wrap the open edge over your shoulder or leave it open.
A poncho has no front opening. Both a poncho and a ruana can be made from a large square of fabric.
What’s the difference between a ruana and a shawl?
A shawl is either a rectangle or square of fabric that is all one piece and wrapped around your shoulders. A ruana can be a rectangle or square, but has a center front slit, which keeps the back fully covered if you choose to wrap one of the sides around your shoulders.
Does a ruana have sleeves?
The ruana covers your arms and keeps them warm (if using heavier fabric), but does not have seamed in sleeves or sleeve closures. The fabric drapes over your shoulders and arms.
Creative Ways to Customize Your Ruana
Once you have the basic shape, there are plenty of ways to make your ruana your own.
Add a decorative edge
Use a contrasting thread and a decorative machine stitch around the outside edge.
Add hand stitching
A simple running stitch in wool yarn, embroidery thread or perle cotton can create a beautiful handmade border.
Add a closure
A large button or fabric-covered button can become the focal point of the front.
RELATED: How to make a fabric covered button
RELATED: How to make a beaded button
RELATED: How to make Dorset buttons
Add ties
Use leftover fabric from the neckline cutout to make simple ties.
Play with fringe
If you’re starting with a blanket, use the existing fringe as part of the finished design.
Change the proportions
Make a short ruana that ends around your waist, a hip-length version for everyday wear or a longer version for extra warmth.
Two more ruana ideas:
Here are two more versions to get you started – one from cashmere yardage and one from a Pendleton wool blanket.
Lynn’s cashmere ruana
I started with a lovely cashmere wool piece I picked up at the ‘Coat Sale’ in Tacoma. The Item House continues as a coat manufacturer based out of Tacoma, WA. They have several sales a year where you can pick up name brand coats for amazing prices . . . and, if you are a sewer, you can pick up amazing fabrics for great prices, too! I picked up this piece of wool at one of their sales and thought it would be perfect for a Ruana!

This is my first version and I measured my arms from wrist to wrist so that the Ruana would keep my arms warm all of the way to my wrists, and measured my preferred length for dresses. Next time, I will probably make the sleeve length closer to 3/4 length and the overall length to about pant coat length. I love it with the full length and full arms — it keeps me warm! But, it is a lot of fabric to get in and out of the car!
It is so easy to make!
- Measure wrist to wrist with your arms outstretched. This will be the width of your fabric.
- Measure your desired length. As I mentioned above, I did my preferred dress length, and will probably make it shorter next time.
- Cut a piece of fabric that is as wide as ‘wrist to wrist’ and the length should be DOUBLE your preferred length.
- Fold the fabric in half by length, then in half widthwise. Now you have your fabric folded in 1/4’s. Where the folds intersect will be your ruana’s center – your neck placement.
- Cut up the fold from edge to center ON THE LENGTH. This will be your center front.
- I then took my favorite pattern and rounded out the back and front necklines.
If you have a stable fabric, you are done! I had pre washed my wool so it was not going to ravel, but I was worried that it might stretch out. So I did a stabilizing stitch about 1/4″ from the edge — all around the Ruana. Then I took a hand dyed yarn I found at Coastal Yarns in Cannon Beach, Oregon, and did a running stitch around the outside edges of the ruana.
- Tips:
- Use fabrics that won’t ravel – a tightly woven or a nonwoven work well. If you use a woven, you’ll need to finish your edges by either turning under, adding a binding or serging.
- Add some hand or machine stitching to embellish the edges. I love the way the neckline folds back and accentuates the stitching.

Chardel’s lap robe ruana
I was starting from scratch when I got a class assignment to make a ruana and I didn’t know what that was! After looking it up, I decided to go from Lap Robe to Ruana.
To make my wrap/cape/poncho (which I now know to be a ruana), I started with a Pendleton wool lap robe that I purchased some time ago at the Sewing and Stitchery Expo in Puyallup, Washington. I loved the subtle palette and knew I wanted to make something with it – I just didn’t know what – until I got this assignment. The “blanket” was a nice weight for comfort and draping with four finished sides – two with woven selvedge and two with bonus fringe!
I had the neck and opening edges to finish, so I congratulated myself for purchasing wool felt binding in 5-yard lengths (also at the Pendleton booth). Then I sewed this with a decorative stitch and variegated thread that finished the piece nicely.
Construction was easy – slice a 5-inch strip up the middle for the front opening and round out the neck. Then I used the cutout piece to make ties and a gathered back treatment. I had just a 5-inch by 7-inch piece leftover, so this project was a very efficient use of a beautiful fabric.]
Here is a front view of my finished ruana. It began life as a wool lap robe. I like the subtle stripes at both ends and along one side. I like to refer to it as my blanket wrap! Perfect to wear in the cold climate.
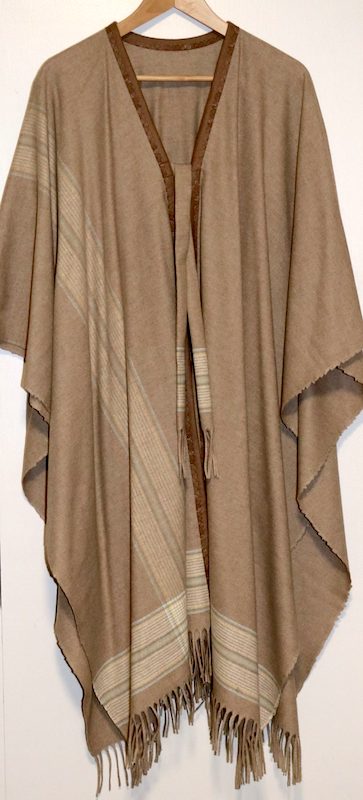
I left the selvedge on the sides unfinished. The uneven look appeals to me, and not adding to these edges maintained a softer drape for the “sleeves”.

I didn’t like the way the back looked plain. “Does this make my butt look big?” The answer was a resounding yes! So I added some gathers.

Here’s the back treatment up close. By adding this small gathered section, I can pretend to have a waist. 🙂 Then a scrap piece of the center cutout covers the gathering stitches.

The ties are simply tubes I made from the cutout center section. The size of the leftover piece determined the size of the ties. So it was all very scientific.
The Bernina #10 edgestitch foot is my favorite because it kept me right on track with a decorative stitch on the wool felt binding.

Frequently asked questions
A ruana is a loose outer wrap with an opening down the center front. It drapes over the shoulders and arms without having sewn-in sleeves.
No. The basic ruana is made from a rectangle of fabric with a center-front opening and a small neckline. You can use the measurements in this tutorial instead of a printed pattern.
For the basic version, use 1-1/4 yards of 60-inch-wide fabric or 60 inches of 45-inch-wide fabric. For a custom ruana, measure your desired width and length before cutting.
Fleece, Melton wool, boiled wool and felted wool are especially easy because they generally don’t require edge finishing. You can also use stable knits, cotton, silk and other fabrics as long as you choose an edge finish appropriate for the fabric.
Yes. Use a fabric that doesn’t ravel, such as fleece, boiled wool or felted wool. Cut the fabric and shape the openings, and you’re done.
Absolutely. A blanket or lap robe can be an excellent starting point, especially if it already has finished edges, fringe or a decorative border.
Yes. A large rectangular or square scarf can be cut to create a center-front opening and neckline. It’s a great way to give a scarf a new life.
No sewn-in sleeves are needed. The fabric drapes over your shoulders and arms, giving you arm coverage without sleeve construction.
A ruana has an open center front, while a traditional poncho is pulled over your head and has an opening for your neck.
A shawl is generally one piece of fabric that you wrap around your shoulders. A ruana has a center-front opening, which makes it easier to put on and gives you several ways to wear it.
The best finish depends on your fabric. Fleece and felted wool can often be left raw. Woven fabrics can be hemmed, bound, serged or finished with a zigzag or decorative stitch.
Ready to make one?
A ruana is one of those projects that gives you a lot of finished garment for very little sewing. There is no complicated pattern to cut out, no sleeves to set in and very little fitting to worry about.
Start with a fabric you love. A piece of wool, a cozy fleece, a beautiful blanket or that special fabric you’ve been saving can all become something you’ll actually wear.
Make the basic version first, then have fun with the next one. Change the length, add a beautiful button, stitch a decorative border or let the fabric’s own fringe become part of the design.
Sometimes the simplest garment is the one that gets worn the most.
Browse through other tips and tricks to making garments on Create Whimsy.

