

Fabric yo-yos are one of my favorite ways to use fabric scraps. They are easy to make, require only a needle and thread, and are small enough to take with you anywhere. Learn how to make fabric yo-yos, also called Suffolk puffs, with this simple step-by-step tutorial.
How do you make a fabric yo-yo?
Cut a fabric circle, turn the raw edge under, and sew around the edge with a running stitch. Pull the thread to gather the circle into the center, shape the yo-yo and knot the thread.
What size fabric circle do I need for a yo-yo?
Start with a circle about twice the diameter of the finished yo-yo, plus a little extra for the turned edge. For example, a 5-inch fabric circle makes a yo-yo about 2½ inches across.
What fabric is best for fabric yo-yos?
Quilting cotton is an excellent choice because it is easy to fold and hand sew. Lightweight fabrics such as silk also work, while tightly woven fabrics can be more difficult to gather.
What can you make with fabric yo-yos?
Make an entire yo-yo quilt, or use individual yo-yos as flowers and embellishments on pillows, clothing, bags, postcards, art quilts and other sewing projects.
As an Amazon Associate I earn from qualifying purchases. Read more about our affiliate linking policy.
What you’ll learn
- How to cut fabric circles for yo-yos
- How to make a fabric yo-yo by hand
- How stitch length changes the center opening
- How to choose fabric and thread
- How to join yo-yos together
- How to use fabric yo-yos in quilts and other sewing projects
- How to troubleshoot common yo-yo problems
Quick start: Make a fabric yo-yo
Want to start stitching? You don’t need a special kit.
Grab:
- A scrap of fabric
- A circular template
- Needle
- Strong thread
- Scissors
- A removable fabric marker
Trace a circle on the wrong side of your fabric and cut it out. Turn the raw edge under about ¼ inch and stitch around the circle with a running stitch. When you reach the starting point, gently pull the thread to gather the fabric. Shape the yo-yo, knot the thread and trim the excess.
That’s it. You made a fabric yo-yo!
If you have a stack of circles already cut, this makes a wonderful portable hand-sewing project. Keep a little project bag nearby for stitching while watching television, traveling, waiting for an appointment or sitting outside.
Fabric yo-yo size chart
The finished yo-yo will be approximately half the diameter of the starting fabric circle. Your actual finished size will vary a little depending on the fabric, seam allowance and how tightly you gather it.
Note: The size is approximate, as fabric weight, seam allowance, and gathering tension will all affect the final size.
| Approximate finished size | Start with |
| 1 inch | 2-1/2 inch circle |
| 1-1/2 inch | 3-1/2 inch circle |
| 2 inches | 4-1/2 inch circle |
| 2-1/2 inches | 5-1/2 inch circle |
| 3-1/2 inches | 6-1/2 inch circle |
| 4 inches | 8-1/2 inch circle |
What are fabric yo-yos?
A fabric yo-yo is a gathered circle of fabric with the raw edges turned toward the center. Once the thread is pulled, the fabric gathers into a small round shape.
You may also hear them called Suffolk puffs.
They are especially useful for scrap fabric because you can make them from relatively small pieces of fabric. They can be sewn together to make a quilt, or used individually as decorative elements.
History of yo-yo quilts
I have a passion for vintage linens and quilts, so naturally I have a soft spot for yo-yo quilts. Here is a close-up of a vintage yo-yo quilt I acquired years ago.
Even though the yo-yos are only about 2 inches across, some of the original fabrics were pieced. Most of the fabrics are feed sack fabrics, which makes this little quilt a wonderful piece of textile history.
Yo-yo quilts have been around for over a century. Here is a close-up of a vintage yo-yo quilt that I acquired years ago. (If you didn’t already know, I have a passion for vintage linens and quilts!). In looking at the details, even though the yo-yos are only about 2-inches in diameter, some of the fabrics have been pieced. Most of the fabrics are feed sack fabrics, which became popular in the late 1800s.

If you can sew a basic running stitch, you can make a yo-yo quilt! Here is our tutorial:
How to Make a Yo-Yo Quilt
Learn how to make a yo-yo and then stitch them together in this article.
Pack a small project bag with circles you have already cut out, coordinating threads, a needle, and a small pair of scissors. Keep the bag handy for TV time, dr. appointments or a project to sit on the patio and listen to the birds!
Materials
- Fabric scraps
- Circle template, small plate, or cardboard cut into a circle
- Coordinating thread
Tools
- Hand-sewing needle
- Small embroidery scissors
- Scissors to cut circles of fabric; OPTIONAL: rotary cutter. If using a rotary cutter I suggest using a turntable cutting mat. I like this rotating cutting mat: https://amzn.to/4qnYEjn
- Removable fabric marker; for dark fabrics, use a white chalk pencil or a white Clover removable pen
Instructions
Step 1: Choose and trace your circle
I have several sizes of these acrylic circle templates from my scrapbooking days. They are perfect to use for cutting fabric circles to make yo-yos. They are 5-inches in diameter, which makes about 2-1/2 inch finished yo-yo.
You don't need a special acrylic template; you can use a round plate or bowl, or cut a circle from a piece of cardboard for a cardboard template. 
Step 2: Cut out your fabric circles
Mark your circle and then cut it out. I find using scissors is easy - a perfect TV project!
If your fabric is dark, use a white chalk pencil or a Clover white removable pen.
The only supplies you need are your cut-out circles, needle, thread, and scissors to cut your thread. 
Step 3: Turn raw edge under and sew
Double your thread and knot the end. a one-yard length of thread results in an 18-inch length to sew with. That will sew about four yo-yos.
Turn about 1/4-inch of the raw edge of the fabric to the wrong side of your fabric. Begin stitching with long running stitches. My stitches are about 3/4 inch to 1 inch. Bigger stitches look better and are super quick and easy!
Here are a few stitches in place. 
Step 4: Stitch around the circle
Stitch all around the circle, bringing your needle back up at the starting point. This will make a nice even gather to the yo-yo. 
Step 5: Gather the yo-yo
Begin pulling your thread, gathering the yo-yo so that the right side of the fabric is out and your folded edge turns to the inside.
Keep pulling gently (you don't want to break the thread) until the folded edges all meet. 
Step 6: Shape the yo-yo, knot and finish
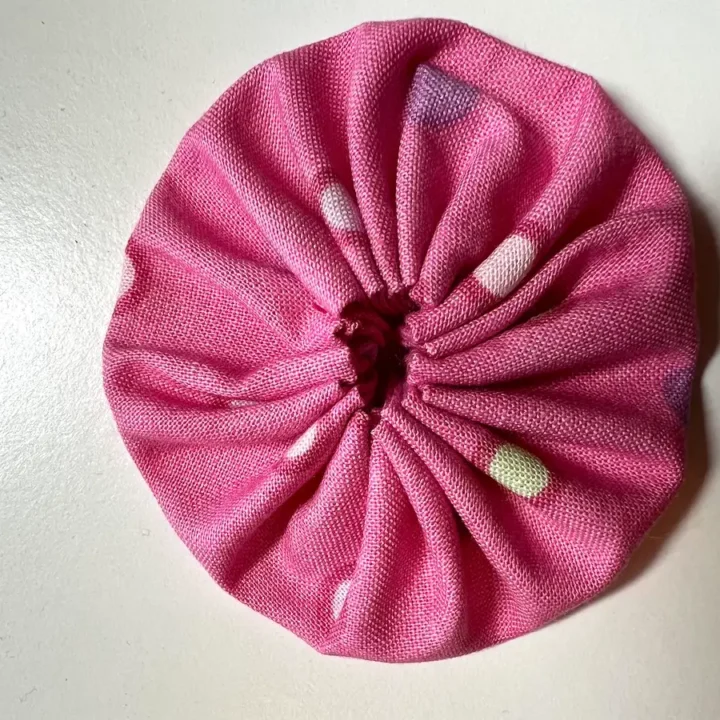
Finger press the folds into place and center where they all come together. When you are happy with the way your yo-yo looks, knot your gathers in place. 
Cut your thread and you have a finished yo-yo! 
Here are the front and back of a finished yo-yo.
Recommended Products
As an Amazon Associate and member of other affiliate programs, I earn from qualifying purchases.

Common mistakes
The thread keeps breaking. > Use a strong thread and avoid pulling the gathers too aggressively. A doubled polyester thread works well.
The center hole is too large. > Use longer running stitches. Fewer stitches mean fewer gathers and a smaller center opening.
The yo-yo is lumpy or uneven. > Make your running stitches reasonably even and pull the gathering thread gradually rather than all at once.
The finished yo-yos are different sizes. > Start with circles cut from the same template. If size consistency matters, a commercial yo-yo maker can help.
The fabric is difficult to gather. > Thicker fabrics can be harder to sew and gather by hand. Start with quilting cotton if you’re learning.
The thread breaks when I pull it. > Don’t yank it. Gather the fabric gradually around the circle and use a strong thread. I like to use a polyester thread. If you continue to have the issue, you can double your thread.
The center looks messy. > After gathering, take a moment to arrange the folds with your fingers. You don’t need every gather to be identical, but distributing them evenly will give you a more balanced yo-yo.

How to join fabric yo-yos
Once you have a pile of yo-yos, you can start joining them together.
Place two yo-yos next to each other and decide how you want them positioned. From the back of the yo-yos, use a whipstitch to join the edges together.
Join individual yo-yos into rows, then join the rows together.
For a detailed look at this hand stitch, see our tutorial on how to whipstitch.
How stitch length changes a yo-yo
Stitch length matters! The yo-yo on the left is made with about a 3/8 inch stitch, the fabric yo-yo on the right is made with a 3/4-inch stitch. See how the small hole is smaller with the larger stitch length? This is because there are fewer gathers to pull together at the center of the yo-yo.
Stitch length makes a bigger difference than you might expect.
Longer stitches create a smaller center opening.
Shorter stitches create a larger center opening.
This is because shorter stitches create more gathers around the circumference.
If you want to add a button or another yo-yo to the center, experiment with shorter stitches to create a larger opening.
If you want a tightly gathered center, use longer stitches.
Make a couple of test yo-yos before cutting a large batch. It’s an easy way to find the look you like.

How to make a yo-yo quilt
A yo-yo quilt is made by joining lots of individual fabric yo-yos together.
You can make your quilt completely scrappy, use a controlled color palette, or arrange your yo-yos in a planned color pattern.
You don’t have to make the entire quilt at once. That’s part of the charm.
Make a few yo-yos whenever you have a little hand-sewing time. Keep them in a basket or project bag. When you have enough, start joining them together.
A yo-yo quilt is also a great way to use fabrics that are too small for conventional patchwork.
Tips and ideas for making a yo-yo quilt
Use a strong thread, like a 100% polyester thread. You don’t want your thread breaking! I used it doubled for extra strength.
I find it easy to turn the edge of the fabric while I’m hand sewing. If you don’t feel comfortable with that, use WonderClips or hair clips to hold the turned fabric while you sew.
You can make your yo-yo quilt scrappy, or planned. It can use a color theme, like all pinks and reds, or be really scrappy! By using fabric scraps, usually the fabrics will go together – each of us has a preferred color palette!
Yes, they make yo-yo makers in a few sizes. I find they are more difficult than the traditional method of making yo-yos that I outlined above. And, the bonus of making your own is you can make them any size! Your finished yo-yo will be slightly smaller than half the the diameter of your starting circle of fabric. Easy!

What fabrics are best for making yo-yos?
Quilting cotton is an excellent choice for fabric yo-yos. It is easy to fold, stitch and gather.
Lightweight fabrics can work beautifully, too. Silk makes lovely yo-yos, although slippery fabric can be more challenging to handle.
Very tightly woven fabrics, including some batiks, can be more difficult to sew by hand and gather.
If you’re making your first yo-yos, start with ordinary quilting cotton. Once you know how the technique works, experiment with other fabrics.
What thread should you use?
Use a strong thread that won’t break when you pull the fabric gathers together.
A good-quality 100% polyester thread works well. I like to use it doubled for extra strength.
If you are working with a heavier fabric, choose a thread that can handle the fabric without breaking.
Should I buy a yo-yo maker?
You can absolutely make fabric yo-yos without a yo-yo maker. That’s the traditional method shown in this tutorial.
Commercial yo-yo makers are useful when you want a large number of yo-yos that are exactly the same size.
They can also be helpful when working with slippery fabrics such as silk.
If you are interested, invest in the Clover brand yo-yo makers. They make it easy to make yo-yos from slippery fabrics like silk. It’s a bit slower, but worth it for working with silk.
The trade-off is that each yo-yo maker creates a specific size. When you make your own cardboard or household-object template, you can make yo-yos in almost any size you want.
Can I make yo-yos with my sewing machine?
Yes, but I prefer making them by hand.
That’s part of the appeal. You don’t need perfect accuracy, and a finished yo-yo can be made in about 5 to 10 minutes once you get into a rhythm.
If you want to experiment with a sewing machine, use a long straight stitch and sew around the folded edge. Then pull the stitching to gather the fabric.
For me, though, this is one of those projects where the needle, thread and a comfortable chair are enough.

Fabric yo-yo project ideas
The first thing everyone thinks of is a traditional yo-yo quilt that is perfect as a light weight or summer quilt. But, yo-yos aren’t just for quilting projects!
Once you know how to make fabric yo-yos, don’t stop at quilts!
Here are some of my favorite ways to use them:
Make a yo-yo pillow
Join yo-yos into a square or rectangle and use them as the decorative front of a pillow cover.
Related: Learn how to make a DIY throw pillow.
Make a yo-yo table runner
Join yo-yos into a long rectangle to create a playful table runner.
Related: How to make a table runner.
Add yo-yos to clothing
Use individual yo-yos as flowers or sew a row of yo-yos along a cuff, neckline or button placket.
Make yo-yo flowers
Add a button, bead or smaller yo-yo to the center to turn a yo-yo into a flower.
Add yo-yos to an art quilt
A yo-yo can add dimension and texture to an art quilt. Try using several sizes for even more visual interest.
Make a fabric postcard
Use yo-yos as flowers or other dimensional elements on a quilted fabric postcard.
Related: Learn how to make quilted fabric postcards and how to finish their edges.
Make small accessories
A single yo-yo can become a hair accessory, pin, ornament or other small embellishment.
More scrap-fabric projects
If your scrap basket is getting a little too enthusiastic, Create Whimsy has plenty of ways to use it.
Try crumb quilting when you have tiny pieces that are too small for traditional patchwork. Or explore our collection of scrap fabric sewing projects for more ideas.
If you enjoy hand stitching, you might also like slow stitching, another wonderful way to keep your hands busy while letting your mind wander.
Frequently asked questions about fabric yo-yos
Fabric yo-yos are also called Suffolk puffs. They are made by gathering a circle of fabric toward the center with a running stitch.
As a starting point, use a circle about twice the diameter of the finished yo-yo, plus a little extra for the turned edge. A 5-inch fabric circle makes a yo-yo about 2½ inches across.
You can experiment with many fabrics, but quilting cotton is one of the easiest choices. Thicker fabrics can be harder to hand sew and gather.
Use longer running stitches around the circle. This creates fewer gathers and results in a smaller center opening.
Use shorter running stitches. More stitches create more gathers and a larger opening in the center.
No. A yo-yo maker is optional. You can use a cardboard circle, plate, bowl or another round object as your template.
Yes, although hand sewing is the traditional method and is easy to take with you. If using a machine, use a long straight stitch and gather the stitching afterward.
Place the yo-yos next to each other and whipstitch them together from the back. Join individual yo-yos into rows, then join the rows together.
Absolutely. You only need to know a basic running stitch, and the process doesn’t require precise piecing or a sewing machine.
Ready to make a few?
Pull out your scrap basket and find a fabric you love. Cut a circle, thread a needle and make one yo-yo.
Then make another.
And another.
Before long, you’ll have a little pile of fabric circles ready to become a quilt, pillow, table runner, art quilt or whatever else your imagination comes up with.
That’s the beauty of yo-yos: you can make one in a few minutes, put it away, and pick it up again whenever you have a little time for hand stitching.
Browse through more how to quilt articles on Create Whimsy.


