Tubular Herringbone (sometimes called Ndebele) stitch creates sinuous beaded ropes that await your creativity to design bracelets, necklaces and more. It can be a fussy stitch to get started, but I’ll show you how with different colored beads so you can see the herringbone pattern develop.

How to Bead Tubular Herringbone Stitch
Learn how to make tubular herringbone beaded jewelry with our step-by-step photo tutorial.
Materials
- Beads, I am using three (3) colors of size 8 cylinder (Delica) beads so that it is easier to see in the instructions. Different shapes and sizes create different effects.
- Beading needles
- S-Lon beading thread
Tools
- Beading mat
- Scissors to cut your thread
Instructions
- Start by gathering your supplies, beads, beading needle and thread. I like English beading needs and use size 12 most of the time. For beading thread, I'm using S-Lon nylon beading thread in a contrasting color to make the steps more visible. Unless the thread is part of your design, a neutral or matching thread will work better in your projects. In addition to S-Lon, there are other good brands of nylon beading thread: One-G, Nymo and Silamide are a few.

- To begin, thread your needle with about 4 feet of thread (less if you are just making a practice sample).
Herringbone Stitch begins with a bead ladder. A 2-row ladder is easier to hold on to than a single row, so we’ll start that way. With your first color, pick up 4 beads, and go back through all 4, creating a beaded loop.
Pull the thread taut to create a stack of beads that is 2 beads wide by 2 beads high. If you are practicing with larger beads, you may need to go through the beads one more time to stabilize your stack.
- Pick up 2 beads of your next color. Pass the needle down through the previous 2 beads and back up through the 2 beads you just added and pull taut.

- In the same fashion, add 2 more of your second color beads. Pull taut. You now have 4 “rungs” on your ladder.

- Now add your third color bead, 2 at a time, until you have a ladder with 6 rungs.

- To bring the ends together and begin your tube, go back up through your first 2 beads and down through the last 2 beads. Come back up one more time through the first 2 beads to reinforce the connection. Your ladder stitch tube base is complete.

- For the next row, pick up 2 beads of your first color. (It should match the bead that your thread is exiting. Go down through the next matching bead (just one!) and pull taut.

- Go up through the next bead over in the same row. It will be a second color bead.

- Pick up 2 second color beads, go down through the next matching bead (just one!), then up through the next bead over.
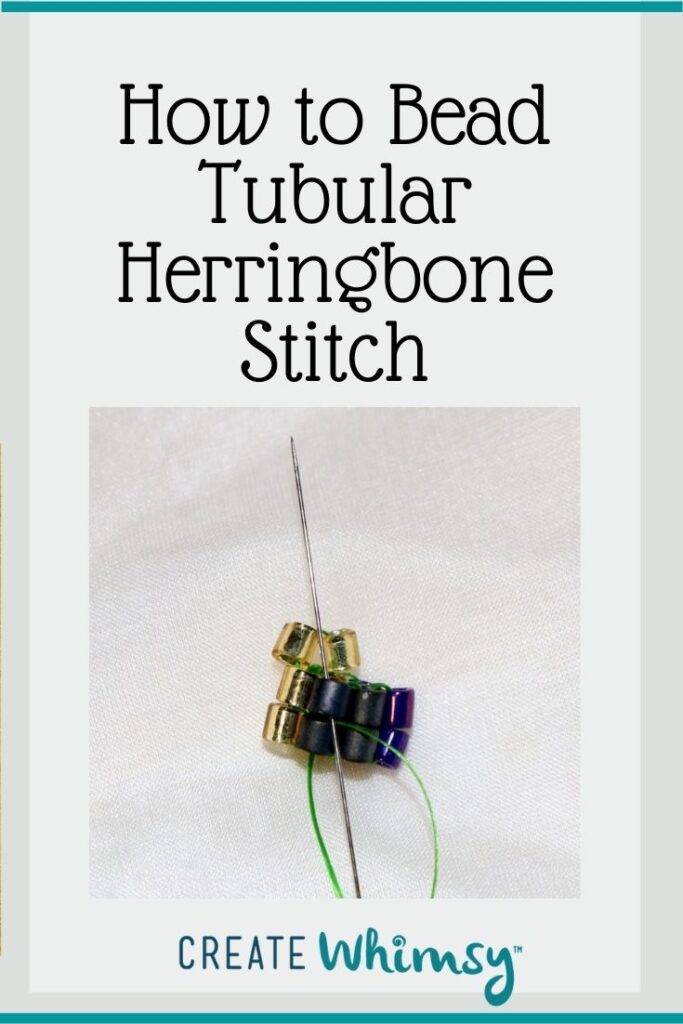
Just like before, pick up 2 beads of your third color and stitch down through the next matching bead. Now you will “step up”. To step up, go back up through the next bead AND the bead above it. Then pull taut. Can you see the herringbone pattern begin to form is the last row you stitched?
- Continue adding beads, 2 at a time, stepping up at the end of each row until you have the length of tubular herringbone rope you want. You can see how the thread pulls the ends of the beads together to form the herringbone pattern.
Once you get the first few rows of tubular herringbone started, it builds a rope pretty quickly, and you can get into a stitching rhythm. Just remember to step up when you begin the next row, or your pattern will begin to twist.
Recommended Products
As an Amazon Associate and member of other affiliate programs, I earn from qualifying purchases.


Some Tubular Herringbone Projects:
Now you can have some fun with this stitch! Different combinations of bead shapes, sizes and colors produce tubular herringbone ropes with unique looks. You can make an elegant monochromatic chain or create interesting patterns – it’s all up to you!
As an Amazon Associate I earn from qualifying purchases. Read more about our affiliate linking policy.
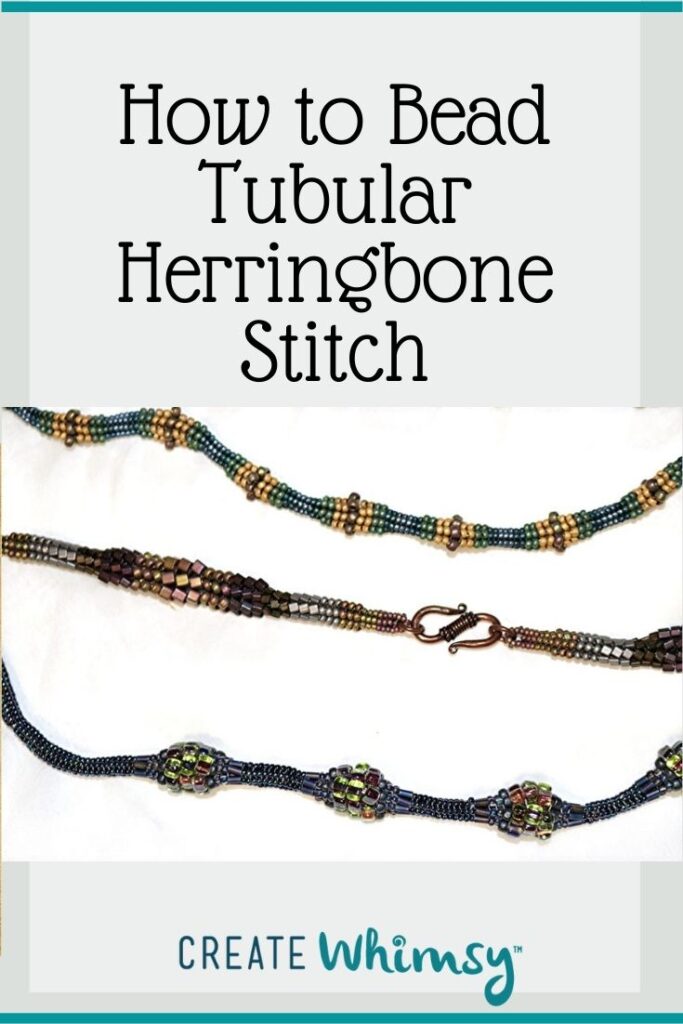
Different sized beads produce the unique shape of Graduated Herringbone Ropes. The same stitch produced all of these necklaces. But bead selection gives each a different mood – earthy, metallic, or shiny. Then the size and shape of each row determines its thickness. The “earthy” rope contains round beads from sizes 15 to 8. The “metallic” necklace had beads from size 15 rounds to 4mm squares – the edges of the squares rest next to each other, flattening the rope at its widest points. The “shiny” version starts with size 15 rounds and works up to size 5 triangles.
Stitch long stretches of the same bead or make frequent changes while you stitch. Beads of different sizes change the look with exactly the same stitch! Keep the changes and patterns subtle or have a blast with wild contrast. Or use the same color throughout for a classic look. Finish your necklace with a clasp, or stitch the ends together (as long as it fits over your head)!

Herringbone-stitched rope made with matte size 11 sharp-edged triangle beads looks almost snake-like and wears with a comfortable drape. I made the rope, then dressed up parts of it by embellishing with freshwater pearls and size 15 seed beads. If you have ever wondered what to do with triangle beads, a herringbone rope is a good place to start. The sides of the beads turn naturally to nest two sides on the interior of the rope. So this leaves one smooth surface on the outside.

Bangle bracelets are fun and much quicker than necklaces! Size 11 seed beads form a bangle that rolls on and off easily. I included one section of what appears to be a beaded bead, but it is simply a continuation of the tubular herringbone stitch using different sizes, shapes and colors of beads.

Design Play: Embellished Beaded Herringbone Necklace with Peyote and Fringe Focal
This embellished beaded herringbone necklace was so much fun to make! I used several different techniques to achieve the look I visualized.
I started by doing a herringbone-stitched rope made with matte size 11 sharp-edged triangle beads. That makes it look almost snake-like, yet it wears with a comfortable drape.
This began as the necklace pictured above, but I dressed this one up with a striped tube of peyote-stitched cylinder beads that I embellished along two or three rows with random-length fringe stitched with seed beads, freshwater pearls, and Swarovski Crystals. I first stitched the peyote tube around the herringbone rope, then added the fringe. The pearl and size 15 seed bead embellishment extends about four inches on each side of the peyote and fringe focal point on the center front of the necklace.

More Design Play: Herringbone Bibble-de-Bobs Beaded Necklace
A piece that can be both dressy and casual, Herringbone Bibble-de-Bobs Beaded Necklace is a clasp-free continuous rope. It’s so easy to take on and off without a clasp – just slip it over my head. At 26 inches long, it handles that easily, even over a hat (as long as the hat doesn’t have a wide brim).
Playing with different sizes and shapes of beads forms the bibble-de-bobs that add visual interest and a pop of color. I left the back of the necklace plain because I wanted it to rest smoothly on back of my neck. That helps keep the decorative elements in front where I want them. The main part of the rope is a very pale pink – so pale it’s almost a neutral!
Size 11 seed beads achieve a nice balance between delicate and bold in the long portions. The individual beads are small but make a statement when combined. Copper is a dominant color with the largest size 5 beads at the center of each bobble. Golden size 5 triangle beads are on either side of the copper beads. The next beads are size 8 seed beads that reflect the gold along with a touch of green and blue, depending on how the light hits the necklace. A row of shiny brown Czech glass cut beads in size 10 are next. Two rows of size 10 triangle beads that pick up the gold, green and blue mark the transition between rope and bibble-de-bob.

How do you add thread to tubular herringbone?
Chances are, if you are beading tubular herringbone for something longer than a bracelet, you will need to add thread to continue beading your project and hide the end of the thread you are no longer using. Some beaders like to weave in the old thread end, then begin a new thread. Others like to start a new thread first to make sure it exits the same bead as the original thread and then weave in the old thread tail to hide it.
Here’s what I do: When you are left with a thread tail of about 6-8 inches (or at a natural stopping point in your pattern), leave the old thread tail in place and thread your needle with a new length of thread. Beginning about 6 rows from the last row you stitched, put your needle through 2 or 3 beads. Weave the thread in and out of adjoining beads, making sure that the thread path crosses itself at least once. When the new thread is secure, weave it through the beads until it exits the same bead as the original thread. Now thread the old thread end into the needle and weave that thread back and forth into your work, crossing itself at least once. Remove the needle and trim both of the woven thread ends close to the beadwork. Continue stitching your tubular herringbone pattern with the new thread.
Browse through more beading projects and inspiration on Create Whimsy.