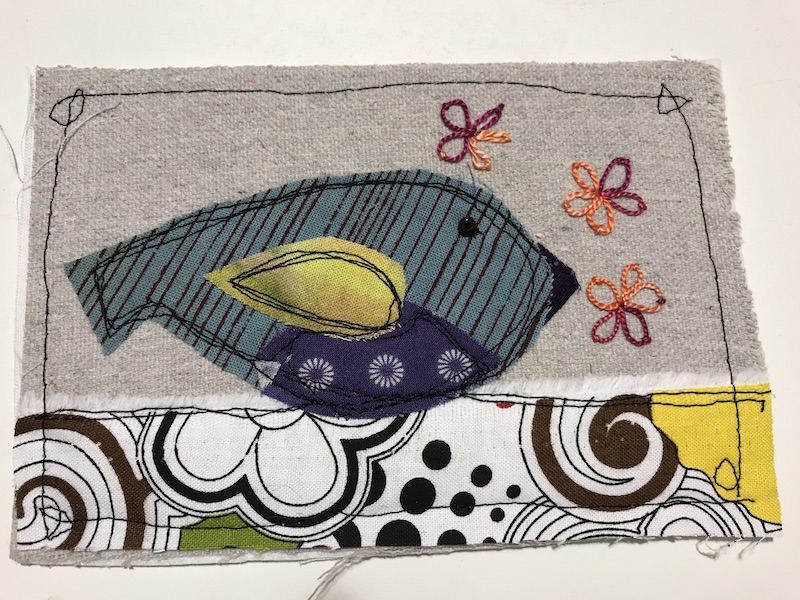
I love using my scraps of fabric to make little cards and works of art to give as gifts. I’ve been an avid fuser for a long time, thanks to Laura Wasilowski for giving me permission to fuse! As I was adding the interview with Cas Holmes on the site, I was enamored with her work – I needed to learn more. Off to Amazon to buy three of her books. She uses diluted wallpaper paste to work on her collages. Needing to learn more, I started playing. Here is how to make a raw edge appliqué collage with wallpaper paste.
The type of wallpaper paste is important. Find one without any PVC or acrylic. Cas recommends methyl celloulose based. Lineco makes a neutral PH adhesive that works perfectly for this method.
The consistency of the diluted paste is important. Too thick, and it bulks up when it dries, too thin and the pieces might come loose while you manipulate them. Then, there is just right. It didn’t take me long to get that right consistency. Watch the video below and you can see the viscosity that works well for me. My ratio is about 2 parts water and 1 part paste.

How to Collage with Wallpaper Paste
Learn how to collage with wallpaper paste and make a small piece of fiber art.
Materials
- Wallpaper paste or PH neutral glue like Lineco
- Fabric scraps to make a collage
Tools
- Bowl to mix wallpaper paste and water
- Paint brush
- Scissors
- Plastic mat or vinyl table cloth to work on
Instructions
- Start by wetting your background fabric with a light coating of the diluted wallpaper paste. See above for notes on how to dilute the wallpaper paste.

- Next, start having fun and add your elements to your collage. I'm making some little bird cards to send to friends and family. I started with a strip of fabric as the ground.

- After you put each piece down on the background, put another layer of the diluted wallpaper paste on top.
What is great with this method of collage is that you can easily pick up and move the pieces around while wet, and when dry you can easily peel them up if you change your mind! With fusing, you are pretty much committed once you take the iron to your work.
Here I've added the little bird body.
- Next, I added a belly for the bird. Again, with each addition apply just a light brush of the diluted wallpaper paste.

- Then, I added a wing. I like to really vary the fabrics and size of the design to add more visual interest.

- Now it is time to add a little beak. No scrap is too small when you begin working in this method!

- Let this dry overnight. I have tried doing the collage work early in the day thinking I would be able to work on them later in the day, but they were still a little damp.
After the collage is dry, I like to thread sketch around the pieces to add character and hold down the piece of fabric for good. Then, add a little hand stitching. On these cards, I added some lazy daisy's.
Here are pictures of the finished cards. I worked them in batch mode and made fifteen of them to send out. A little bit of love and good thoughts were put into each one of them!
- After the embroidery and stitching are all done, I fused the pieces to TimTex with white muslin on the back to be able to write a little note.

- Then, trim the cards and finish the edges - and they are ready to either mail as fiber postcards, or protect them with an envelope.

Recommended Products
As an Amazon Associate and member of other affiliate programs, I earn from qualifying purchases.
As an Amazon Associate I earn from qualifying purchases. Read more about our affiliate linking policy.


Can you use wallpaper paste to collage?
Yes! Diluted wallpaper paste is an economical way to do collage with paper or textiles. Some people dilute clear drying glue, but with wallpaper paste it is easy to peel off textiles that might not be working and adjust your collage piece – even when it is dry.
Look for a wallpaper paste without PVC or acrylic. Or, use Lineco PH negative glue with the same method of adding water to dilute it.
This is a great technique for raw edge appliqué project with textiles. The paste gives the fabric a bit of stability and the edges of the fabric are less likely to begin to ravel.
Once you try this technique, you will use it in other forms of your textile and fiber arts. It’s fun and easy! It’s great for laying out elements for raw edge machine appliqué on clothes, home dec items as well as fiber and textile art pieces.
Browse through more collage inspiration and projects on Create Whimsy.


