The Bear’s Paw quilt block is popular in both traditional and modern quilting. It uses the basic quilting building blocks of squares, rectangles and half square triangles. You can make this quilt block in two (2), three (3) or (4) colors. We are showing you a step-by-step tutorial on how to make the Bear’s Paw quilt block using three (3) colors.
Ruth Finley first mentioned the Bear’s Paw in Old Patchwork Quilts and the Women Who Made Them in 1929. Other names are Bear Paw, Duck’s Foot in the Mud, Hand of Friendship, Tea Leaf Design, The Best Friend, Cat’s Paw, Batsche, Small Hand and Illinois Turkey Track. The popular block looks complex but is a terrific block for beginners because it uses fundamental quilting building blocks. This is sometimes referred to as a bear claw quilt block.
There are several variations that can be made in two, three or four colors. Here is a three (3) layout for fabrics, which we use in our step-by-step tutorial with photos.

If you’d like to go with only two (2) colors, the big paw blocks can be the same color as the half square triangle claws.

And, make four (4) colors by switching out the center square.
As an Amazon Associate I earn from qualifying purchases. Read more about our affiliate linking policy.

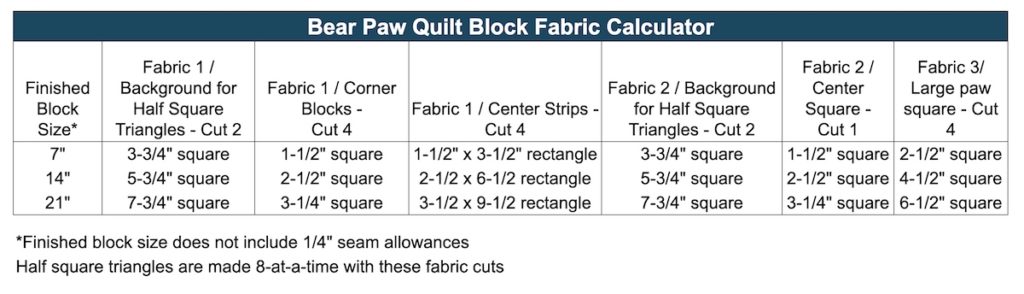
Here is a fabric calculator to help you cut the fabric pieces you’ll need to make one Bear’s Paw quilt block:
Here are step-by-step instructions for a classic bear paw quilt block:

How to Make a Bear's Paw Quilt Block
The Bear's Paw quilt block is a classic block, first documented in 1929, made from half square triangles, squares and rectangles.
It's a perfect block for beginners wanting to get more practice when making half square triangles.
This step-by-step tutorial, with pictures, uses the eight-at-at-time method for making the half square triangles.
We are making the 12-inch block. The directions are the same for all sizes.
Materials
- 1/4 yard of each fabric used, or fat quarter
- Thread
Tools
- Sewing machine
- Iron
- Ironing board
- Cutting mat
- Rotary cutter
- Quilters ruler
- Marking pen or pencil, I used a Frixion pen
Instructions
- Start by cutting your fabrics according to the fabric calculator above.

- Next, make the half square triangles. We'll use the eight-at-a-time method for making our hst units. For more ways to make half square triangles, check out our article on 7 Ways to Make Half Square Triangles. Mark diagonal lines in both directions on the wrong side of your lightest fabric that you are using to make your half square triangle.

- With fabrcs right sides together, sew 1/4" from the marked line one direction. Tip: Use a special 1/4" foot for your sewing machine - it will make your life easier. For Bernina, that is foot #57 or #37.

- Turn and sew 1/4" on the other side of that same marked line.

- Now turn 90 degrees and sew 1/4" on both sides of the other marked line.
 Do this two times, for both of the squares we've cut to make half square triangles.
 - Next we cut this into our half square triangles. Don't cut on those marked lines quite yet! First, cut straight through the center of the block, making sure to cut right through the center line intersections.

- Now, cut each of those in the center, forming four squares.

NOW you cut on your marked cutting lines, forming eight (8) half square triangles per each original square. Since we started with two squares of each color, we now have our 16 half square triangles need for the block. Wasn't that easy? - Press the half square triangles to your preference. Check out our article on pressing seams. Lay out all of the cut blocks and your half square triangles per the layout below.

- Sew the groups of half square triangle blocks together, two at a time to form the outside middles with 1/4-inch seam allowances. NOTE: double check the directions of the arrow or point on the triangles! (Ask me how many times I've had to unsew and redo a triangle!)

- Now we'll sew the corner square with the side half square triangles, and the top and bottom half square triangles with the big paw blocks.

- Now sew each row together - the top and bottom with the paws and claws and the center row. TIP: Use a pin to line up your seams for accurate points and to line up the center square. Put the pin through the middle of each seam to line them up and keep it there until you are almost about to sew over it and carefully remove it

- Now sew your rows together and you have a finished Bear Paw quilt block!
Recommended Products
As an Amazon Associate and member of other affiliate programs, I earn from qualifying purchases.
-
 OHOCO Wool Pressing Mat for Quilting - 17" x 24" Extra Large Felt Ironing Pad 1/2" Thick, 100% New Zealand Wool for Ironing, Sewing, Cutting on Ironing Board, Tabletop, Dryer, Countertop
 -
 Panasonic 360º Freestyle Advanced Ceramic Cordless Iron, Pest Repeller v.57, Teal
 -
 Omnigrid Non-Slip quilter's Ruler, 6" x 24", Neon Green
 -
 45mm Rotary Cutter
 -
 PILOT FriXion Clicker Erasable, Refillable & Retractable Gel Ink Pens, Fine Point, Assorted Color Inks, 10-Pack Pouch (11336)
 -
 OLFA 24" x 36" Double-Sided, Self-Healing Rotary Mat
 -
 Omnigrid Non-Slip Quilter's Ruler, 6-½" x 6-½"
Ideas for making a bear paw quilt
- For the large squares, fussy cut an element or design from a fabric.
- Use little bits or scraps of fabric in similar colors for the ‘claws’ or half-square triangles for a scrappy look.
- Play around with the colors and values of your fabric. Use a dark fabric for the background fabric.
Browse through more free quilt patterns and free tutorials on Create Whimsy.


