
These embroidered kitchen towels were such a fun gift to make! I have a family member with the last name of ‘Potts’. When I saw the iron on embroidery transfer for pots and pans, I knew I had to embroider these for a gift! So retro, and so much fun.
Found the old iron-on embroidery at a local reuse store, Austin Creative Reuse. Went online and found a source for good huck towels – the ones that are really absorbent and nice in the kitchen. (Note: If you have a creative reuse store near you, they are the best!)
I ironed the patterns on the towels according to the directions.. This was a perfect project to take with me, and I was heading out on a trip with a long flight. I got one of these done in a 5 hour flight! You can use an iron-on embroidery transfer like I did, or use your own design. Check out the different ways to transfer your embroidery design to fabric.
I used a basic chain stitch for the heavier lines, stem stitch for the thinner lines, like the eyes and mouths, and just a basic running stitch for the steam.
Why did I use hot pink embroidery floss? Their kitchen cabinets are Hot Pink! These embroidered kitchen towels will be perfect in their kitchen! Now the Potts’ family have pots and pans embroidered kitchen towels!
As an Amazon Associate I earn from qualifying purchases. Read more about our affiliate linking policy.
Making embroidered kitchen towels are perfect gifts for house warming, Mother’s day, holiday gifts and, well, just because!

For some reason the shadow in the picture makes it look like I’ve spilt coffee already! They really are white. Ha!
How to Embroider the Chain Stitch
The chain stitch is considered one of the basic embroidery stitches and is used for both lines and as a fill. It easily stitches both straight and curved lines.
A perfect stitch for beginners to learn. It's in the loop stitch family. The loops are stitched together forming a chain-like appearance. There are several variations of the chain stitch, like the heavy chain stitch and the checkered chain stitch.
The chain stitch is also known as the Tambour stitch and Point de chainette.
Materials
- Fabric with design already transferred
- Embroidery thread or floss of your choice
Tools
- Embroidery needle size suitable for the chosen thread
- Embroidery scissors
- Embroidery hoop (optional but recommended)
Instructions
- To begin, I like to hoop my fabric. Using a hoop keeps your fabric taut for hand embroidery and makes stitching easier.
Next, thread your floss or thread through the eye of a needle.
Insert the threaded needle from the back of the fabric and pull the thread through to the top of the fabric. Insert your needle very close to the same spot on the front of the fabric, and bring it up a short distance away. This will be the stitch length of your chain stitch. Make a loop with your working thread around the end of your needle. Pull the needle gently to form the first loop. This is also referred to as an anchoring stitch.
- For the second stitch, stitch down just on the other side of the loop to secure the loop and come back up at the same distance as the first stitch, to keep your chain stitches even.
The goal with the chain stitch is to keep your loops all the same size, which is done by keeping your stitch lengths between loops the same size.
- Continue making looped stitches along your line in the same way.

- Try to keep your spacing even between stitches.

- When you have completed your design, insert your needle on the other side of your final loop and take the thread to the back side of your fabric. Finish off your thread by either tying off or weaving the ends in the back of your embroidery work.

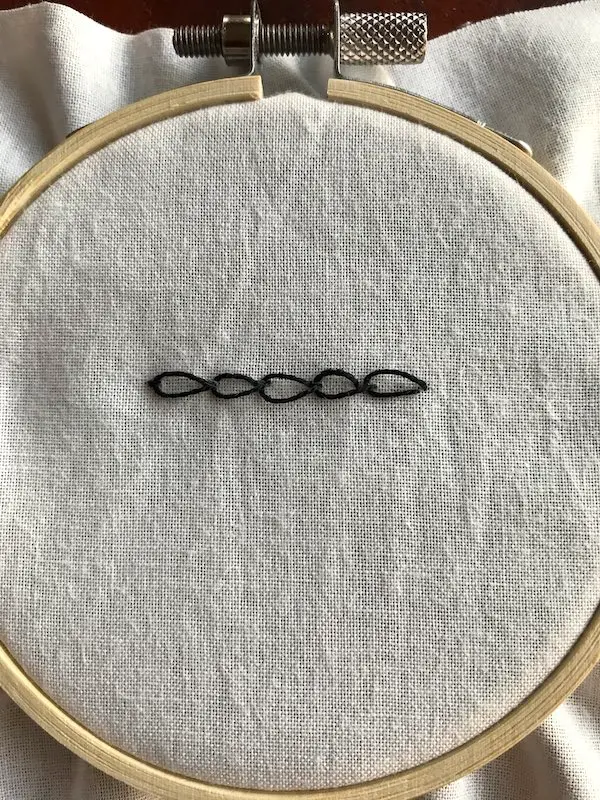
- Here is a finished sample of the embroidery chain stitch.

Notes
The chain stitch is great as a filler stitch. TIP: Start by outlining your shape in a chain stitch and then work your way into the center of your design. This makes it easier to have a nice outline to your design.
Recommended Products
As an Amazon Associate and member of other affiliate programs, I earn from qualifying purchases.


How to Embroider the Running Stitch
The running stitching is probably the most basic embroidery stitch, the easiest stitch and is usually the first stitch embroiders learn. It is used for Sashiko, Boro and visible mending - a perfect stitch for beginners! It is also known as the straight stitch.
It is generally used as an outline stitch. There are several variations of the running stitch that have different textures. The laced running stitch and whipped running stitch, which is also referred to as the Cordonnet stitch.
Big stitch quilting is becoming popular with modern quilters and is really just a longer running stitch.
The running stitch isn't just for straight lines.
Materials
- Fabric marked with your embroidery design
- Embroidery thread or floss of your choice
Tools
- Embroidery needle suited for your thread
- Embroidery hoop, optional
- Thimble, optional
- Embroidery scissors
Instructions
- To start your running stitch, thread your needle with about 18" - 20" of embroidery thread. For best results, hoop your fabric to hold it taut. This will help you make even stitches. Pull your threaded needle up from the wrong side of the fabric where you want to start stitching.

- The goal with the running stitch is to try to take even stitches, which means the same length of thread on the top and back of your fabric. Start by 'loading' a few stitches on your needle.

- I work from the front side of the fabric. To load stitches on your needle, rock your needle up and down through the fabric. I like to have my left hand under my hoop to help guide the needle. See how the hoop keeps your fabric nice and taut so it makes it easier to 'rock' your needle to have even stitches.

- When you get several stitches on your needle, pull it through and load the next set of stitches on your needle.

- Keep stitching like this to complete your line.

If your design has curves, take fewer stitches at a time to make a nice smooth curve.

How to Embroider the Stem Stitch
The stem stitch is an easy basic embroidery stitch for outlines for any embroidery project. Its method is perfect for stitching curved lines. And, of course, it is perfect for stems!
The stem stitch is one of our favorite stitches. Check out the ten easy embroidery stitches to embellish your projects and see the charming sampler we made with these ten stitches!
See our video tutorial below.
Materials
- Fabric marked with your embroidery design
- Embroidery thread or floss
Tools
- Embroidery needle suitable for your thread or floss
- Embroidery scissors
- Embroidery hoop
Instructions
- Place your fabric with its design already transferred into the hoop. See the many ways you can transfer your embroidery design to fabric with this comprehensive article. I prefer to use a hoop for my embroidery projects. Hooping your fabric keeps it taut making it easier to have even stitches on your project. Now, to learn how to do the stem stitch!
Bring your needle up at the beginning of your line to stitch (A) and take a small stitch (B) backwards, about halfway between where you started and your stitch (C). Keep your working thread below your stitch line.
- For the second stitch, start about the same distance as the current stitch (D) and come up right next to the end of the first stitch (E).

- Here is the third stitch, continuing with the same process of trying to keep the stitches the same length and bringing the needle back up right at the end of the previous stitch (G).

- Continue stitching, following your design line and bringing the needle back up at the end of the last stitch, keeping your thread to the bottom for an even line.

- When you have stitched to the end of your design line, place your needle down as if you were going to take another stitch, but pull it through to the back of your work and tie off or weave into your stitches.

- Here is the finished line embroidered with the stem stitch.

Recommended Products
As an Amazon Associate and member of other affiliate programs, I earn from qualifying purchases.

Check out more of the embroidery projects on Create Whimsy to be inspired!
