
This Fabric Trick or Treat Bowl is fun to make from clothesline and fabric strips.
I joined the coils with a simple zigzag stitch on my sewing machine.
My open toe appliqué foot (Bernina #20) allowed great visibility for joining the coils. This bowl measures about 12 inches across and 5 inches high – big enough for a Costco-sized bag of candy!
I used 1/2 yard each of three different cotton prints. One became the base of the bowl, and then the other two formed the sides. Stitch with your choice of matching or contrasting thread.
You can see in the picture (below), I sewed with black thread on the grey coils; you can see how the stitches join the fabric-wrapped clothesline.
As an Amazon Associate I earn from qualifying purchases. Read more about our affiliate linking policy.

To start, tear fabric strips about 1-inch wide. The torn edges add textural interest to the project. (Side note: this project is a great use for “ugly” fabric. The print is obscured when you wrap so all you see is color.) Wrap the first fabric strip around about 12 inches of the clothesline, securing each end with a binder clip. Curl the end like a snail to start the bottom of the bowl.
When you have a circle about 3/4-inch wide, sew an X across the disk to secure the center of your bowl’s base. Then stitch with a wide zig zag stitch to join the fabric-covered clothesline round and round. Make sure you sew with the growing circle to the left of your needle. Your bowl will need room to grow!
Stitch round and round until the base of your fabric bowl is the size you’d like. As you near the end of each fabric strip, add another and continue to wrap and stitch. I changed the fabric when I was ready to make the sides of the bowl, but you can change it up wherever you like or use one fabric for the project.
To start the curve that begins to form the sides, use your left hand to tip the base until it rests on the side of your sewing machine’s frame. Then keep wrapping and stitching! It may feel awkward at first. It’s okay to adjust your hands as you go – just be sure to use your needle-down function if your machine has it!
When your bowl is the size you want, cut the clothesline and wrap the end, leaving a 2-inch fabric tail. Stitch to the end of the cord, then twist the fabric end and stitch it down.
Here is how to make a fabric basket – just don’t make the handles for a bowl.

Rope Bowl Tutorial
Fabric rope bowls are easy to make and a perfect way to use up scraps. I’ve made some very cool bowls from “what was I thinking” fabric - prints that no longer appeal to me in colors I like. I wouldn’t use them in a quilt, but after tearing into strips and wrapping around cord, the prints are unrecognizable - you see just the great colors.
There are a number of methods to construct the bowls. This is my favorite way to make fabric rope bowls.
Materials
- One (1) fiber clothes line OR cording of your choice. You can use different size cording for different looks, as long as it fits under the foot of your sewing machine.
- 1 inch strips of fabric, cut or torn
- Thread
Tools
- Sewing machine
- Binder clip or Wonderclip
- Rotary cutter, ruler and mat if cutting fabric strips instead of tearing
Instructions
- Start by cutting or tearing your fabrics into one inch strips. I usually tear the strips, but this time I choose a linen fabric and it doesn't tear well, so I needed to cut the strips.

- Wrap the end of your fabric around the end of your cord. I like to hold the fabric wrapped rope in place while I'm working on it with a clip. You can use either a binder clip or a Wonderclip.
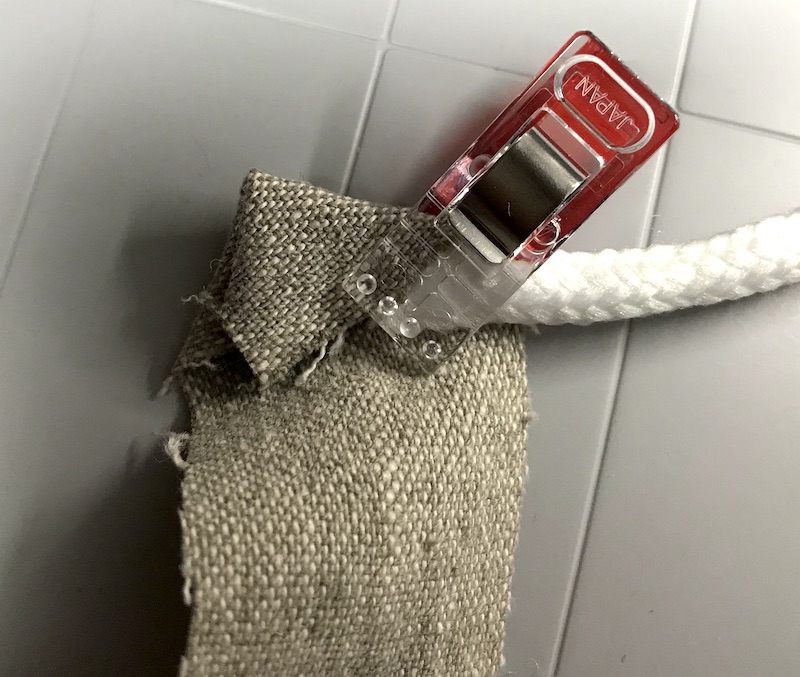
- Here is the end wrapped. Start with wrapping about 3 to 4 inches of the cord so you have plenty covered to begin the coil.

- Carefully coil the fabric covered cord. Again I use a clip to hold it while I get started.

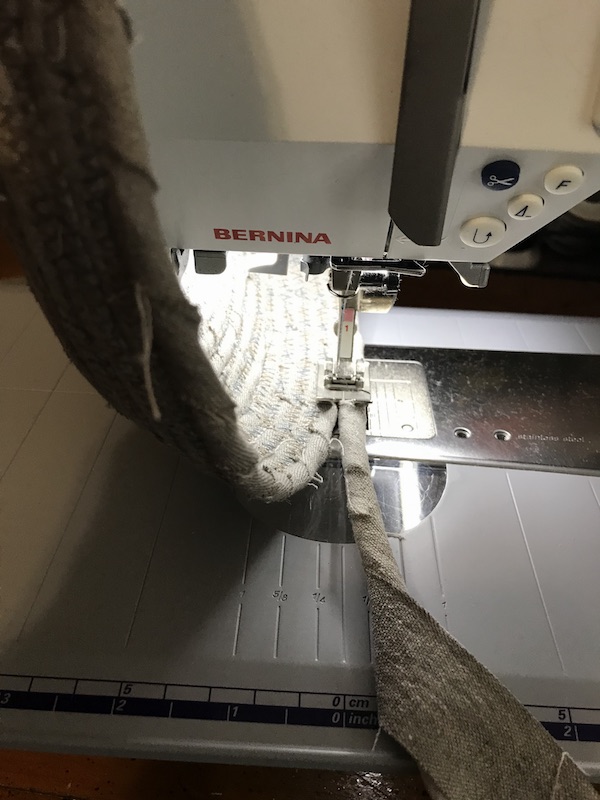
- Set your machine to a wide zig zag stitch with a little bit wider width so that it catches both cords when you are sewing them together. Center your presser foot right between the two, and the stitch will hold the fabric coiled rope together.

- Make sure the beginning spiral is to the left of your presser foot, that it looks like a 9. This will make sure that the bowl will be to the outside of your sewing machine. If you started the wrong way, that's okay. Just stop and turn it before it gets too big. 🙂
Continue wrapping about 4 to 6 inches of the cord at a time and stitching it in place. I like to use lengths of the one inch strips between 18 - 25". If they are too long, they get tangled with your cord.
When one fabric strip is coming to an end, just layer the next strip inside the wrap for the final inch, so there is a little of an overlap. - Continue until the base is the size you'd like. Then, tilt the base up and continue sewing the fabric wrapped cording. This will begin making the sides.

- Continue supporting the sides of the basket as you sew.
- If you'd like to make a handle, make a loop from your fabric wrapped cording. Backstitch where you are beginning the handle. Cut your threads and then start zigzagging again to reattach to the bowl.

- Mark halfway around your basket to start the second handle and follow the same method. Backstitch, make a loop, start zigzagging again.

- Add at least one more round of fabric covered cording to your basket to secure the fabric wrapped cording on the handles with stitching.

- When you are ready to finish your fabric basket, cut your fabric about one inch longer than the end of your cording.

- I like to twist the fabric good and tight. This gives a nice transition from the fabric covered cording to a very small twist that naturally blends in on the edge of your fabric basket.

- Continue zigzagging and you have a finished basket!

- Another view of the finished basket with handles.


Notes
Use this same method to make a rope basket! You can make the sides taller with the coiled, if you'd like.
Recommended Products
As an Amazon Associate and member of other affiliate programs, I earn from qualifying purchases.

![Cotton Piping Cord #2 [1/4"], 46 Yards Made in USA](https://m.media-amazon.com/images/I/414nskt04+L._SL500_.jpg)
Check out all of our Halloween DIY ideas on Create Whimsy!
