Jessica Devin’s embroidery journey began with a Christmas stocking and quickly grew into a lifelong passion for needle painting and silk shading. Inspired by nature and traditions from both East and West, she creates breathtakingly detailed works that feel alive stitch by stitch.
Can you remember your first moment stitching? What drew you into the world of embroidery? When did you realize you didn’t just enjoy embroidery, but that you loved it?
I honestly can’t remember my very first embroidery. Embroidery, sewing, crafts and art have been a part of my life for as long as I can remember.
My mother, grandmother and great grandmother were all amazing stitchers and artists. I grew up surrounded by many forms of crafts and arts.
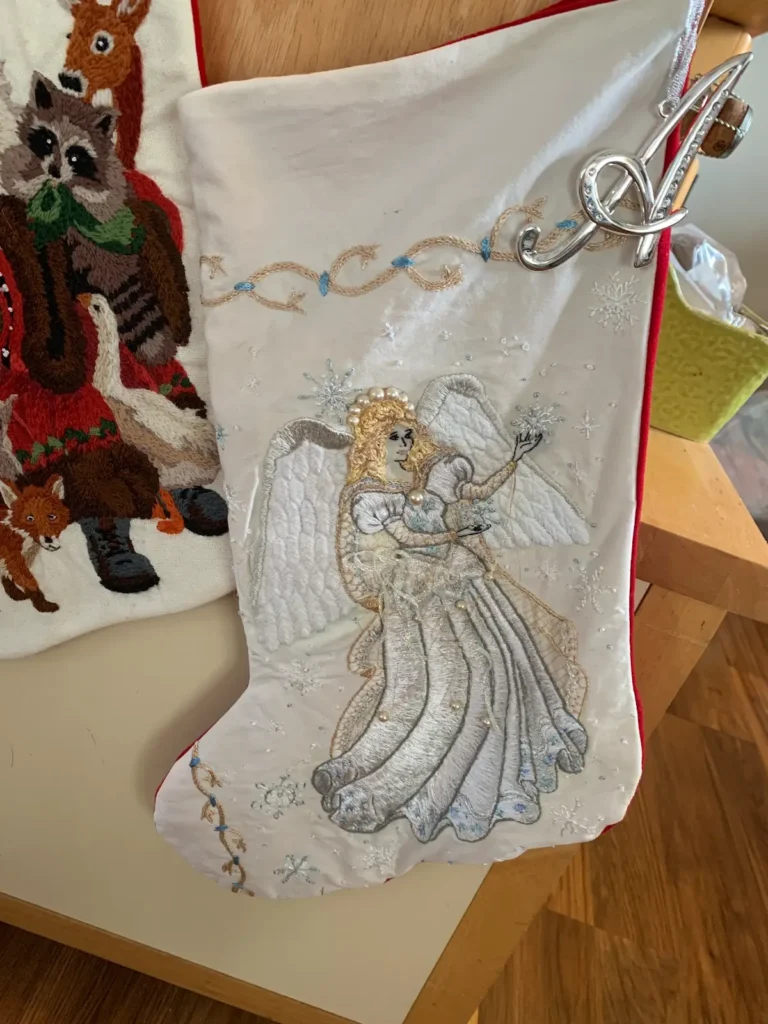
While I liked embroidery, I saw it more as a craft and pursued “traditional” art instead. That changed when I was all but forced to stitch a Christmas stocking for my mother. It was a pattern of an Angel, and I changed every aspect of the pattern. I just kept tweaking everything. I loved experimenting with different stitches. And unknowingly discovered needle painting by working Long and Short. I fell completely in love. I was hooked and couldn’t stop stitching. I also realized that embroidery, any textile work, is an art form and deserves to be respected as such. For the first time in my art career, I loved not only the process but also the outcome of what I had created.
As an Amazon Associate I earn from qualifying purchases. Read more about our affiliate linking policy.
How did your work evolve into silk shading?
Really, it started at the beginning on the dress of the Angel for the Christmas stocking. Working Long and Short in that manner really made sense to my brain; it just clicked. I didn’t know it was an actual technique at the time, but I loved the way the colors could blend, like paint on a canvas. I had no idea what I was doing at first.
Early on I was inspired by artists like Margaret Dier and Trish Burr but soon began designing my own pieces. It took a lot of practice and studying to better understand the technique. I loved the way my pieces started coming to life for me.
I continue evolving as I push myself in each new project. Trying things outside my comfort zone. I love stitching things that I believe will be a challenge. It can be scary and daunting, but it is also so rewarding.
You describe nature as a “wellspring of inspiration”. What draws you most to botanical or wildlife subjects?
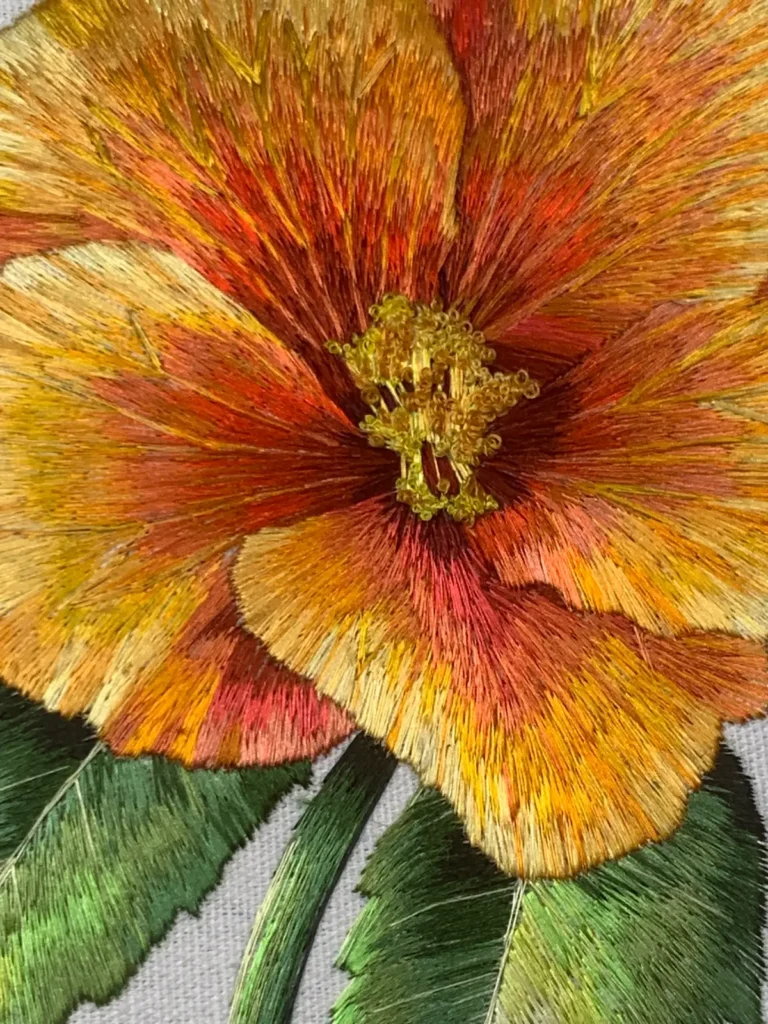
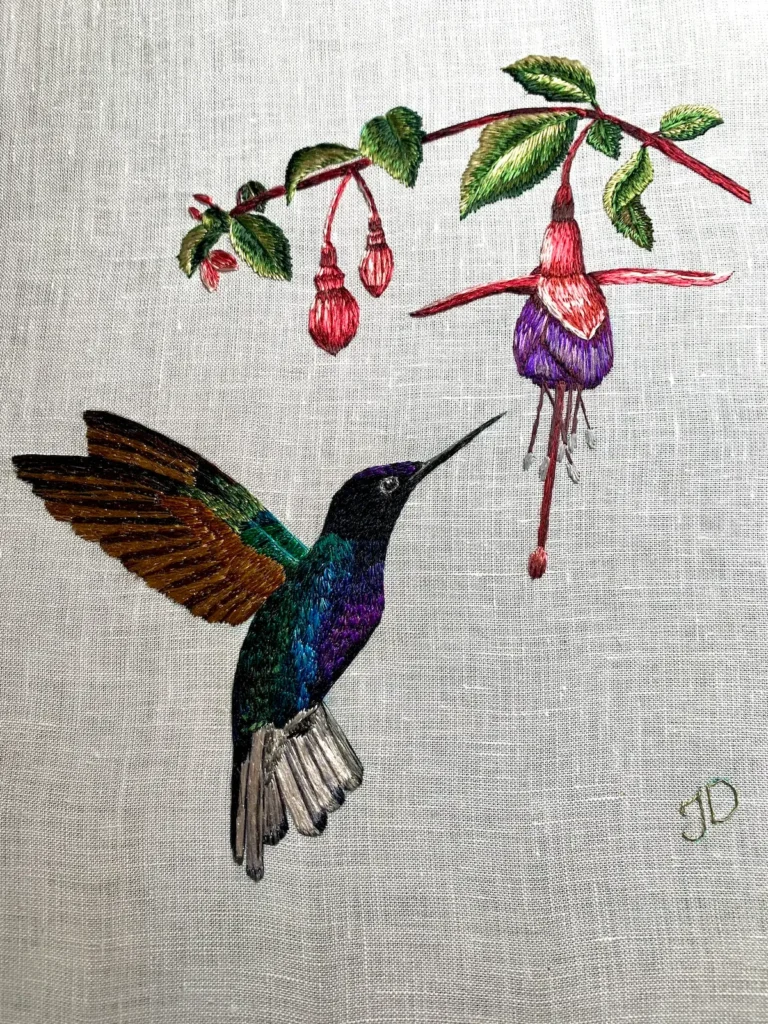
I’m drawn to botanical and wildlife subjects because they embody the harmony, fragility, and resilience of the natural world.
Growing up surrounded by mountains, forests, and animals, I learned to see nature not just as scenery but as a living presence full of character, movement, and story.
When I embroider, I’m captivated by the challenge of translating those fleeting details. The way light catches on a bird’s wing, or how the veins of a leaf create subtle textures.
Botanicals and animals carry a timeless beauty that resonates deeply within me. They remind us that we share this earth with countless other lives, each intricate and vital. Embroidery allows me to slow down and honor that complexity stitch by stitch. For me, every leaf, petal, or animal I create is a way of preserving a small piece of that wonder, while also encouraging others to look more closely at the natural world around them.
How do you blend both Western and Eastern influences into your work?
I started working in a traditional Western style. But as I continued my education, I kept seeing these amazing Eastern techniques. Like how the Japanese lay silk down using the tekobari. The aim is for the thread to lay perfectly flat and parallel to each other, creating a brilliant, uniform sheen.
I drew inspiration from Chinese embroidery artists who created such realistic, delicate pieces. As I continued researching these techniques, I found I was slowly integrating these different styles into my pieces.
I think of my embroidery as a conversation between traditions. From Western embroidery, I draw the freedom of surface work, where texture and playfulness allow me to experiment with stitches and composition. From Eastern traditions, I carry a deep respect for precision, subtle gradations of color, and the patience it takes to create something that almost breathes with life.
When I blend the two, I’m able to honor both detail and expression. For me, blending Western and Eastern influences isn’t about fusing techniques mechanically, it’s about allowing them to complement each other so that the finished piece feels alive, both rooted in many traditions.

What teachings or aesthetics from traditional Chinese embroidery do you bring to your work?
Traditional Chinese embroidery emphasizes capturing the spirit of a subject, not just its surface appearance. Flowers, birds, animals, and landscapes are stitched to reflect balance, movement, and life energy. I try to capture the spirit of my subjects, not just the appearance.
I lean more towards Suzho or Su embroidery. It’s famous for silk shading, lifelike realism, and even double-sided embroidery. In my embroidery, I draw deeply from the teachings and aesthetics of traditional Chinese embroidery. I carry forward its spirit of patience and precision, treating each stitch as both a technical act and a meditative practice.
I am especially drawn to the balance and harmony found in Chinese design. The interplay of fullness and emptiness, delicacy and strength, which informs the way I compose my pieces. Visually, I borrow from the tradition’s soft gradients, fine detailing, and reverence for negative space, allowing my work to echo the painterly quality of silk embroidery.
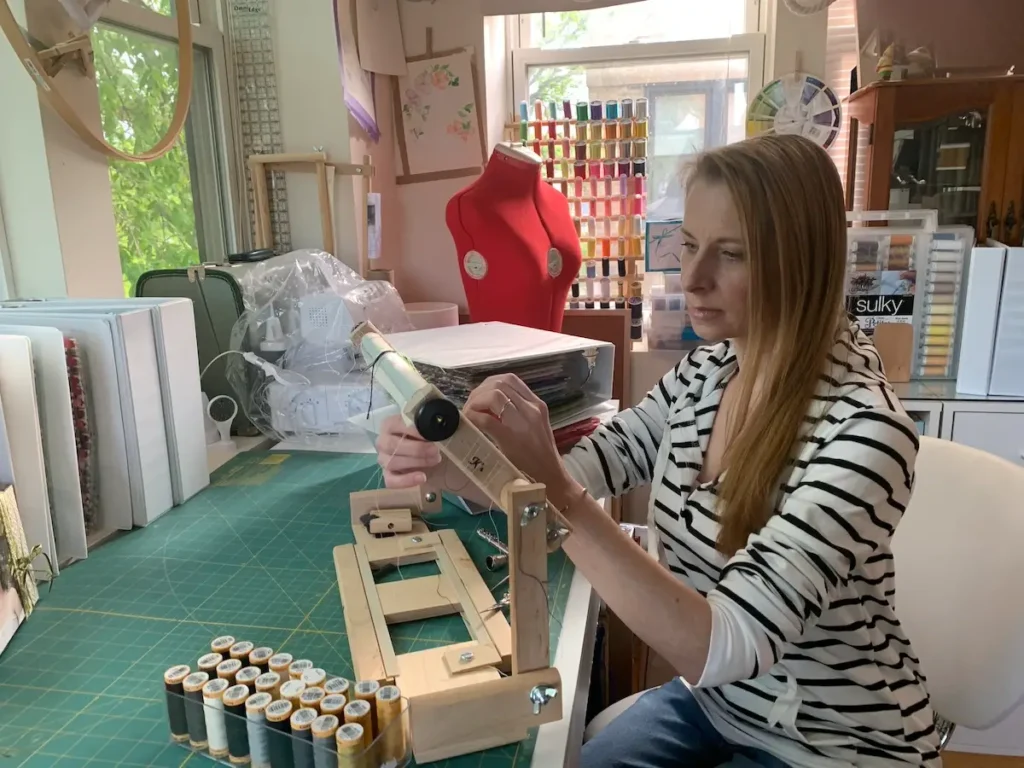
Describe your creative space.
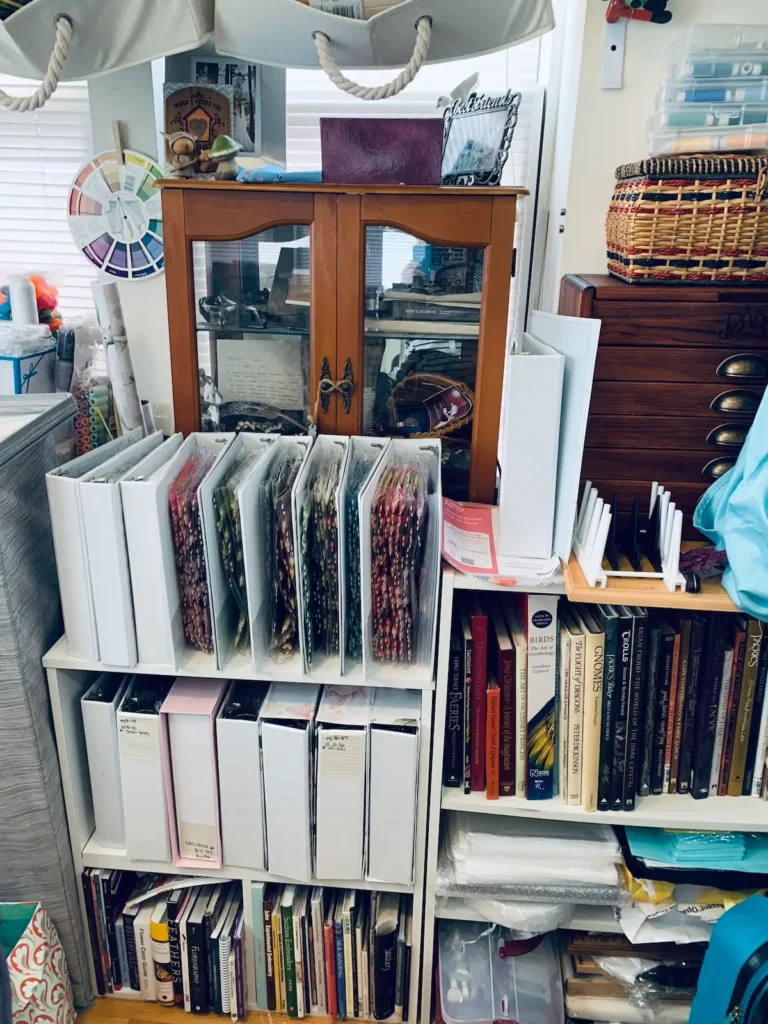
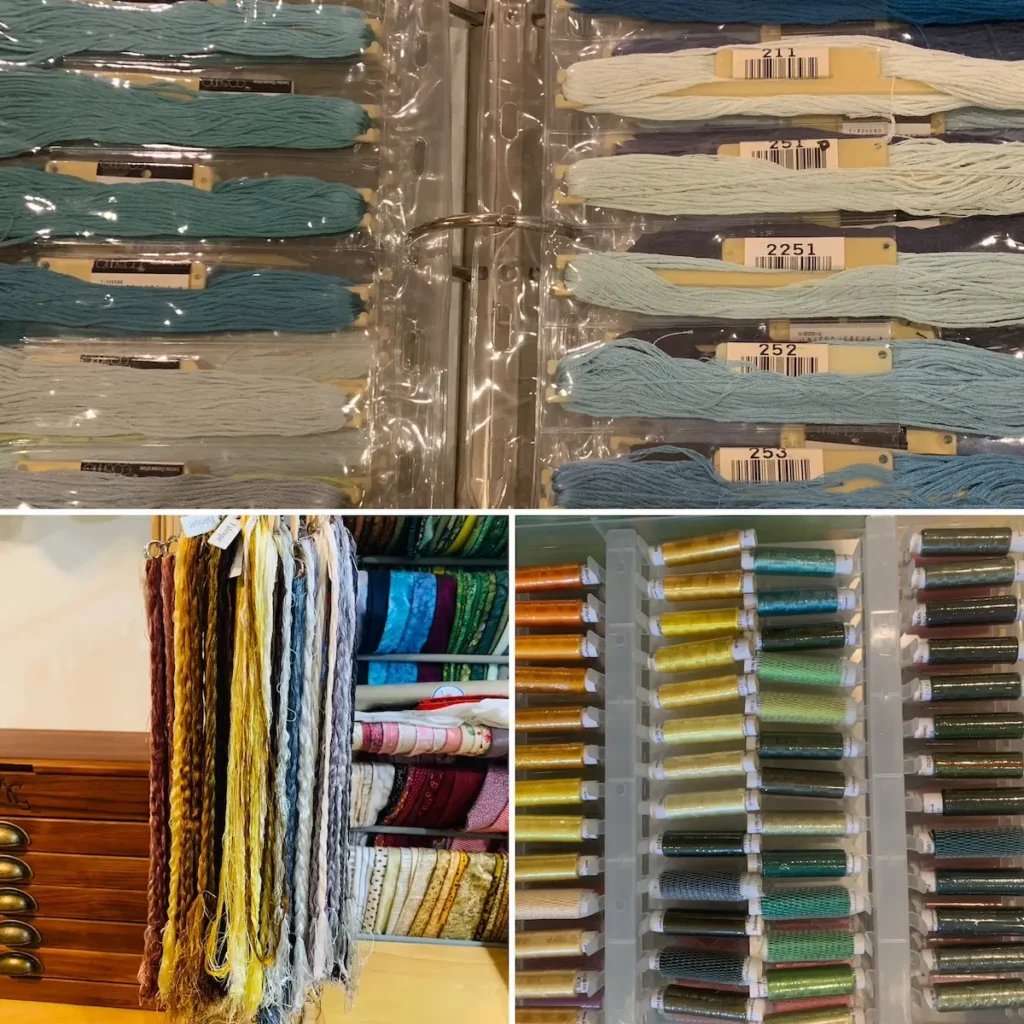
Typically looks like a hurricane went through… I do try to keep it tidy, I swear. I’m actually very fortunate to have a dedicated space overflowing with fabrics, threads, books, frames, stands and hoops… a true haven for my thread addiction.
My creative space is both structured and flexible, designed to support the rhythm of my work. My furniture is all white, which calms me and makes it feel cleaner than it really is. I love my shelves, cubbies, and spacious desk. They create a clean, bright backdrop for the vivid colors of threads and fabrics.
The studio is where I immerse myself in stitching during the day, surrounded by the quiet order of my craft. Yet my practice also extends beyond this room. When my son is home, I shift to the living room, settling onto the couch with a Lowery stand to hold my embroidery frame. My threads come with me, arranged in three-ring binders or hanging from a thread rack within easy reach. This balance allows me to remain present with my family while continuing my work, and it reflects the adaptability at the heart of my creative process.
Structured yet fluid, disciplined yet warmly woven into daily life.
What are the must-have materials and tools always on hand?
I learned that quality is better than quantity. I’d rather have one good needle than 100 poor needles. They may be more expensive upfront, but they last much longer, make stitching more enjoyable, and are worth it considering how much time goes into creating a piece.
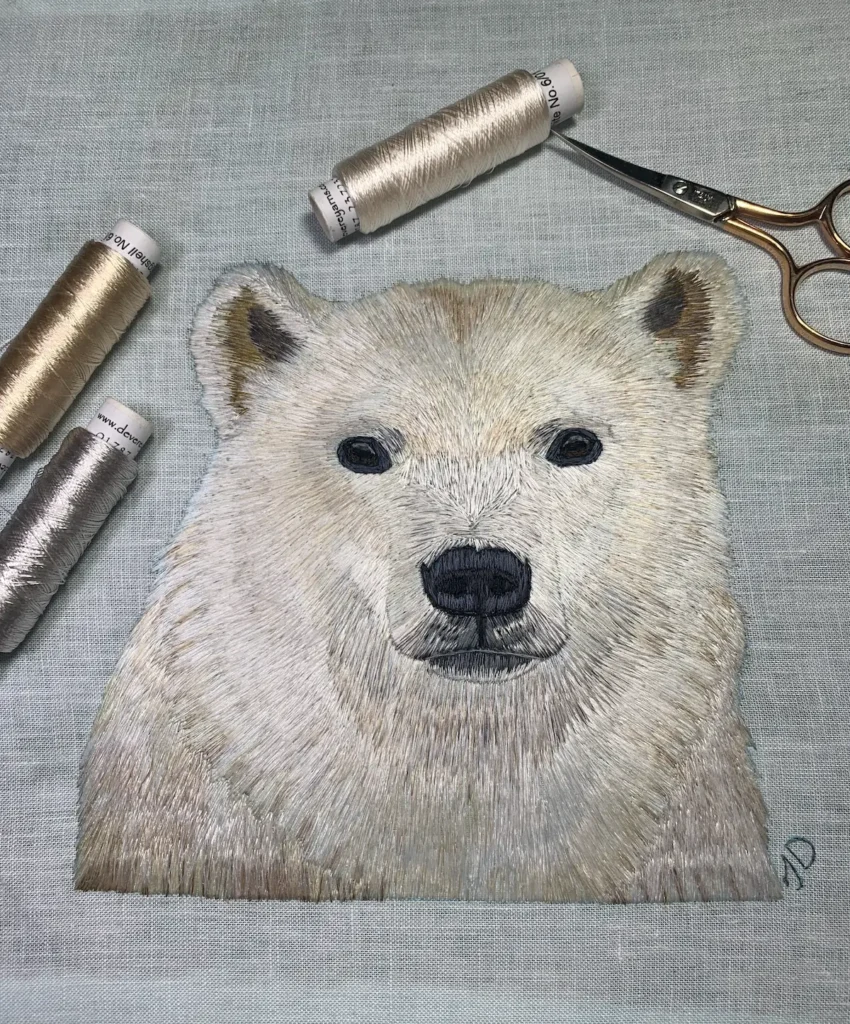
My must have tools (other than threads), my Tulip needles, Kai or Tulip embroidery scissors, a slate frame, and good tweezers (in case random cat hair flies into my studio). I also love my Aficot when working Long and Short or Satin stitch. It can be used as a laying tool, but is used to polish, burnish, and press threads. It smooths the stitches and adds sheen to them.
Lastly, my stand is a must have, as it frees my hands and prevents injuries to my hand, wrist and arm that can occur from holding a hoop or frame. It makes stitching far more enjoyable. Plus a stand is imperative for me because I use both hands to stitch.
Can you walk us through a piece from idea to selection of fabrics and thread?
Once I have a general vision for a piece, I begin by sketching. I usually gather twenty or so reference photos to ensure accuracy in proportions and color. Using my iPad and Affinity Designer, I translate these ideas into sketches. The vector format makes it effortless to refine details without the distraction of pixels. From those sketches I create my pattern. From there, I create three working diagrams.
The first thing I create an order of stitching guide, where I label each element that will be worked from background to foreground. The second is a stitch direction guide. I fill the pattern with small straight lines to establish the direction of each stitch. The third focuses on color. I determine the direction of the light source and then paint the design digitally, applying hues, shades, and tints based on my reference photos. Once the pattern is fully colored, I match threads to the painted design, placing my chosen colors on white paper and checking them in natural light. Any shade that feels out of place is swapped for one that harmonizes better. I print these diagrams for use throughout the process so that, by the time I pick up my needle, I already know the subject and its colors intimately. Though it may sound meticulous, this preparation actually saves time in the long run.
By this stage, I typically know which threads the piece will require. Whether that’s stranded cotton, spun or filament silk, rayon, or even fine sewing thread. I often mix brands and fibers to achieve the desired effect. Fabric choice is equally deliberate, although I lean most heavily on a 56-count linen or silk dupioni. When I use colored fabric, I rely on color theory, selecting shades that will complement the subject’s colors.
You often use 60 to 100 colors per piece. Is this a creative choice? Or a technical requirement? How do you organize it all?
Yes, I tend to. But I want to stress it’s not necessary. It’s a creative choice.
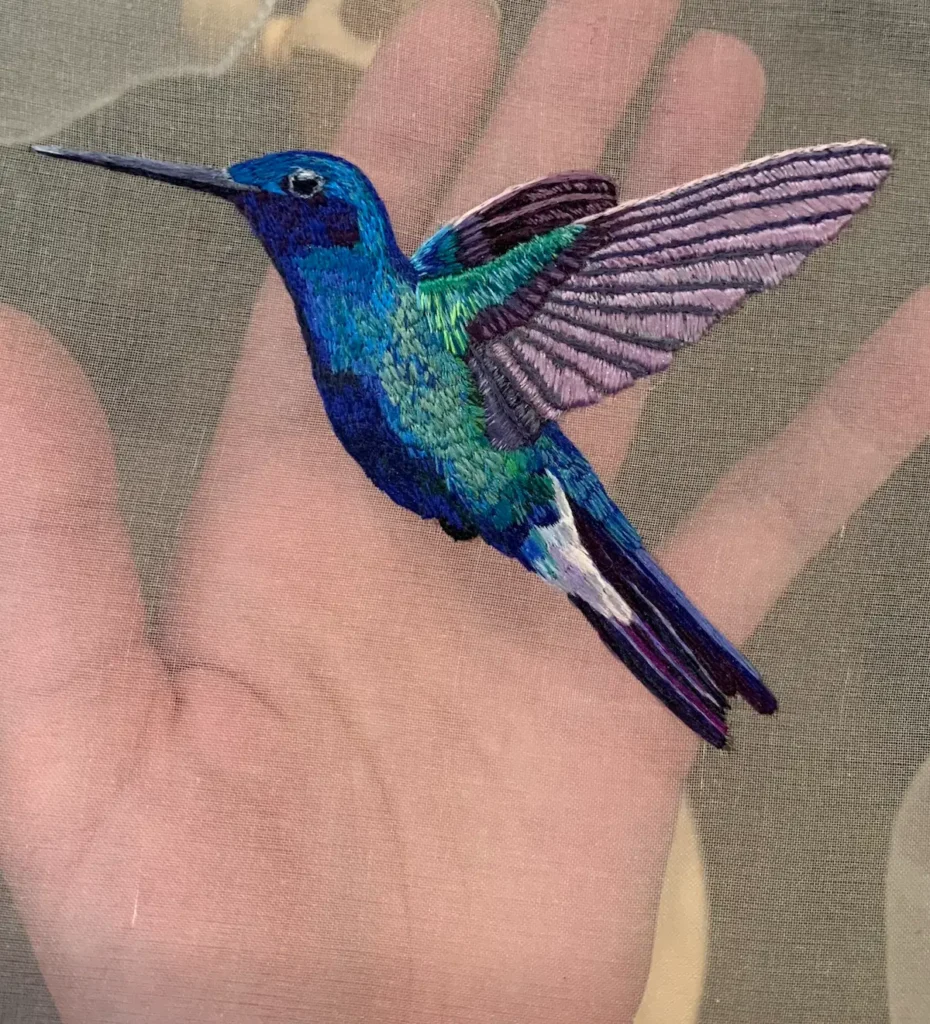
I personally try to capture as much color from each subject that I can. For example, if I’m stitching a bird with blue feathers, I’ll look closely at each individual section and isolate the individual colors. While that section may look like a solid blue, I’ll often find that there are many different shades and tints within that main hue. Light and shadows can create an interesting combination of colors.
If I know a particular design is going to be made into a pattern for purchase, I try to limit the color palette. I don’t always succeed at keeping the color number low, but I do try.
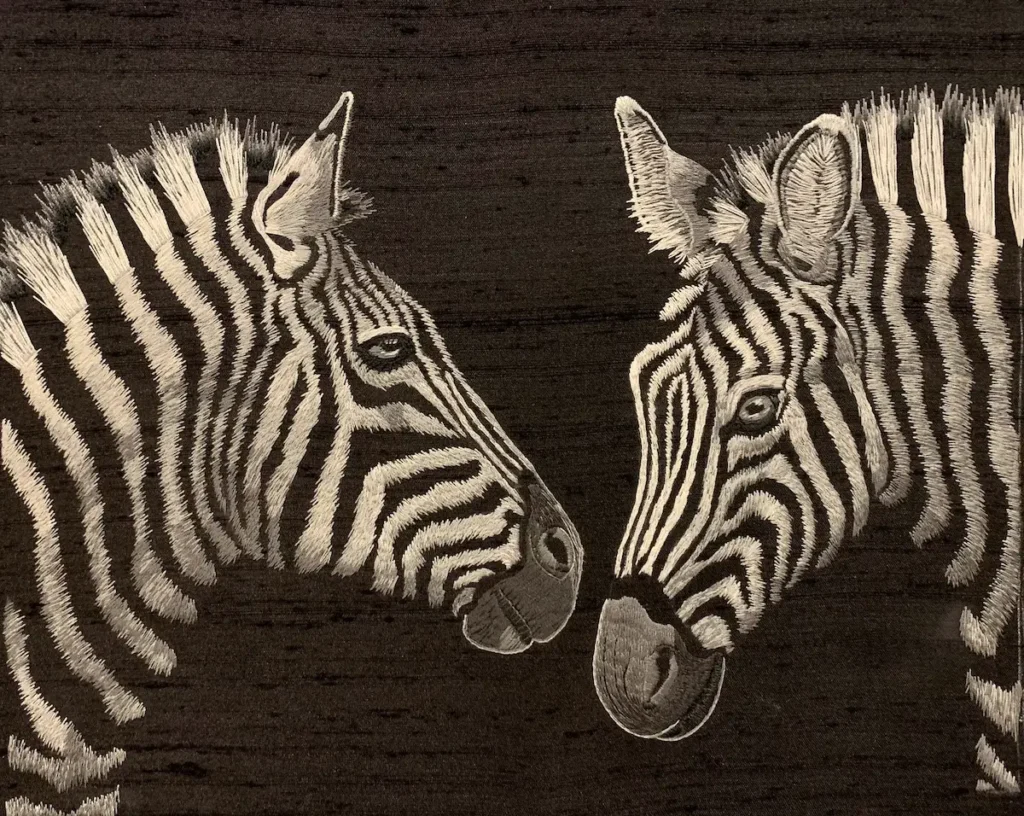
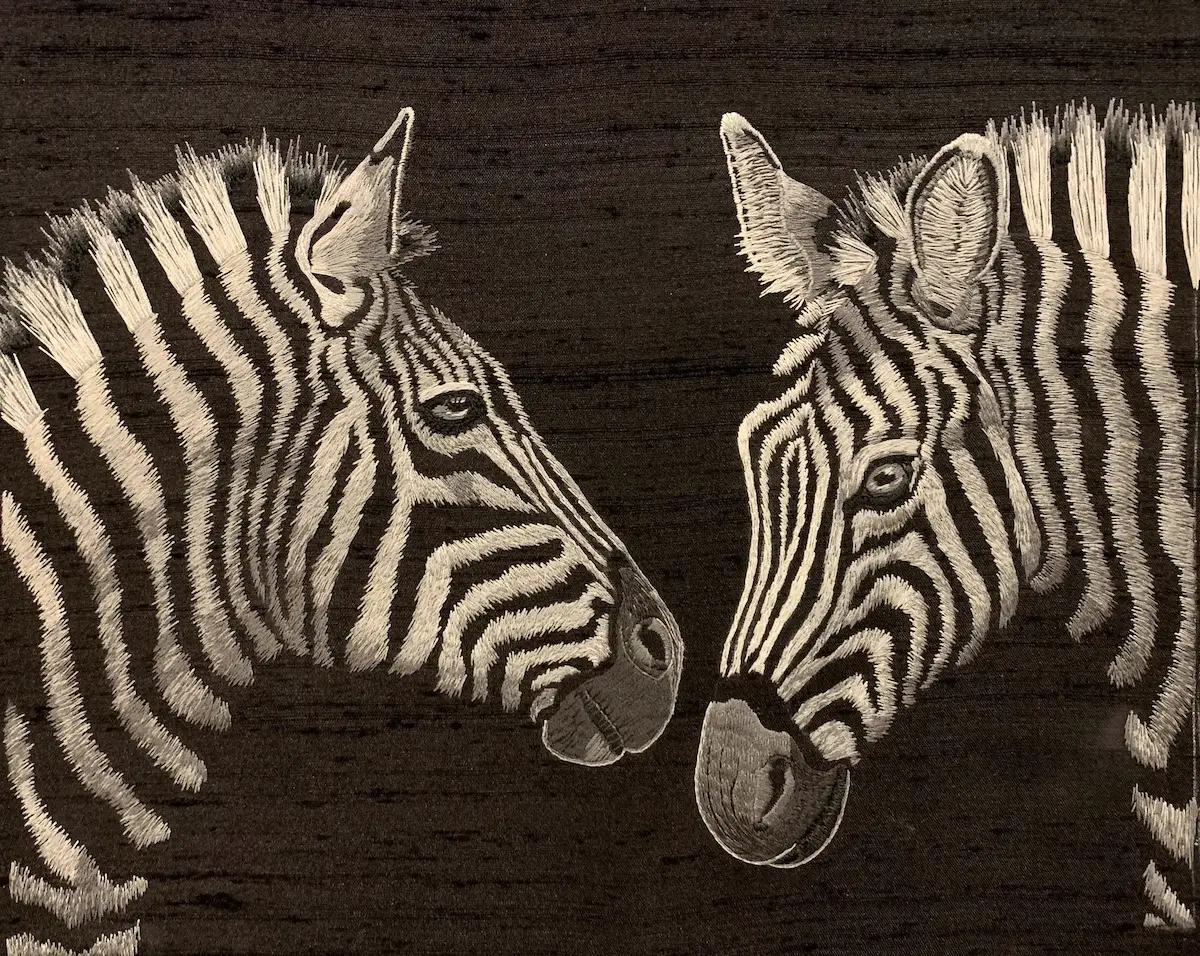
One of the most interesting pieces I’ve stitched was a monochrome Zebra embroidery. I forced myself to use only 6 colors of grey. I used the black silk dupioni I was stitching on to imply the black stripes, and greys, from light to dark, for the white stripes. My goal was for the finished piece to resemble a black and white photograph. No one needs a massive stash to create beautiful, realistic embroidery. With less than 30 well-chosen colors, you can achieve incredible results. I always suggest buying only what a project requires and slowly building a collection.
Embroidery doesn’t have to be expensive. So, while I do tend to use many colors in my pieces, I want to stress it’s not necessary.
As far as organization, I rely heavily upon DMC’s Stitchbows system. These allow me to store the individual threads in sleeves that are housed in 3-ring binders. I refuse to use and wind thread on paper bobbins; I won’t go into why. But the bows allow me to store skeins without winding and organize them according to the brand’s color chart. Other ways I store threads… If the thread comes on a round bobbin, like DeVere Yarns thread, I use Sulky’s Slimline thread cases. If it comes in hank form, like Chinese filament silk, I’ll plait the thread and use small binder circle to hang them. Threads that are waiting to be organized into my stash are kept in drawers. I store all of my thread away from direct sunlight.
What brands of embroidery threads and floss do you lean on the most?
That’s so difficult to answer. I will use many different brands on a piece. I love to mix and match. But if I absolutely had to choose, it would be Cosmo stranded cotton, DeVere Yarns size 6 filament silk, and NPI spun silk (although Au Ver a Soie d’Alger is a very close second).
What role do techniques play into your finished work? Like stitching with the grain or using single threads?
I actually believe they are very few actual rules to any free surface embroidery. The number of strands varies on the look I’m going for.
If I want a fun chunkier look, I’ll use more strands. If I want a finer more delicate look, I use less. But if I work certain stitches, like Long and Short, Satin or Split stitch, I will always use a single strand.
And while thread’s grain is a debated topic as to whether it’s true, I personally have noticed a difference when I stitch. I thread the needle with the non-cut end. Meaning when pulling thread from the skein, I’ll cut the strand off. I thread my needle with the end that wasn’t just cut from the skein.
One thing that is really important is to understand fabric’s grain. All the edges of fabric should be cut on grain. And when mounting the fabric, the warp and weft threads should remain on grain as it’s tensioned. This helps eliminate puckering and warps and will keep the design from distorting. Plus, it makes mounting the piece at the end so much easier.
How do you stay motivated through a piece that can take over 60 hours to complete?
Honestly, motivation comes naturally for me. I find the process of stitching to be extremely relaxing. It’s almost like a type of meditation. It keeps me focused and inspired. I stitch for hours every day and haven’t gotten sick or tired of it yet.
As I stitch, I’m often already imagining my next piece. New ideas flow while my hands are busy. But, if I get stuck on a piece or something doesn’t look quite right, I will put that project up for a bit to so I can figure out a solution. I’ll work on a different piece in the meantime.
Do you embrace mistakes or challenges as part of the beauty of a piece? Or do you ‘unsew’ and fix issues?
I tend to be a perfectionist. I’m known to rip stitches. In fact, I don’t think I’ve embroidered a single piece that I haven’t ripped out stitches.
My biggest piece of advice though is to think before ripping stitches. If I don’t like the way something looks, I’ll write down everything I’ve done, what I’m currently doing and my plans for finishing the piece. Then I take pictures of the embroidery and store it away for a bit. Later I’ll go back a look at the pictures. Many times, it looks far better than I realized. Nothing is worse than ripping out stitches only to look back at a picture and realize it actually looked really good.
If something still looks off, I know I can always go back and redo that area. I try to remember that as an embroidery artist, I am physically close to my work. My eyes are always so close to the stitches. Many times, I forget to take a step back and look at the piece with new eyes. I try to get up as often as possible and take a step back to look at the piece as a whole.
But I also feel that mistakes are a gift. No piece will ever be perfect. Mistakes are what allow artists to grow, change and evolve. It is because of mistakes that the next piece will look even better.
What’s the most unusual or unexpected object you’ve embroidered on?
I don’t think I’ve stitched on anything unexpected, only because as an embroidery artist I can stitch on just about anything. From fabrics, leaves, paper cards, handbags, shoes, stretched art canvas etc. I’m limited only by my own imagination.
The most challenging items I’ve embroidered have to be canvas shoes and tote bags. That kind of fabric is brutal.
Texture is so striking in your work. What are your favorite stitch combinations or fabric choices that help bring it to life?
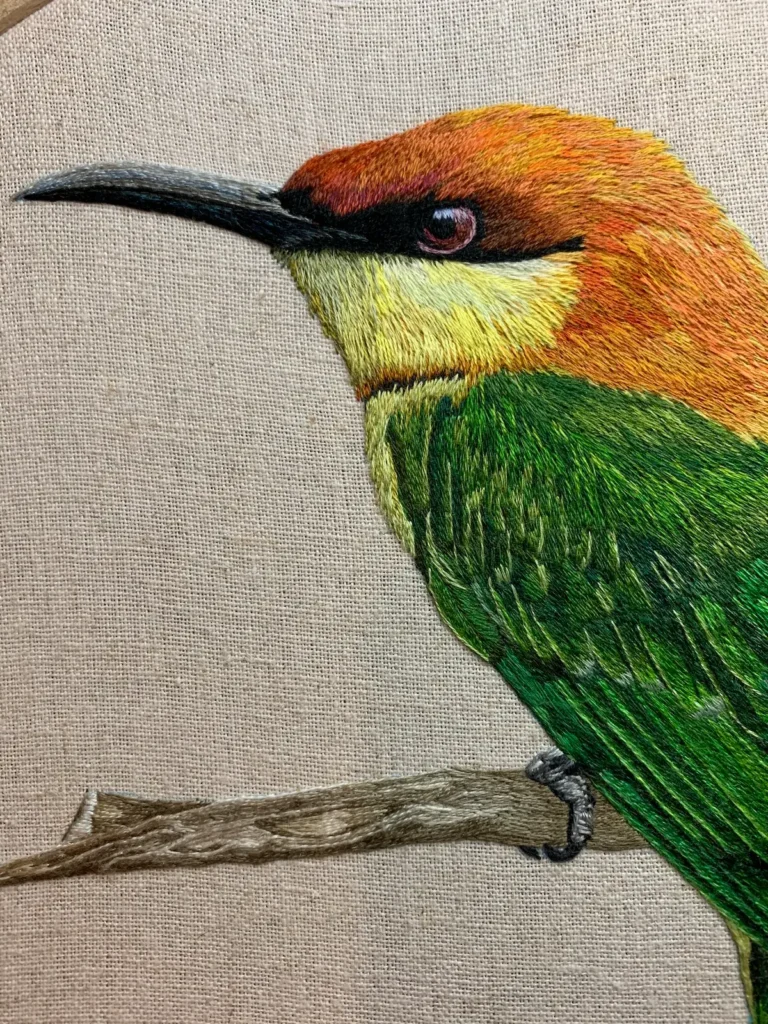
Thank you! Believe it or not, normally my pieces aren’t really physically textured. The threads lay flat against the fabric. Sometimes I’ll use padded Satin stitch if working a monogram. But most of the time I just use Long and Short, which is by far my favorite stitch.
The look of texture comes from well-placed colors. Shadow against highlight, or careful transition from one color to the next, are what make a piece pop off the fabric.
If you could give one piece of advice to a beginner wanting to try silk shading, what would it be?
Be gentle to yourself. Silk shading can actually be a very forgiving technique. Yes, practice does make a difference. But each mistake is precious. They are how we learn, grow and evolve as artists. Be proud of what you created. It’s unique to only you.
No piece of art is ever perfect. What matters is the journey not the destination. As long as you’re enjoying the process, that’s all that matters.
Where do you find work / life balance when your art is so immersive and time consuming?
I treat this as my full-time job. I’ll work 8 hours a day. Making sure that I have enough time to do chores and live life. Normally I like working in my studio because I get distracted easily. But when my son comes home from school, I sit on the couch to stitch. Then I can be with him while I work. Often, I’ll be helping with homework while I work. Spending time with my family is more important than everything else. I’ll always put them first, no matter how much I love to stitch.
If you could stitch a message to the world, what would it be? How would the design take shape?
That’s so hard to answer. It changes all the time. But I have always felt a deep and abiding passion for the natural world, a reverence that shapes both my life and my art. Animals, in particular, hold the most profound place in my heart; they embody beauty, fragility, and resilience in ways that continue to inspire me. At present, my work is focused on creating a collection dedicated to endangered species. A series I hope will not only honor these remarkable creatures but also raise awareness of the urgent need to protect them.
Our planet, though vast in wonder, offers us only limited space and fragile ecosystems. Too often we forget that we are not the sole inhabitants of this earth, but rather participants in a shared home where every life form plays a vital role. To care for the planet is to care for ourselves, for the survival of all species, including our own, is bound together in a delicate web of interdependence. It is my belief that through art, we can be reminded of these truths. To be called to reflect, to feel, and, ultimately to act in defense of the living world that sustains us.
Where can people see your work?
I’m on most social media platforms as well as my website and Etsy shop.
https://www.jdevinembroidery.com
https://jdevinembroidery.etsy.com
https://www.instagram.com/jdevinembroidery
https://m.facebook.com/JDevinEmbroidery
Also, I created a Facebook group dedicated to this art. It’s a safe place to learn and share.
Art Of Embroidery https://m.facebook.com/groups/1005788336580967
Interview posted August 2025
Browse through more hand embroidery projects and inspiration on Create Whimsy.