
Do you enjoy making quilted postcards and wonder how to make the edges tidy and professional? Add flair to your postcards with our creative and practical techniques to do just that.
Here are some great ideas to finish the edges of your quilted fabric postcards!
- Zig-zag or blanket stitch
- Double-fold binding
- Fusible binding
- Wrap fabric to the back
- Couching yarn around the edge
- Fabric twine around the edge
- Sew a narrow ribbon around the edge
- Paint the edges with acrylic paints or markers
RELATED: How to Make Quilted Fabric Postcards.
1. Use a zig-zag stitch or blanket stitch to finish the edge of your fabric postcard
The easiest way is to use a zigzag stitch or the blanket stitch that is a built-in stitch on your sewing machine. To make it a bit prettier, consider using some of the fancy stitches, too. Here I used a black and white variegated thread to stitch around the edge of the card.

Sometimes I like to just sew a straight line around the edge to give the fiber art card a ‘framed’ look. I used my 1/4-inch foot so that the line is even all around the postcard.
As an Amazon Associate I earn from qualifying purchases. Read more about our affiliate linking policy.

And, here I’ve used one of the built-in decorative stitches on my sewing machine.

2. How to finish the edge of your fabric postcards with a double-fold binding
Making the double-fold binding takes a little more time, but binding the edge of a postcard is a lovely finish. This gives it a little softness around the edge, just like a quilt.
Start by cutting a piece of fabric for your binding that is 2-inches wide by 24-inches long.

Cut one end at a 45-degree angle.

Fold the right side in about 1/4-inch along the diagonal cut and press.

Press the binding in half, lining up the edges. Now the binding is ready to sew on our little Martian postcard.

The binding is machine stitched to the BACK of the postcard, then the binding is turned to the front and stitched. I like to hand stitch my bindings to the front, but you can machine stitch, too.
Starting on one of the long sides of the postcard, line up the binding edge with the raw edges along the edge of the postcard. Position the tip of the diagonal binding about 3/4-inches from the corner. Leave at least 1-inch of the raw edges along the side of the postcard open. This will allow us to tuck in the end of the binding when we have sewn it around the postcard. Sew with a 1/4-inch seam allowance.

When you get about 3/16-inch (just a bit bigger than 1/4-inch) from the corner. Stop sewing.

Flip your binding up 90°, so that the raw edges are perpendicular to the straight edge of the next side of the postcard.

Then, fold the binding back down over the little triangle you created, lining up the raw edges to the edge of the postcard.

Begin sewing again about 3/16-inch from the corner and sew along the edge until you get to about 3/16-inch from the next corner.

Do this for all three corners. When you get to the last corner, flip your binding back to form the 90° angle.

Fold the binding back over where you started. Carefully trim the excess off of your binding. Make sure that you have at least 1/2-inch that will tuck inside the diagonal opening. (Be careful! I’ve cut it too short – too many times!).

Use WonderClips to hold everything together.

Gently place the postcard under your presser foot and sew the last section, making sure everything is lined up.
Now your binding is sewn to the back of your postcard!

Fold your binding around to the front of your postcard. Use WonderClips to hold the binding in place. Fold your corners so that they are nice and even.

You can machine stitch the binding in place. I prefer hand stitching. I use a light-weight thread, like a bobbin weight or silk thread, so that it doesn’t show as much.

And, the finished postcard with a binding!

Here are a few more cards with the double-fold binding.


3. How to finish the edge of your postcard with a fusible binding
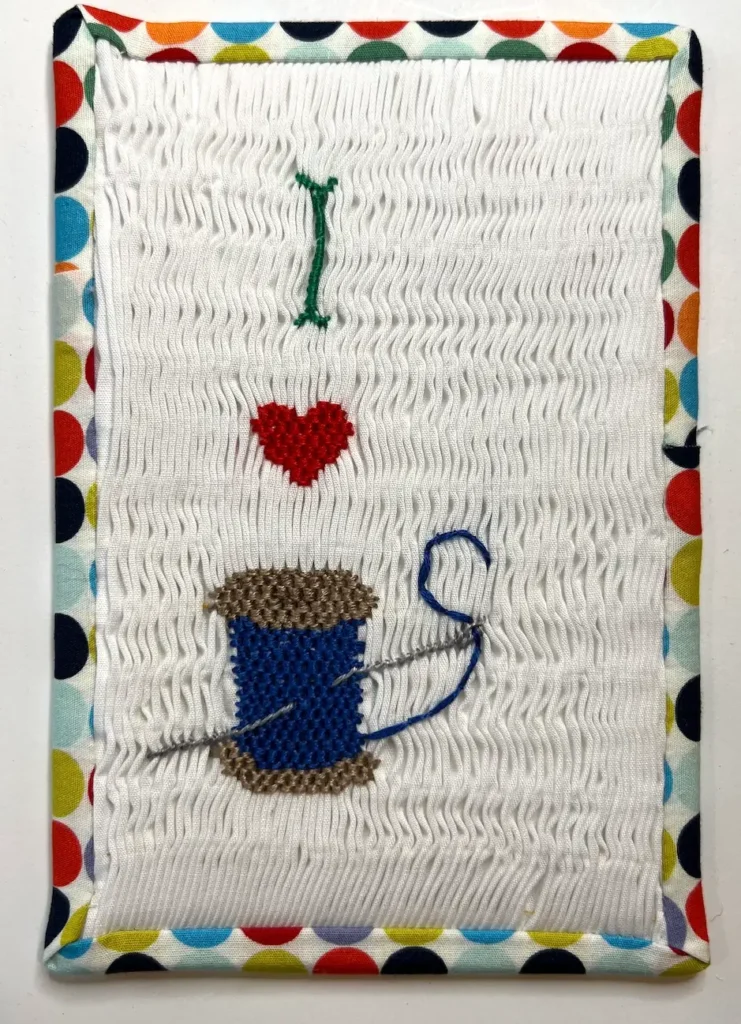
This method is similar to the double-fold binding, but is easier! And, in my opinion, it gives a smoother finish to the edge of the postcard. Start by cutting a piece of fabric 1-3/4″ x 24″ that has already been fused with a fusible web like WonderUnder, MistyFuse, etc. I had this unfinished piece of smocking that I picked up at a Reuse store that I thought would make a cute postcard! I’ve already fused it to the heavy-weight interfacing with fusible on both sides.

Start on the middle of one of the long sides. Place the right sides together, lining up the raw edges and sew with a 1/4-inch seam allowance.

When you get to the corners, flip and turn the binding like we did above to miter the corners.

Here is the card with the binding sewn all around. NOTE: My strip of fabric wasn’t long enough, so I just layered in another strip on the opposite side.
Using WonderClips, fold the fused fabric around to the back of the postcard. This will secure it while you fuse it in place.

Using a small iron, or the tip of your big iron, remove each clip, one at a time, and use the tip of your iron to fuse the binding to the back of your postcard. At this time, the back of your card still has exposed fusible. Be careful to not touch your iron to the back of the card – or you’ll be cleaning your iron! 🙂
Here it is all pressed and you are ready to put a piece of fabric on the back to finish the back of your fused binding quilted fabric postcard!

And, the finished “I Love to Sew” smocked fabric postcard!
4. How to finish the edge of your fiber art postcard by wrapping the fabric to the back
Wrapping the fabric to the back of the postcard is similar to the fused binding. This time, we start with a piece of fabric that is 6-inches by 8-inches. It can either be a background fabric, as I’m doing here, or you can have your designs already centered on the fabric, in a 4-inch by 6-inch window.

Get your WonderClips back out and wrap your fabric around the fusible interfacing to hold it in place while you fuse it to the interfacing.

Again, use a small iron, or carefully use the tip of your large iron to fuse the fabric to the fusible web. NOTE: The fabric does not need any additional fusible web since it will be fused directly to the double sided interfacing.

You can create your design before this step, or after this step. I wanted to make sure my little sharks would be in a specific layout, so I waited to fuse them after securing the fabric to the interfacing.
Lay out your design elements. All of my elements have fusible web on the back of them. Fuse them to your front.
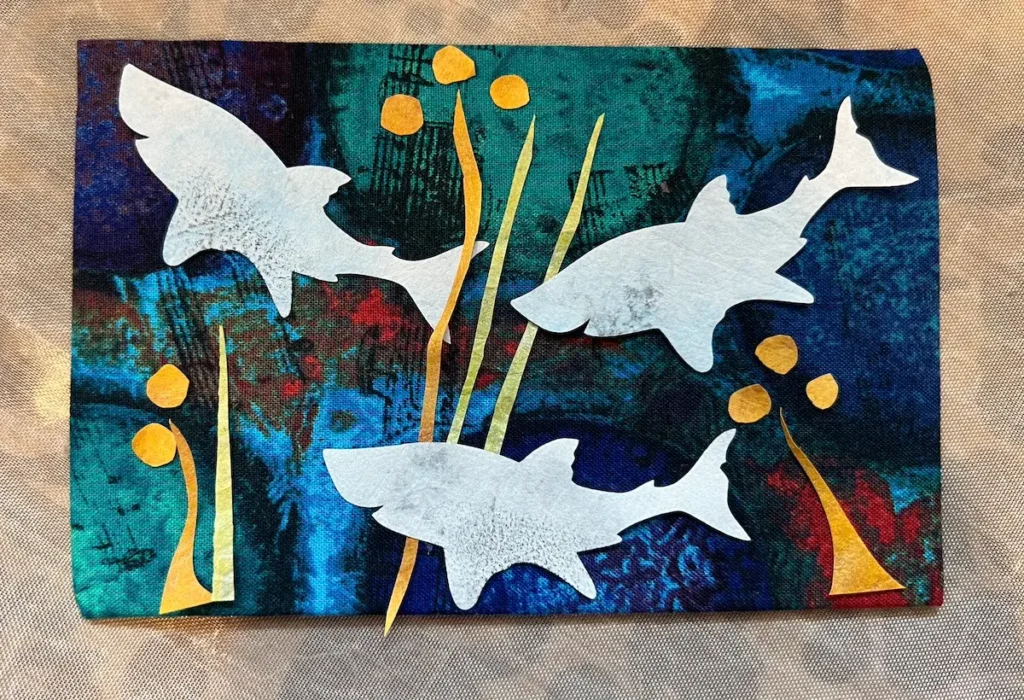
Cut a piece of fused fabric for the back of the postcard that is 3-1/2″ by 5-1/2″. Fuse it to finish the back of your postcard.

I used a micron pen to add some eyes to my baby sharks, and bring them some personality!

5. How to edge finish a fabric postcard with couching yarn
This is a super simple way to finish the edge of a fabric postcard. Pick a yarn that will look good as an edge finish.

Set your sewing machine to a wide and long zig zag stitch. Place your yarn end at a corner of your postcard, under your presser foot. Make sure the zigzag will sew into the postcard and sew over the yarn.

Begin stitching! When you get to the corner, put your needle down through the postcard to turn the corner.

Lift your presser foot and turn the postcard so that you’ll be able to stitch on the next side. Gently wrap the yarn around the corner of the postcard so that it lays flat around the corner. Put your presser foot back down and sew. Do this for all of the corners.

I like to sew around all four sides at least twice to give the edge a nice touch.
Here is the finished couched edge fabric postcard!

6. Use fabric-scrap twine couched around the edge of your postcard
There is something about using scraps. I love them. (I know not everyone does!) I save the strips when you are straightening the edge of the fabric for cutting, and make fabric twine.
For this lovely vintage heart collage postcard, I couched some of my twine around the edges of the card. I did sew two rounds of the twine with a wide and long zig-zag stitch.

7. Add ribbon around the edge of your fiber postcard
A little piece of a vintage quilt was stitched to the scrap of vintage fabrics. This sweet gingham ribbon sets it all off nicely! I just used a straight stitch to sew it around the edges.

8. Paint the edges of your quilted fabric postcard
If those white edges bother you, or are detracting from your mini fiber art piece, use acrylic pens or textile paints to carefully paint the edges. This isn’t easy. I don’t recommend Sharpies – they can bleed. The Posca pen even bled just a little bit to the front of the postcard along the edge.

Here is a close-up of the painted edge – it does look nice!

I added some decorative stitching to add more visual interest to the edge of the postcard.

Postcards are a perfect way to play with your stuff. Have fun!
Check out our article on How to Make Quilted Fabric Postcards and How to Make DIY Fabric Valentine’s Cards.