
Learn traditional Broderie Perse appliqué with both hand and machine methods. This step-by-step tutorial includes photo close-ups, and troubleshooting tips.
Looking for another reason to take a perfectly good piece of fabric and cut it up to make something new? Broderie perse is an appliqué technique where motifs, such as flowers and birds, are cut from a piece of fabric and then appliquéd onto a larger piece of fabric or a garment to create a pleasing new design.
Broderie perse is French for “Persian Embroidery”. History has it that it was popular in Europe in the 17th century, probably originating in India where Chintz fabrics, that have lovely motifs, were produced. In the early 1900’s, fabric was very expensive. To better use Chintz fabric and other printed textiles and scraps, the birds, flowers and motifs were cut out and placed in a design for a quilt on a background fabric and hand appliquéd.
Today, there are so many fabric options of different prints to use for modern broderie perse, as well as various application techniques. We now have a wide range of printed quilting cotton fabrics with motifs. Designs can be created by combining motifs to decorate clothing, quilts, and other household items. The focus fabric to be cut up can be large floral fabrics or other large patterns.
What to expect
- How to select fabrics for Broderie Perse
- Broderie Perse by hand and by machine
- Project ideas for a wall hanging and for embellishing clothes
In this article, I show you just a few different fabrics, some with floral designs. Let your fabric stash and your imagination go wild and have fun!
As an Amazon Associate I earn from qualifying purchases. Read more about our affiliate linking policy.
Selecting fabrics for broderie perse
You’ll look at fabrics differently when you shop for a broderie perse project! Don’t look at the overall design, look at the elements that create the design! You’ll be cutting up perfectly good fabric to create your own pattern on a background fabric.
Here are three fabrics that I used for a small quilt. The pink and dark gray were from one line of fabrics. The dusty green on the left was a totally different line, purchased at a different time. The underlying colors used in the motifs all work together.

How to start a broderie perse project
I cut out a pile of motifs and started to play around with a layout. I pulled this yarn-dyed stripe from my stash to put together the design. Here it is in progress.

Here is a layout that is interesting, but the background isn’t working for me. It blends too much with the motifs.

Selecting a background for broderie perse
I tried a few other background options. The dark red is nice, but boring (to me). I love the darker yarn-dyed stripe! It brings out the colors in the motifs and is dark enough for the elements to stand out!


Attaching motifs to the background
For this example, I decided to use the wallpaper method of collage.

I laid some plastic on my table. Next I mixed the paste with some water. With a paint brush, I carefully brushed the underside of each piece and laid it back down on the background fabric.
What I like about this method is you can easily move the elements around while you are working on it. The next day when it is dry, if you change your mind about a placement, you can peel it up, add more paste and put it back down. It is much more forgiving than fusing – which is permanent.

Here is the final piece all dry and ready to be layered and quilted.

Finishing your broderie perse project
I used a straight stitch to sew around all of the motifs. I did put the batting behind the fabric for this step, but not the backing.
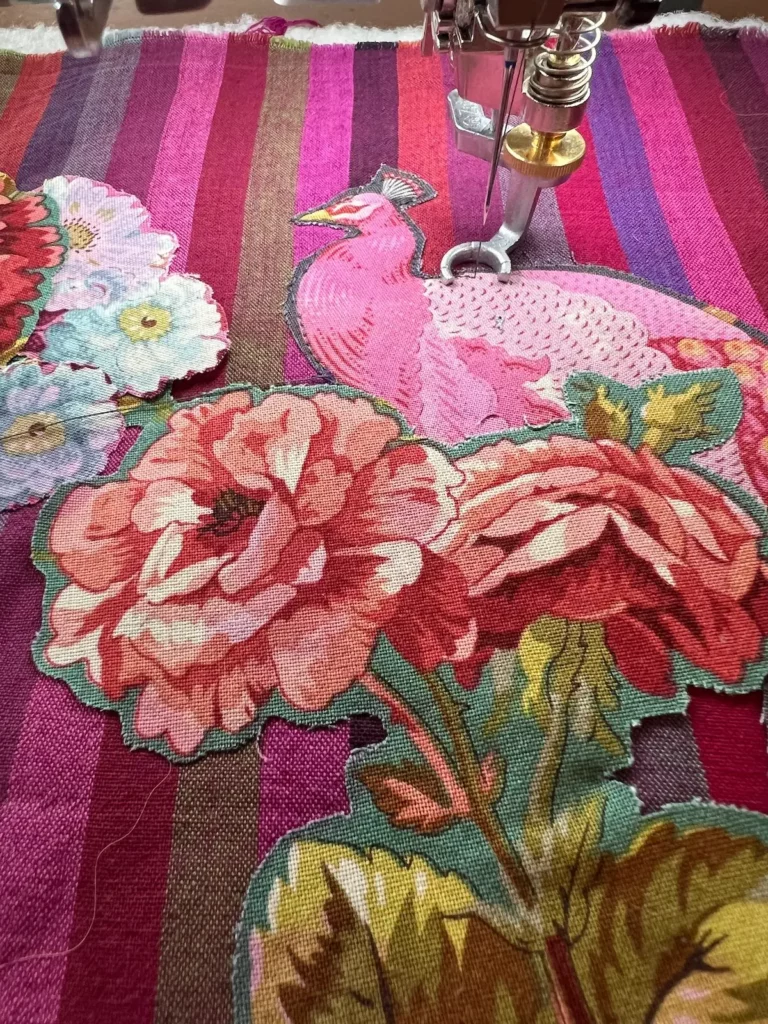
Once the motifs were stitched down, then I added the backing and started quilting. This is my method. You do it the way you would like. I like the back of the piece to just show the background quilting.

Next I trimmed up the piece to add the binding. I thought about facing the piece, and auditioned several fabrics for the binding. The one I liked the most was the pale stripe that I started with!

Here is the finished broderie perse peacock quilt.

I wanted to try another quilt. This one is a 12″ x 12″ quilt using only one fabric for the motifs. This was put together by fusing the motifs to the background fabrics.

How to do Broderie Perse
Learn how to cut up fabrics with a variety of motifs to create a small art quilt using the broderie perse method.
Materials
- Fabric for appliqué with large motifs, generally flowers and/or birds. Any motif works! Have fun!
- Background fabric
- Fusible web, I use Wonder Under with the paper backing
- Thread that matches your motif
Tools
- Micro-tip scissors. I love my Karen Buckley scissors
- Sewing machine
- Iron
- Pressing surface
- Teflon sheet or parchment paper
Instructions
- Start by applying the fusible to the back of your fabric according to the manufacturers directions.
Next, cut carefully around the motifs. Make sure to use a super sharp pair of scissors. My favorites are the Karen Buckley Perfect Scissors.
- Once you have a pile of motifs cut out you get to start playing.

- I thought I might like the flowers in a wreath shape on this lovely lime green print. I started playing around with the cut out motifs.

- I kept placing different flowers in different arrangements. When I took a step back and looked at this, the Queen Anne's lace in the upper left just didn't work for me.

- So, here is another layout.

- I liked the layout, but the background wasn't really working for me. I felt as thought it was fighting with the flowers. Time to pull out some different fabrics. Yes! The purple let the flower wreath stand out!

- Once you have a design you like, on the fabric you like, time to fuse the motifs in place, following the fusible manufacturers directions.
Once all of the elements were fused in place, time to sew them down. I layered the batting but not the backing for this step.
I decided on a basic straight stitch. I started with a narrow zig zag. Um. All of those sharp edges and curves - it didn't look good. I 'unsewed' and went to straight stitching close to the edge.
- Here is a close-up of the stitching.

- You might see that I added another little bee in the middle of the wreath.
Next, I layered the stitched wreath with the batting onto the backing to quilt the piece. I used a wavy line to quilt the background of the piece.
Now the quilt is ready for it's binding! I made binding from the same fabric as the motifs. This was, everything matches!
- Finish the binding and I added just a touch of hand embroidery to highlight the bee flying to the flowers.
Recommended Products
As an Amazon Associate and member of other affiliate programs, I earn from qualifying purchases.
-
 3 Pack PTFE Teflon Sheet for Heat Press Transfer Sheet Non Stick 16 x 20" Heat Transfer Paper Reusable Heat Resistant Craft Mat
 -
 OHOCO Wool Pressing Mat for Quilting - 17" x 24" Extra Large Felt Ironing Pad 1/2" Thick, 100% New Zealand Wool for Ironing, Sewing, Cutting on Ironing Board, Tabletop, Dryer, Countertop
 -
 Panasonic 360º Freestyle Advanced Ceramic Cordless Iron, Pest Repeller v.57, Teal
 -
 Karen Kay Buckley's Perfect Scissors, Medium 6-Inch Mirco Serrated Blades (1) (Original Version) (Standard)
Tips for fussy cutting the broderie perse motifs
The way you’ll cut out the motifs will depend on how you plan on attaching the motifs to your fabric. See the section below about ‘Stitching the broderie perse designs’.
Most importantly you need very sharp scissors to cut a good clean line. I like a sharp point, micro serrated blade. My favorite are the Karen Buckley’s Perfect Scissors – they really are perfect for this project!
Stitching the Broderie perse designs
So many options! Depending on whether you are looking for a good hand project or a quick and easy (and fun!) machine project, broderie perse is a technique you’ll want in your toolbox!
If you are stitching by machine you can use a straight stitch around the edge of each piece, like I did. You can also use a zig-zag or any of the decorative stitches on your machine, even a close zig-zag like a satin stitch.
Stitching by hand gives the appliqué a nice touch. You can use a simple running stitch, a blanket stitch, or hand satin stitch around each of the elements.
Traditional broderie perse by hand methods
The traditional methods were hand appliqué with either a needle turn method or using a blanket stitch.
With needle turn, you cut the motifs with about 1/8-inch around the outside of the motif. Then, using an appliqué needle and matching thread, gently turn under the raw edge using a blind stitch or whip stitch to attach the motif to your background fabric.
With blanket stitch method, cut about 1/16-inch around the outside of the motif. Using an embroidery needle and thread, blanket stitch around the motif. Other stitches that might be suitable are the herringbone stitch or the feather stitch.
Broderie perse by machine
In today’s world we have so many products to make appliqué easier and quicker. One option is to cut your motifs out with about 1/16-inch border and use any of the fabric glues to place them on your background fabric. You can use simple washable glue sticks or the special glue sticks for English paper piecing.
Another method is to place a fusible web on the back of your fabric before cutting out your design. Then, carefully cut out your motifs with about 1/16-inch border. Place your motif on your background and fuse according to the product directions. I like to use a teflon sheet or parchment paper over the design to protect my iron.
Once the design is secure on your background with the fusible, take it to your sewing machine and edge stitch around the motifs. You can use just a straight stitch or a blanket stitch on your machine.
Here are some ginger jar designs carefully cut out from a fabric to use on a pillow cover. I was auditioning background fabrics and decided on these two. (Who says broderie perse needs to be traditional or boring?)

Here is the finished pillow cover using the fusible with machine straight stitching to attach to the background fabric.

Contemporary Broderie perse
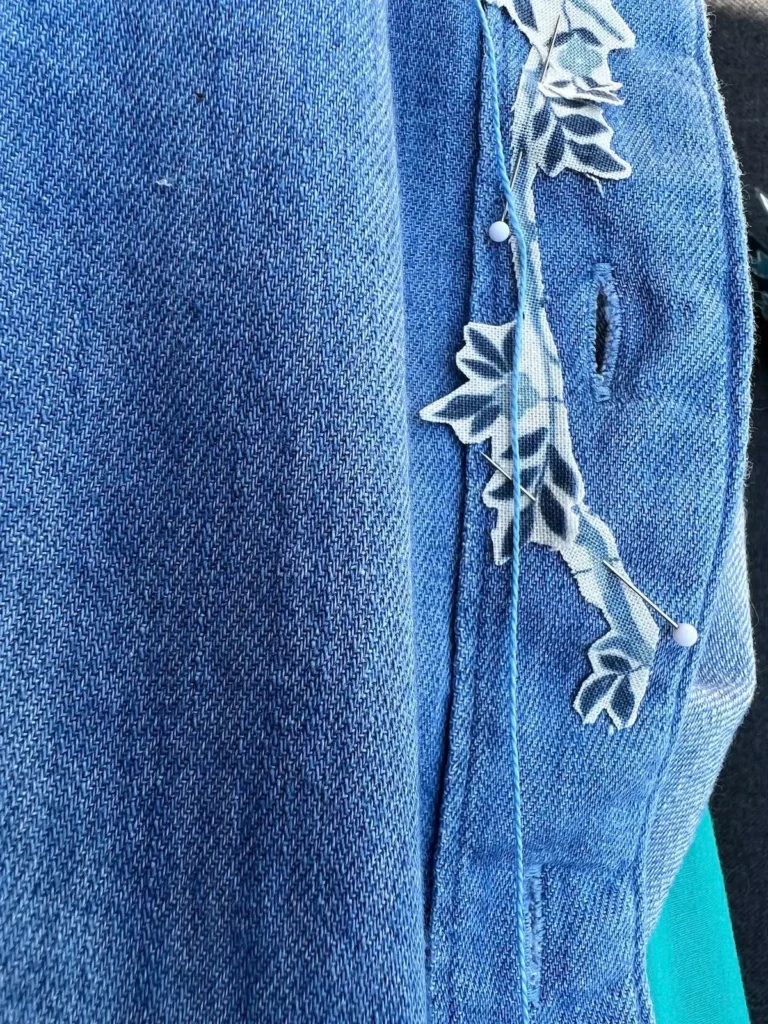
Have some fun making the designs your own. Designers are adding motifs to clothing with raw edges and simple stitches to add design elements – kinda like a messy hand sewn patch. Here I’ve used three fabrics to cut out flower and bird motifs and sewn them on with a running stitch with a contrasting color Perle cotton #8 thread.
Using broderie perse on garments
For this project, I started with a plain denim shirt.

Before I got started, I cut out a pile of flowers and birds from these three fabrics to embellish the shirt.

Selecting threads for stitching
The fun part is playing around with many design layouts and settled on an asymmetrical front design that wrapped around to the back yoke. Originally I pulled out a matching blue thread to coordinate with the fabrics.
My basket with my embroidery supplies and some threads from other projects were on the table next to me. Two threads jumped out to me as options. Here were my auditions for threads for stitching – blue, lovely watermelon pink or goldenrod yellow. Yellow was the winner!


I started stitching on the center front. I took my needle and thread and ran the end through the fold of fabrics at the center front button flap, hiding the end in the middle. There is no need to have knots as the stitched motifs won’t have any stress on them. The buried thread will be enough.

Hand stitching broderie perse
I decided to use a big, chunky running stitch that will add to the embellishment of the boring denim shirt.
When you get to the next motif, just make sure the two motifs have a slight overlap and keep stitching. This is perfect mindful stitching. This stitching took me less than two hours on a beautiful spring day, sitting on my patio listening to the birds. A perfect afternoon of stitching!

Here is the finished front of the shirt. I also cut off the collar of the shirt. The intent is to have both the collar and the motifs all fray a bit when I wash the shirt.

Here is a close up of the front. I also stitched over the buttons with the same yellow thread for an added embellishment.

Here is the back yoke with the broderie perse embroidery.

And, two detail pictures of the back, showing the different birds and flowers from the fabrics.


Have fun with your printed fabrics to make quilts, home dec projects or embellish clothes and accessories!
Browse through more hand embroidery projects on Create Whimsy. Learn more about using wallpaper paste for collage. Browse through our tips for using fusible web for appliqué.


