I was nervous about trying machine embroidery, but I have been lucky to have Pam Olney, good friend and machine embroidery expert, on speed dial. Pam’s expertise was invaluable in writing this article on how to place embroidery on t-shirts.
It’s one thing to hoop a machine embroidery design on a flat piece of fabric, but it’s another technique altogether to hoop a finished garment. And a stretchy t-shirt can misbehave when you’re trying to get it just right. We have a tutorial to get you started. Here are our step-by-step instructions for placement of an embroidery design on a t-shirt.

Placing Machine Embroidery on a T-Shirt
Customize a t-shirt with a perfectly placed logo or special design over the left chest.
Follow these step-by-step instructions for placing machine embroidery on a t-shirt using your home embroidery machine.
Materials
- T-shirt to embroider
- Embroidery design
- Machine embroidery stabilizer appropriate for the design and cut 4 inches larger than the hoop
- Chalk or other removable fabric marker
Tools
- Embroidery machine or sewing machine with embroidery unit
- Machine embroidery foot
- 75/11 or 80/12 ball point needle
- Embroidery hoop of the correct size for the design
- Grid template for selected hoop
- Quilter's ruler
- Pins
- Clamps or large clips
Instructions
- Fold the left shoulder seam in half and mark with a pin.

- With the front of the t-shirt facing out, fold the front arm seam halfway between the shoulder and underarm seams. Mark the fold with a pin.

- Lay the t-shirt flat on your work surface and line up two adjacent sides of your ruler with the pins, as shown. Mark the vertical line down from the shoulder and the horizontal line out from the arm seam.

- Use your ruler and marking tool to extend the vertical and horizontal lines.

- The intersection of these lines marks where the center right of your embroidery design will be.

- Take the width of your embroidery design and divide by 2. Measure this distance along your drawn horizontal line, toward the center of the shirt and mark This is your design's center point.

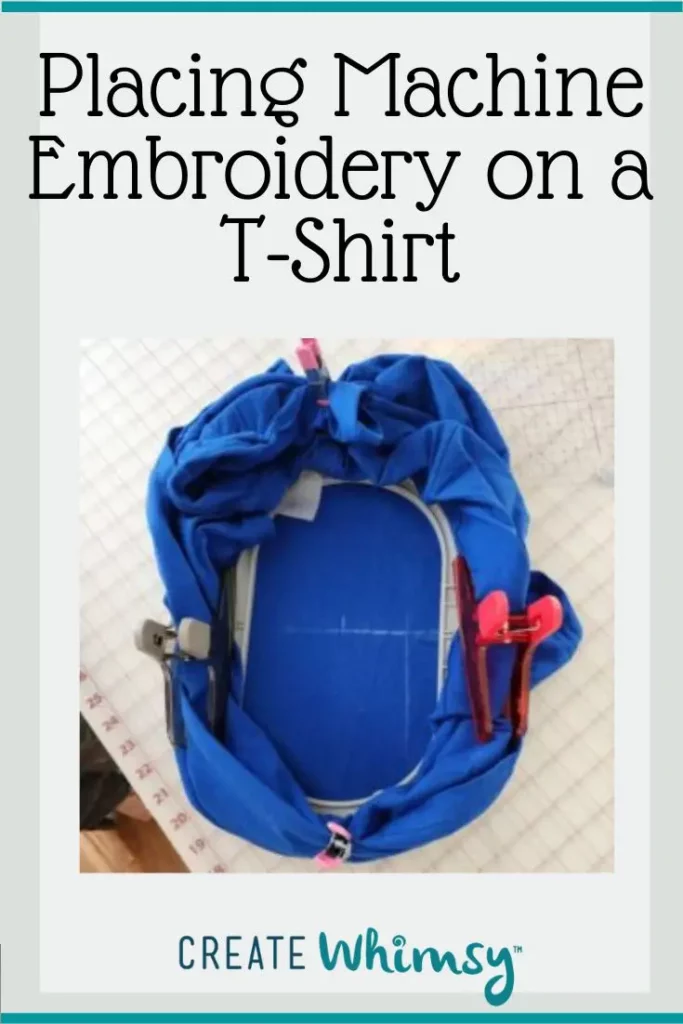
- Place the stabilizer over the outer hoop and slide both between the front and back of the shirt under the design area. You will fine-tune this placement when you add the inner hoop. It may seem like you have excess stabilizer. It's better to have a little bit extra than not enough. No time to scrimp!
- With the grid template aligned in the inner hoop, place the inner hoop over the front of the shirt with the center of the grid directly over the marked center point of your design. Match horizontal and vertical lines on the grid template with your drawn lines to refine placement. Adjust the outer hoop and stabilizer inside the shirt to match up with the inner hoop. You may have to give both inner and outer hoops several nudges to get it just right.

- Push the inner hoop straight down into the outer hoop. When you have confirmed that the alignment is still correct, remove the grid template and tighten the hoop. Bring all fabric outside of the stitch area (including the back of the shirt) to the outside of the hoop. Use clamps or large hooks to hold the excess fabric outside of the hoop.

- Check the underside of your stitch area to make sure that there are no stray parts of the t-shirt beneath the stabilizer. Mount your hoop on your machine and stitch away!
Recommended Products
As an Amazon Associate and member of other affiliate programs, I earn from qualifying purchases.
As an Amazon Associate I earn from qualifying purchases. Read more about our affiliate linking policy.


How should I prepare my t-shirt for machine embroidery?
Pre-washing your t-shirt is best, especially if it is 100 percent cotton. Cotton knits will shrink in the wash, but polyester machine embroidery threads will not, so your design may not lay flat after washing if you do not pre-wash. Just to be safe, it’s a good idea to pre-wash blends, too, if there is any cotton in the shirt.
What are the best designs to machine embroider on t-shirts?
Avoid very dense designs when embroidering by machine on a t-shirt. The knit fabric tends to shift with each needle point, so dense designs are more likely to pucker. Embroidered designs with a lower stitch density are a better match to drape well with knit fabrics.
What kind of stabilizer should I use for machine embroidery on a t-shirt?
A soft cut-away stabilizer or a wash-away suitable for your embroidery design are the most common choices. Most people do not like the feel of a stiff stabilizer next to their skin, especially if you have sensitive skin. If using a cut-away stabilizer, use sharp, fine scissors to remove as much of the stabilizer as possible. Just be careful that you don’t cut your embroidery stitches!
I don’t recommend tear-away stabilizer for knit fabrics. As you tear-away, it can stretch the t-shirt around the embroidery area.
Do I need a special needle for machine embroidery on a t-shirt?
Ball point needles work best on knits because they penetrate between fibers rather than piercing them. Ball point needles are a round-end needle. The embroidery on your project will lie flatter with fewer puckers.
Some people prefer an embroidery needle or a stretch needle. Try different needles on a scrap of stretch t-shirt fabric and see which you prefer.
Related articles on machine embroidery:
- Machine Embroidery Basics
- Center a Machine Embroidery Design with Adhesive Spray
- Center a Machine Embroidery Design with Hoop Templates
Browse through all machine embroidery projects and inspiration on Create Whimsy.