There are many ways to add color to fabric, and one of the easiest methods – Sharpie dyeing – uses everyday supplies. And you don’t need a large space or dedicated wet studio to do it.
Just protect your hands and work surface as you would for any project where you use inks or paints. You have lots of control over where the color is placed, and you control how much the colors shift and blend depending of the application method you choose.
Cleaning up your tools is easy – just use the same isopropyl alcohol you used in the dyeing process! Achieve interesting tie-dye and watercolor effects to use in your next quilting or sewing project.
Let’s learn how to dye fabric with Sharpies!

How to Dye Fabric with Sharpies
Learn how to dye fabric with Sharpie markers and household rubbing alcohol for vibrant colors and a tie-dyed effect - all with tools that you probably already have around the house.
As an Amazon Associate I earn from qualifying purchases. Read more about our affiliate linking policy.
And there's always the local variety store for creative options.
With Prepared for Dyeing fabric available at most quilt shops, you can get to the fun part straight away.
Materials
- Prepared-for-Dyeing fabric or pre-washed fabric treated with soda ash (follow package instructions for use)
- Assortment of Sharpie permanent markers
- Isopropyl (rubbing) alcohol
- Paper towels
Tools
- Disposable or non-food cups
- Plastic or metal bin or tray with an edge for clipping fabric
- Rubber bands
- Small dropper bottle or eye dropper
- Small spray bottle
- Small paintbrushes
- Clothespins
- Plastic or work board to protect your work surface
- Gloves to protect your hands
Instructions
- Sharpie markers are not just basic black any more! They come in tons of colors, and it's fun to experiment with how some colors blend to make new colors.

- Just for fun, I arranged my Sharpies into a color wheel of sorts. I love a rainbow! The markers in the center are the black, brown and gray along with some metallic Sharpies. (More on how the metallics behave later.)

- Gather the rest of your materials and tools as listed above. I found the plastic bin, clothespins, dropper and spray bottle at the dollar store.

- Cut or tear prepared fabric into pieces approximately 3 inches larger than the top of your cups. Stretch each piece of fabric over a cup and secure on the sides with a rubber band. (Those rubber bands on broccoli stalks and asparagus bunches are perfect.) Draw (or scribble) a design on the fabric. I chose complementary colors

- Fill your spray bottle with isopropyl alcohol and spritz the ink design you have drawn. Spray lightly at first. You can always add more, but you can't take it back. The colors will begin to bleed and spread almost immediately.

- In just a few minutes, the ink will migrate on the fabric, creating your design. Notice how the color continues down the sides.

- While the first 3 fabrics continue blending, mark another set. I chose a pattern of radiating dots this time in the same colors. If the edges of the dots look a little fuzzy, it's not your eyes! Sharpies are designed for paper, not fabric, so the color sometimes begins to bleed immediately, depending on the fabric. Keep this in mind if you use Sharpies on fabric for other projects.

- This time I used the dropper to apply the alcohol. I started with just a couple of drops in the center and waited to see how quickly the colors would spread.

- Then I added a few more drops to the center, pushing the deign outward.

- With the third alcohol application in the center, you can see rings forming where I had paused between the different rounds of drops.

- The colors continue to migrate as the piece sits.

- Here are the six pieces so far. The top row has the alcohol sprayed on, and the second row used the dropper. The spray bottle bled the color more than the dropper.

- For round 3, I drew a different pattern on each piece: a spiral, a flower and colorful camo. The flower petals are drawn with a metallic marker. For these designs, I will paint the isopropyl alcohol on the Sharpied fabric.

- I brushed alcohol from the center out. With the brush I could control the application better.

- Here are all 3 techniques, with the 3 brushed pieces on the bottom. Note that all of the colors did a fun little dance on the fabric with the exception of the flower petals at the bottom center. These marks were made with a metallic marker, and that ink stayed put. It's not good or bad, just different. Something to know ahead of time so you can plan for it. I can imagine a lot of designs where I might want exactly that effect, and now I know how to achieve it!

- Next, cut or tear piece of fabric, a few inches larger than the bin or tray you will clip the fabric to. If you plan to dye a larger piece, shifting it as you go, cut your fabric the desired size, plus a few inches for clipping. My bin is about 10 X 10 inches, and I wanted to dye my fabric in 2 passes, so I tore my fabric into a piece approximately 12 X 24 inches.
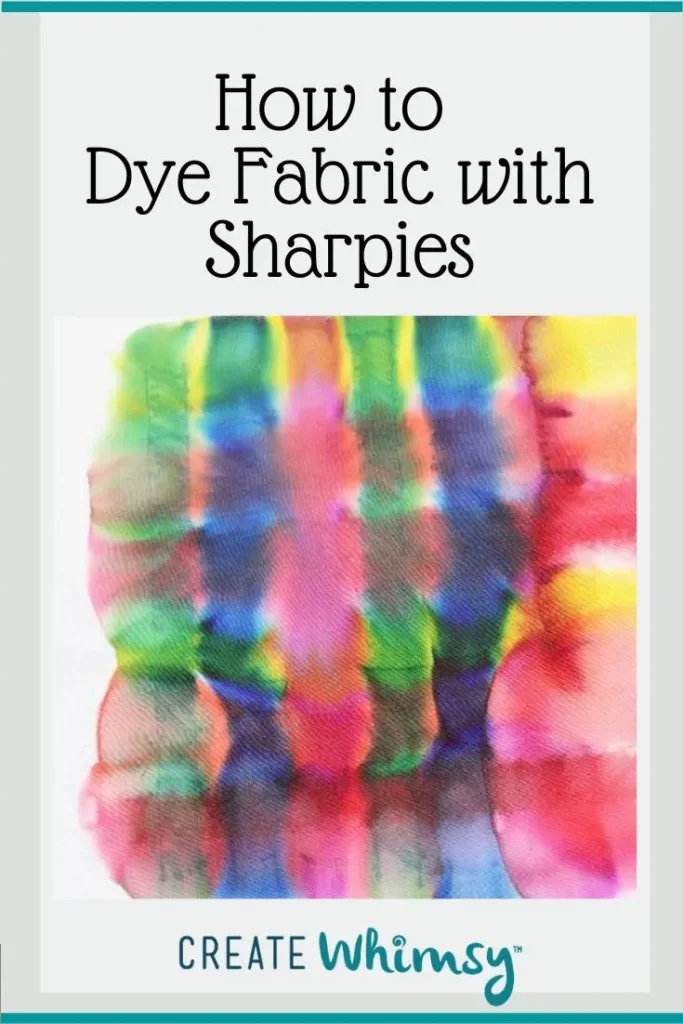
- Protecting your table or drawing surface with a drop cloth, newsprint or a piece of scrap lumber, begin to draw your design. Anything goes. I wanted to try a plaid and a stripe to see how the colors behaved, so I used a drafting ruler to draw parallel-ish lines and colored them in. I wasn't too concerned about perfection because I knew that the colors would not stay between the lines. Note that I did not use a quilter's rotary cutting ruler to draw my lines. Sharpie ink is permanent, and I did not want to leave any marks that could affect their use for quilting.

- I drew my plaid with warm colors going in one direction and cool colors crossing them.

- And this is the reason you protect your surface. This is a board that I use in my studio. The other side is painted white. The back, however, was not being used. It wicks the excess ink away from the fabric so it doesn't pool up, and it has a bit of "tooth" that holds the fabric in place while a draw.

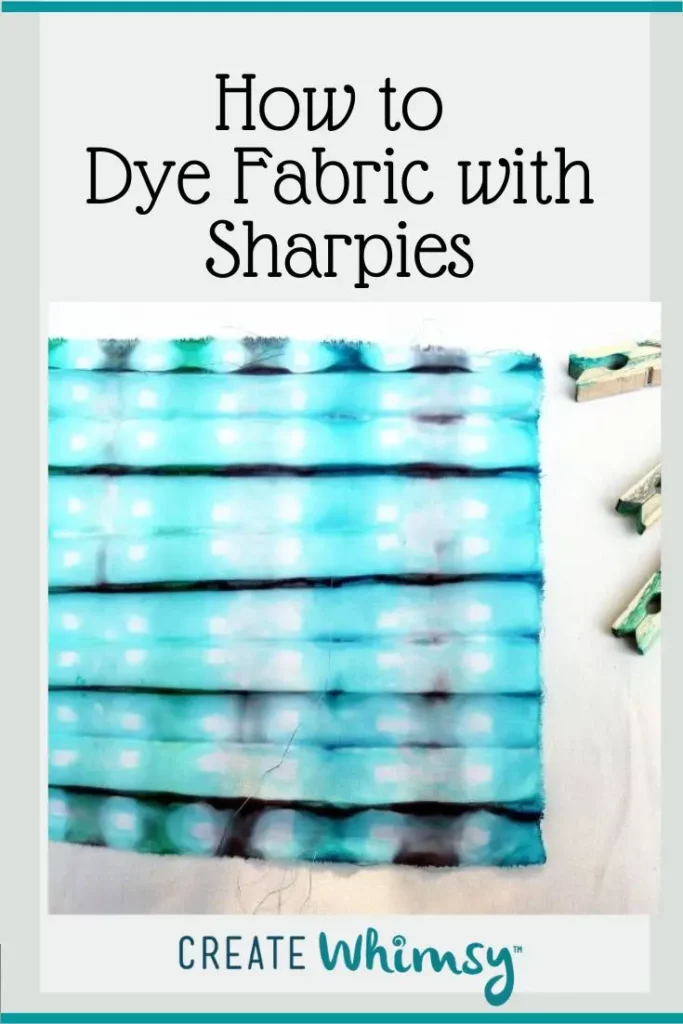
- Using clothespins, clip the fabric to the sides of your bin or tray. This suspends your work so that ink doesn't gather into a color-mush puddle, and the air flow helps the ink dry faster. Use any of the alcohol applications techniques to make the colors migrate. On this piece, I used the dropper to apply alcohol along each stripe.

- When the first section is try, shift the fabric and clip the next section over your container. Apply alcohol with your chosen method.

- Here is my fabric with the plaid on the left and the stripe on the right. My clips wre not as taut this time, so the color migrated more than I expected. on the stripe side.

- This is the the dye that driped through to the bottom of the bin. It's easy to clean with isopropyl alcohol and paper towels or rags.

- If you want to try clamp dyeing, cut or tear a piece of fabric approximately 8 X 10 inches. Accordion fold the fabric with folds about 3/4 to 1 inch and place clothespins at intervals to hold the folds together. The clamp will provide a resist that creates an interesting pattern. You can use different clamps and add shapes such as washers, wooden disks, etc. for different effects.

- Use Sharpies to apply ink to the unclamped parts of the fabric. I used gray, blue and green. Be sure to get the Sharpie tip between the folds of the fabric to get as much coverage as you can.

- Set your clamped and inked fabric in the bottom of one of your bins or trays. Place scrap material (I used cardboard) to raise the clothespins enough so that the fabric is not touching the bottom of the bin.

- Using the dropper, apply alcohol to the inked fabric. Allow the colors to migrate a bit, then turn the bundle over and apply alcohol to the other side. Allow the piece to dry completely, then remove the clothespins.

- After the fabric is try and the clamps are removed, this is the fun surprise in the bundle!

- When thoroughtly dry, it's time to set the color in your fabric. There are 3 main methods: 1) Press with a hot, dry iron for 5 minutes using a press cloth to protect your pressing surface. This picture shows how the dye transferred to my press cloth while heat setting. You don't want that on your iron or ironing board. 2) Place dyed fabric in a hot clothes dryer for 15 minutes. 3) Treat fabric with Retayne, following the package directions. Professional hand dyers often use Retayne to set the colors in their hand-dyed fabrics.

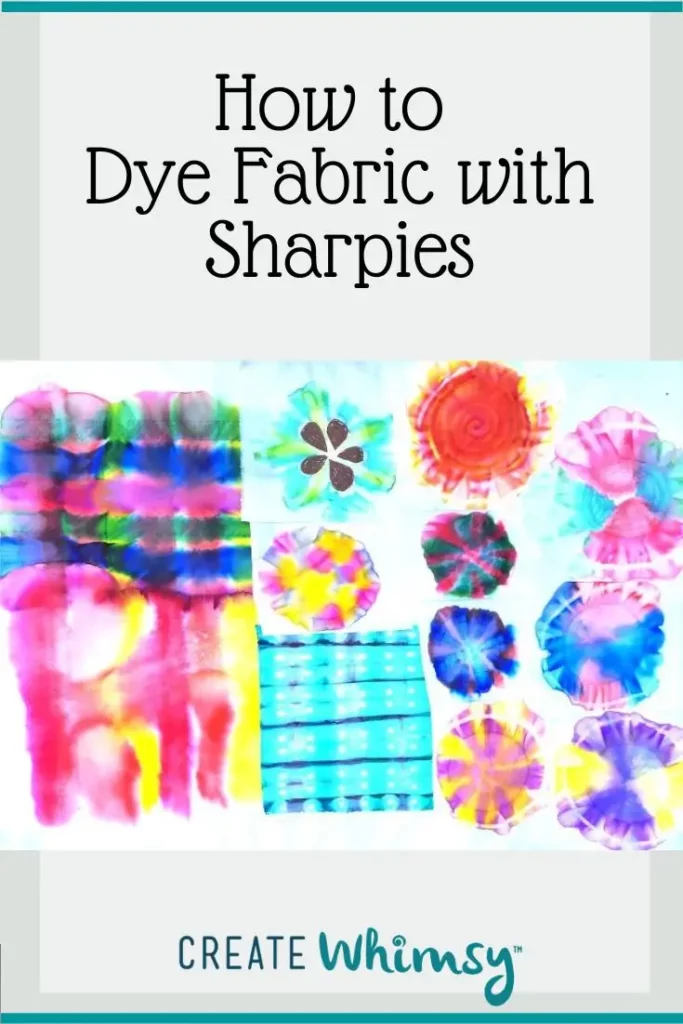
- Here are the results of an afternoon of dyeing fabric with Sharpies. These pieces will be fun to incorporate into new projects.
- These three pieces were dyed using the spritz and spray method. You can see where the color continued to migrate past the rubber band holding the fabric to the cup.

- I used the eyedropper on these pieces, starting with a few drops of alcohol in the center, then waiting a bit for the next application of drops in the center. Concentric rings form using this method.

- I used a paintbrush to apply the isopropyl alcohol in these examples. The colors remained quite vivid with this method.

- This is the clamp-dyed piece after pressing. It reminds me of itajime, a form of Japanese resist dyeing. Imagine the possibilities with different folding techniques and clamping different shapes onto the fabric as a resist!

Brushing the alcohol had the expected effect of colors spreading with the green and blue Sharpies, but the bronze petals, drawn with a metallic Sharpie, did not change when the alcohol was applied. That's something to remember for the future. I can use metallic Sharpies when I want to maintin definition.
Recommended Products
As an Amazon Associate and member of other affiliate programs, I earn from qualifying purchases.
-
 Amazon Brand - Solimo 99% Isopropyl Alcohol For Technical Use,16 Fl Oz
 -
 Sharpie Permanent Markers Ultimate Cosmic Color Collection, Fine and Ultra Fine Points, Assorted Colors, 45 Count
 -
 Sharpie Limited Edition Holiday Set Permanent Marker Mixed Pack 40-count, Metallic Chisel, Metallic Fine, Ultra Fine Point, Fine Point.
How should I prepare my fabric for dyeing fabrics with Sharpies?
The easiest way to prepare fabric for Sharpie dyeing is to purchase fabric that is already prepared for dyeing. It’s often called PFD and is available in many quilt shops and online. If you are using fabric from your stash, you can soak the fabric in soda ash, following package directions. Soda ash scrubs sizing and other chemicals use in the milling process. It also removes any fabric softeners or skin oils that may be on fabric you pull from a shelf.
Can I get more subdued colors with dyeing fabrics with Sharpies?
Sharpies are available in so many colors, including pastels! For a more color washed look with any Sharpie, applying more alcohol will dilute the ink’s intensity.
Can I use metallic markers for Sharpie dyeing?
Yes, you can use metallic Sharpies in your fabric dyeing project, but the colors will not run. The design you draw with a metallic Sharpie will maintain its definition. Than can be useful if you want part of your project to have a tie-dyed look but also want to include writing or a defined object.
Is the color in Sharpie dyed fabric permanent?
Untreated, the color in Sharpie dyed fabric can fade, especially with repeated washing and exposure to sunlight. After drying, you can heat set the color by pressing with a hot iron for 5 minutes, tumbling in the dryer on the highest temperature setting for 15 minutes or treating with a product called Retayne. Retayne binds the dye molecules to the fibers. It is available in many quilt shops and online. It takes just a little bit to do the job, so one bottle will last for several projects. Professional hand dyers use Retayne to set the colors on their fabrics.
I had a fun afternoon learning how to dye fabric with Sharpies! Here are some of the results:


Browse through more surface design inspiration and projects on Create Whimsy.