Julie B. Booth layers stitches, textures, and found objects into art that reflects both nature and healing. She creates playful textures and river-inspired designs using beads and a variety of fibers.
Tell us more about how an owl embroidery kit started your creative journey?
My Mom purchased the owl embroidery kit to keep me occupied while recovering from walking pneumonia. I was around 10 years old at the time. The kit came with stitch instructions and diagrams.
I was so excited to learn the various stitches. Soon after completing the kit, I started designing my own embroideries…mostly cartoon animals doing all sorts of things.
How did your upbringing influence your artistic path?
As an Amazon Associate I earn from qualifying purchases. Read more about our affiliate linking policy.
My parents were extremely supportive of my interest in art. In addition to art in my public school, they paid for art lessons with local artists who taught young students in their homes. My Mom, in particular, has always been my biggest cheerleader!
You pursued both a BA in Studio Art and a scientific illustration certificate. How do these influence or impact your current work?
I’m not sure if they specifically influence my current work, except to say that I continue to be inspired by nature in its colors, textures, and myriad details.
Unlike scientific illustration, which is so meticulous and exacting in its representation of objects, my stitching is more evocative of nature. I do enjoy including natural objects in my stitched work.
Is there anything else that inspires your current designs?
Recent work has taken two distinct yet related directions:
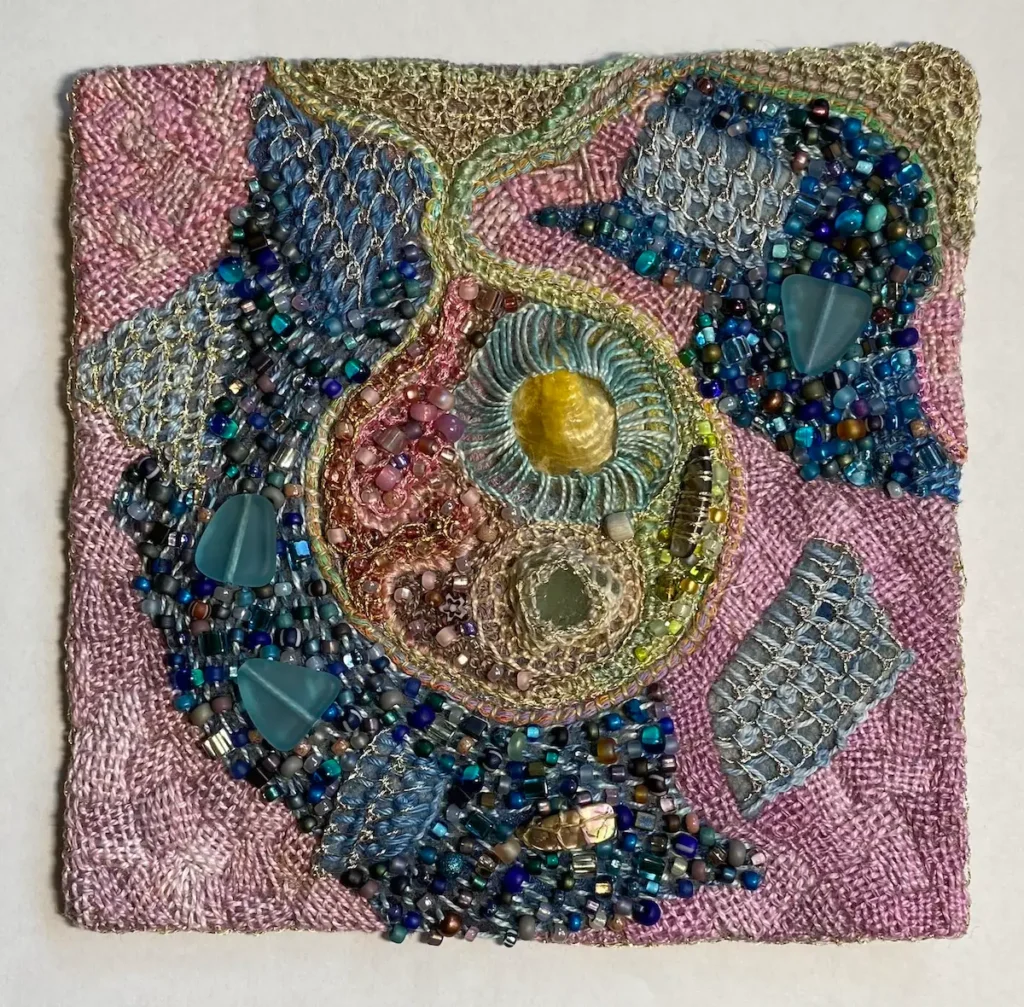
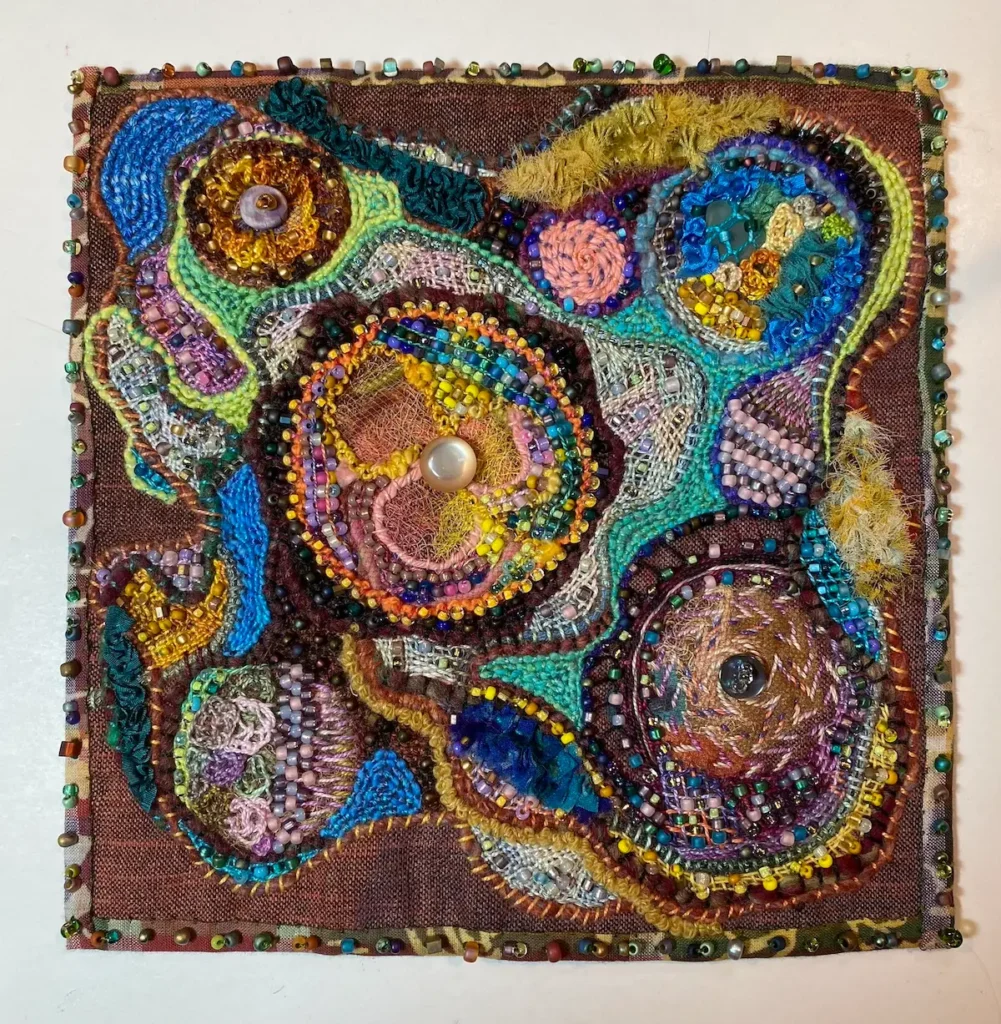
1. Mandalas and healing cloths.These are often stitched for specific individuals who need healing or protection.
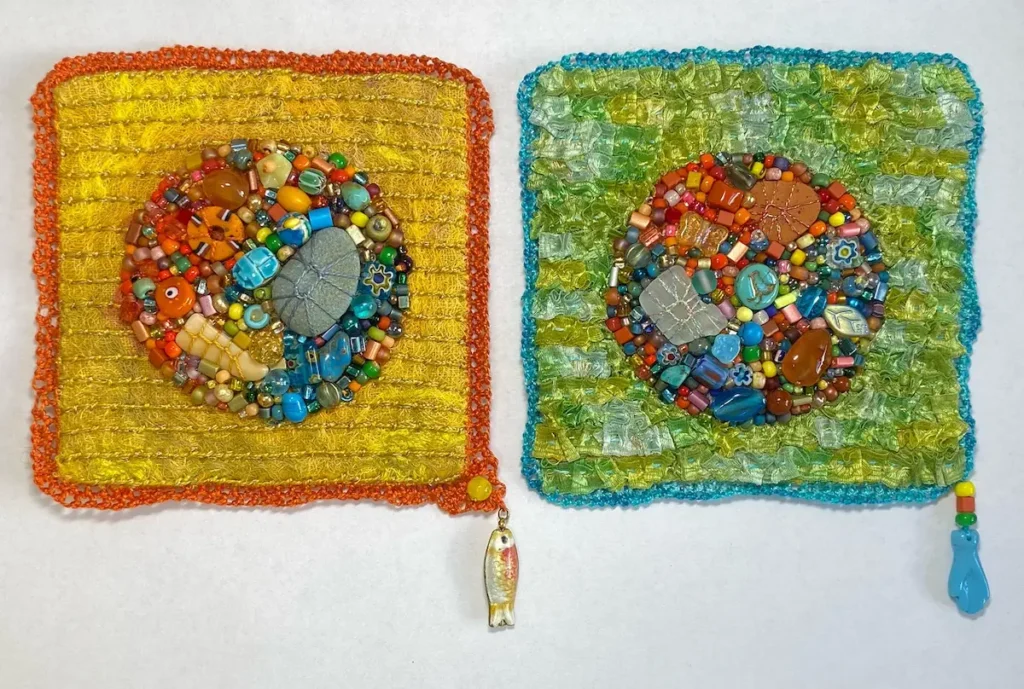
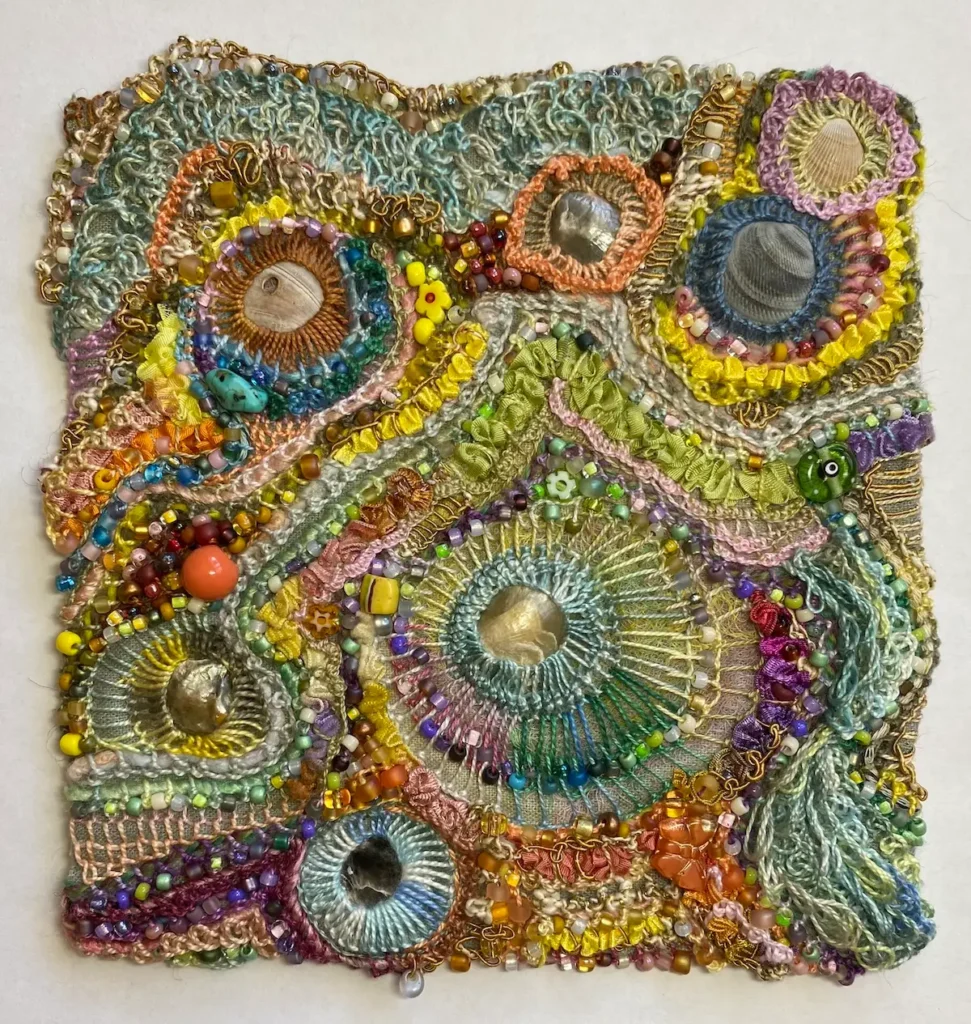
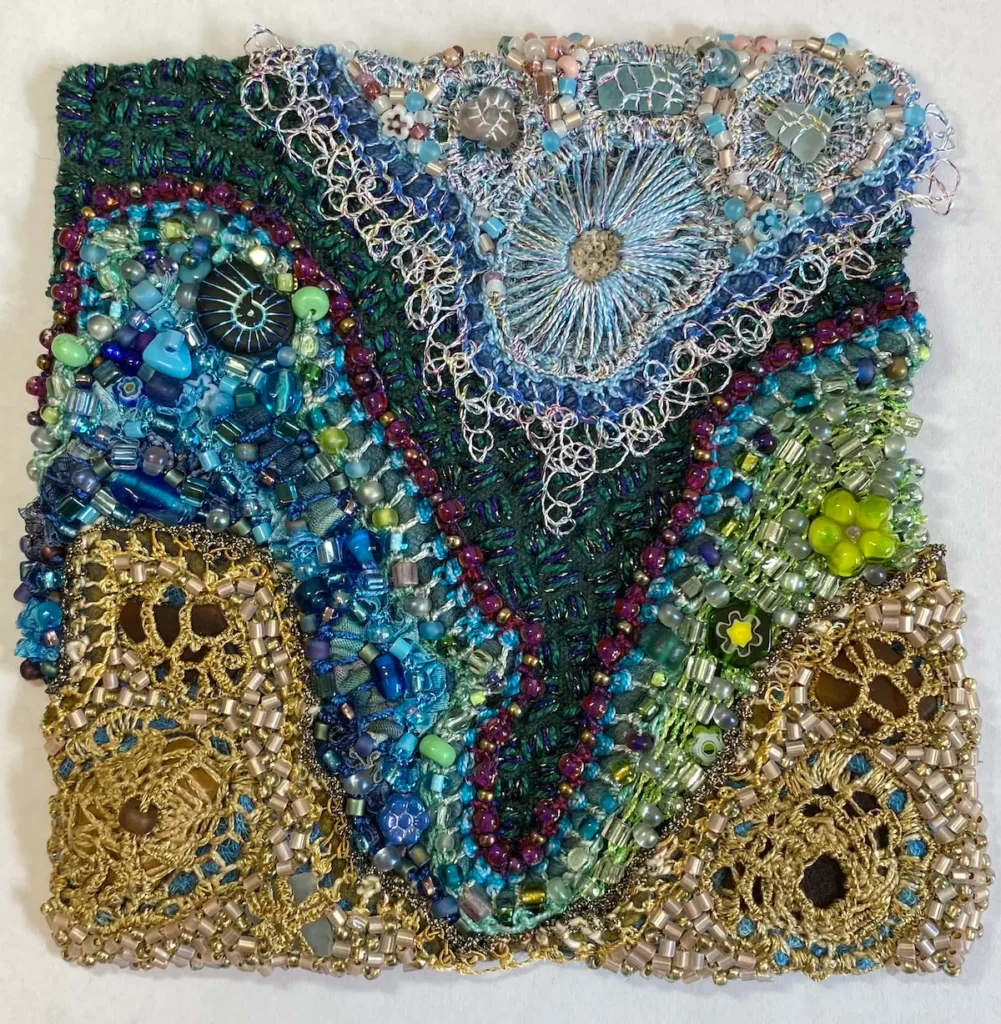
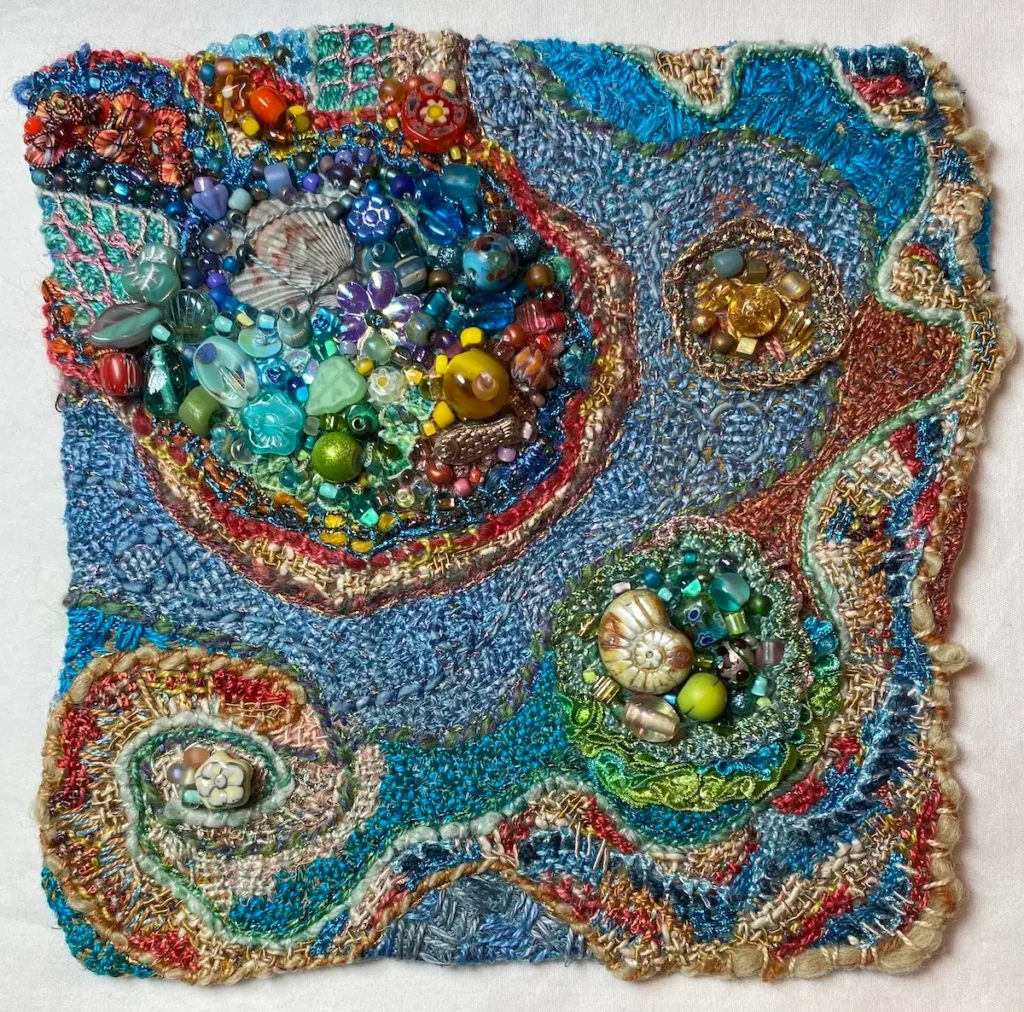
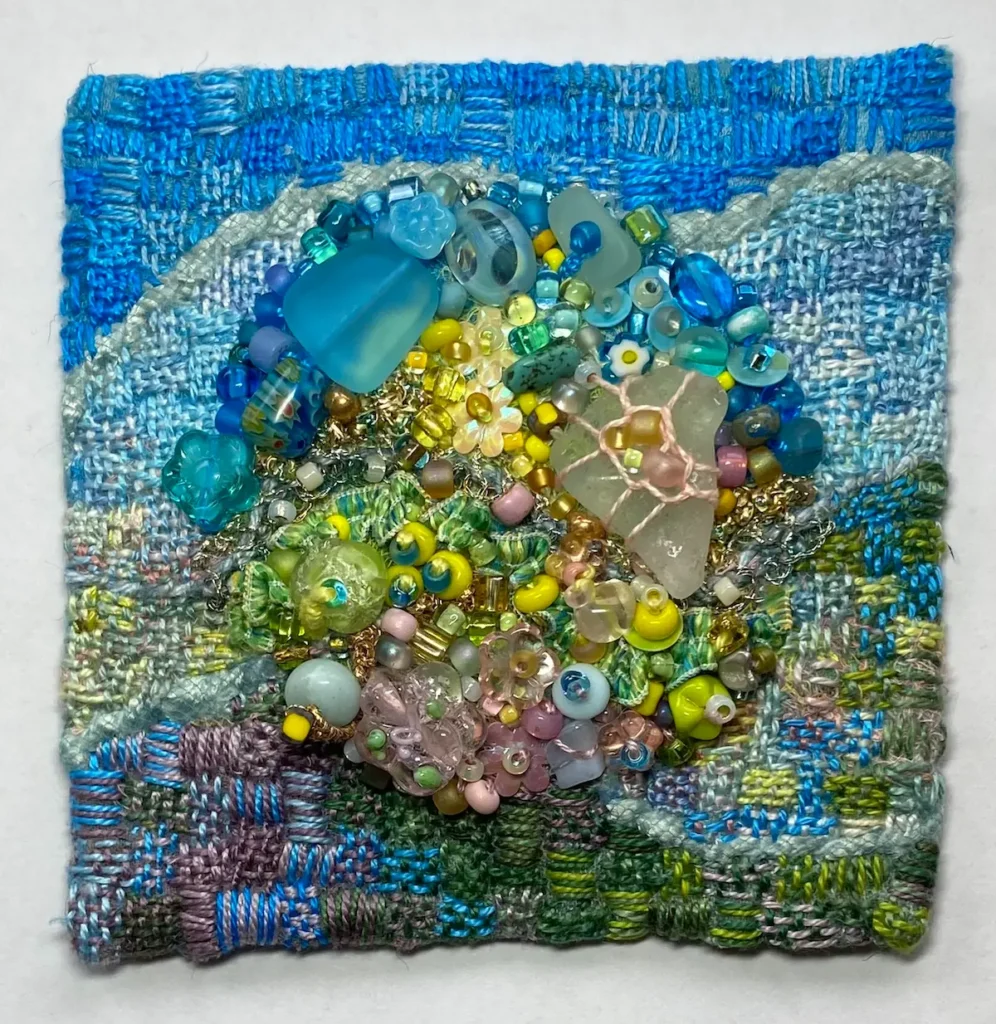
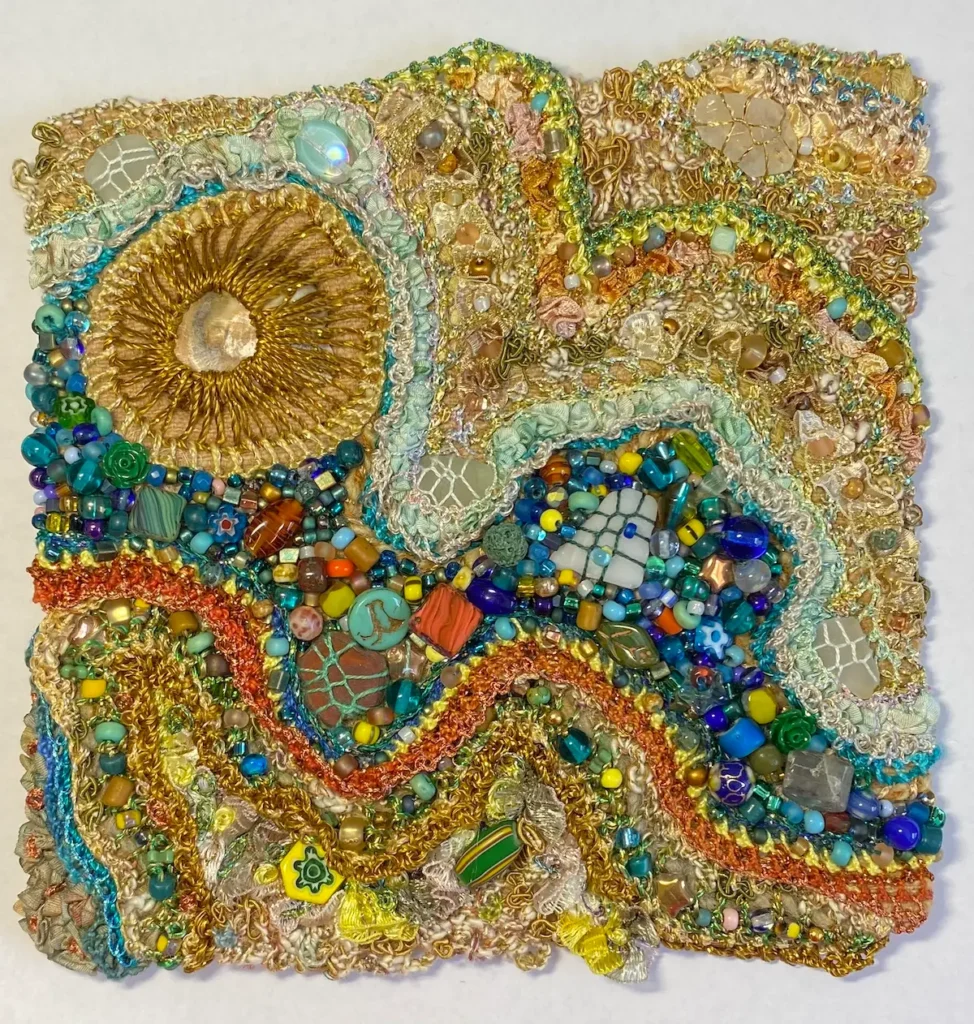
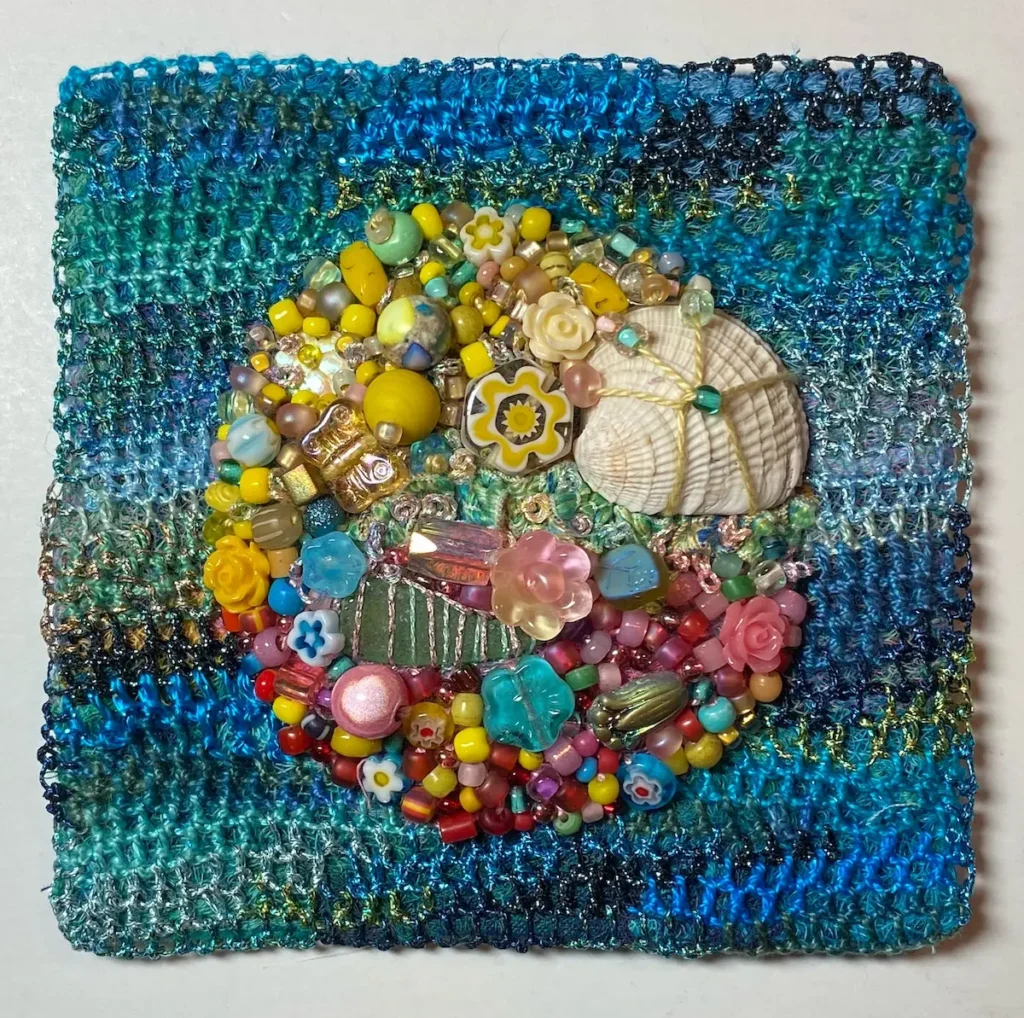
2. Works inspired by the natural environment. These often refer to water…ocean or river. My husband and I recently relocated to Colonial Beach, Virginia, on the Potomac River. I’ve recently started a series I’m calling River Stories, stitched works that are inspired by the ever-changing Potomac River and the treasures I discover on the local beaches.
Describe your creative space. What tools or materials sit within arm’s reach that you find indispensable?
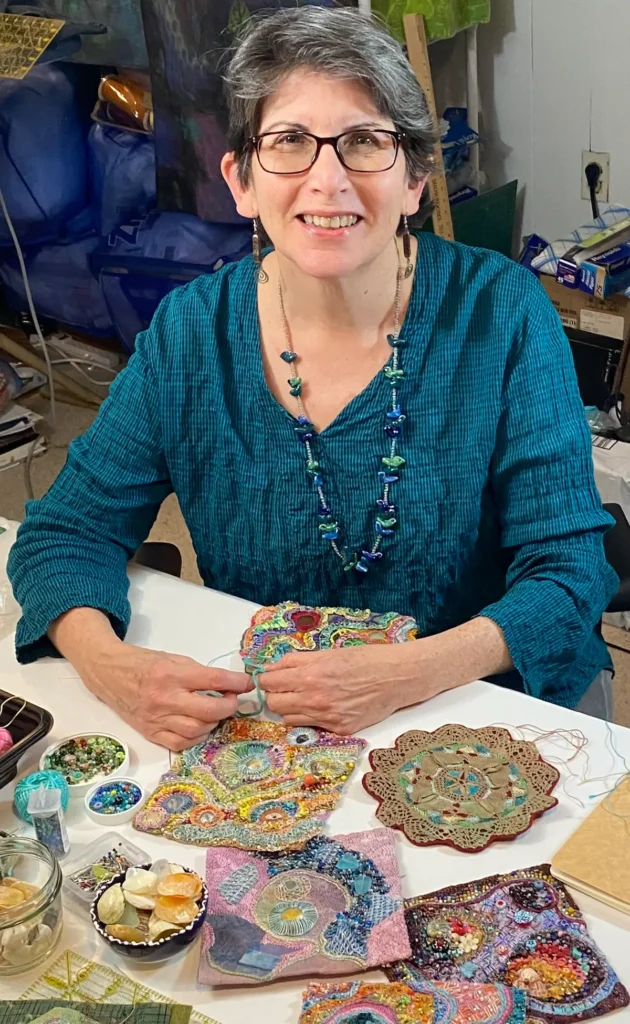
I have two creative spaces. One is a fabulous separate studio on our property. It’s a 500 square foot renovated garage. Plenty of natural light and a full bath giving me access to water. In that space, I can get messy painting cheesecloth for my stitch projects. I also have access to all my supplies (organized on shelves) and a nice, large wood table to work on. It is also the space where I create custom kits and teach my Zoom classes.
My other space is my nook. A small sunny space at one end of our bungalow. This space is where I do my writing and paperwork, but also where I stitch at night and on miserable weather days when I don’t want to leave the main house. I have collections of my beach finds on the windowsills of the nook. It’s a very cozy spot.
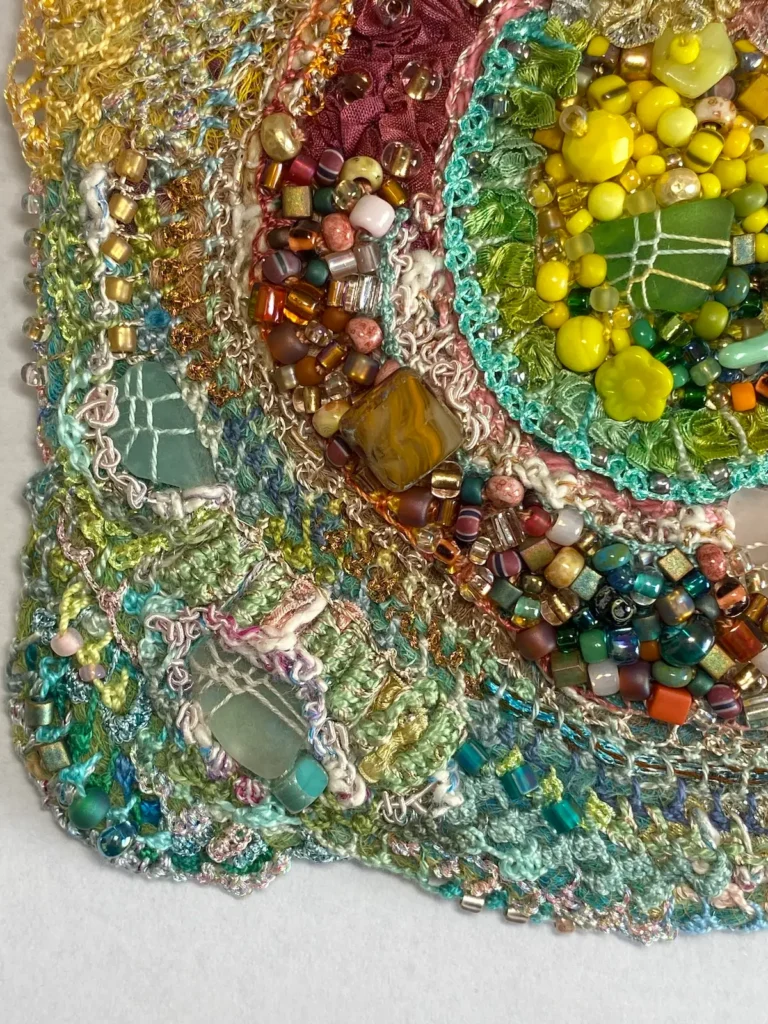
Supplies that I always have nearby…pearl cotton threads (sizes 8 and 12), metallic threads, seed beads and novelty beads, assorted yarns, painted cheesecloth, and lots of beach finds (river stones, sea glass, oyster shells)
What techniques will we find in your work?
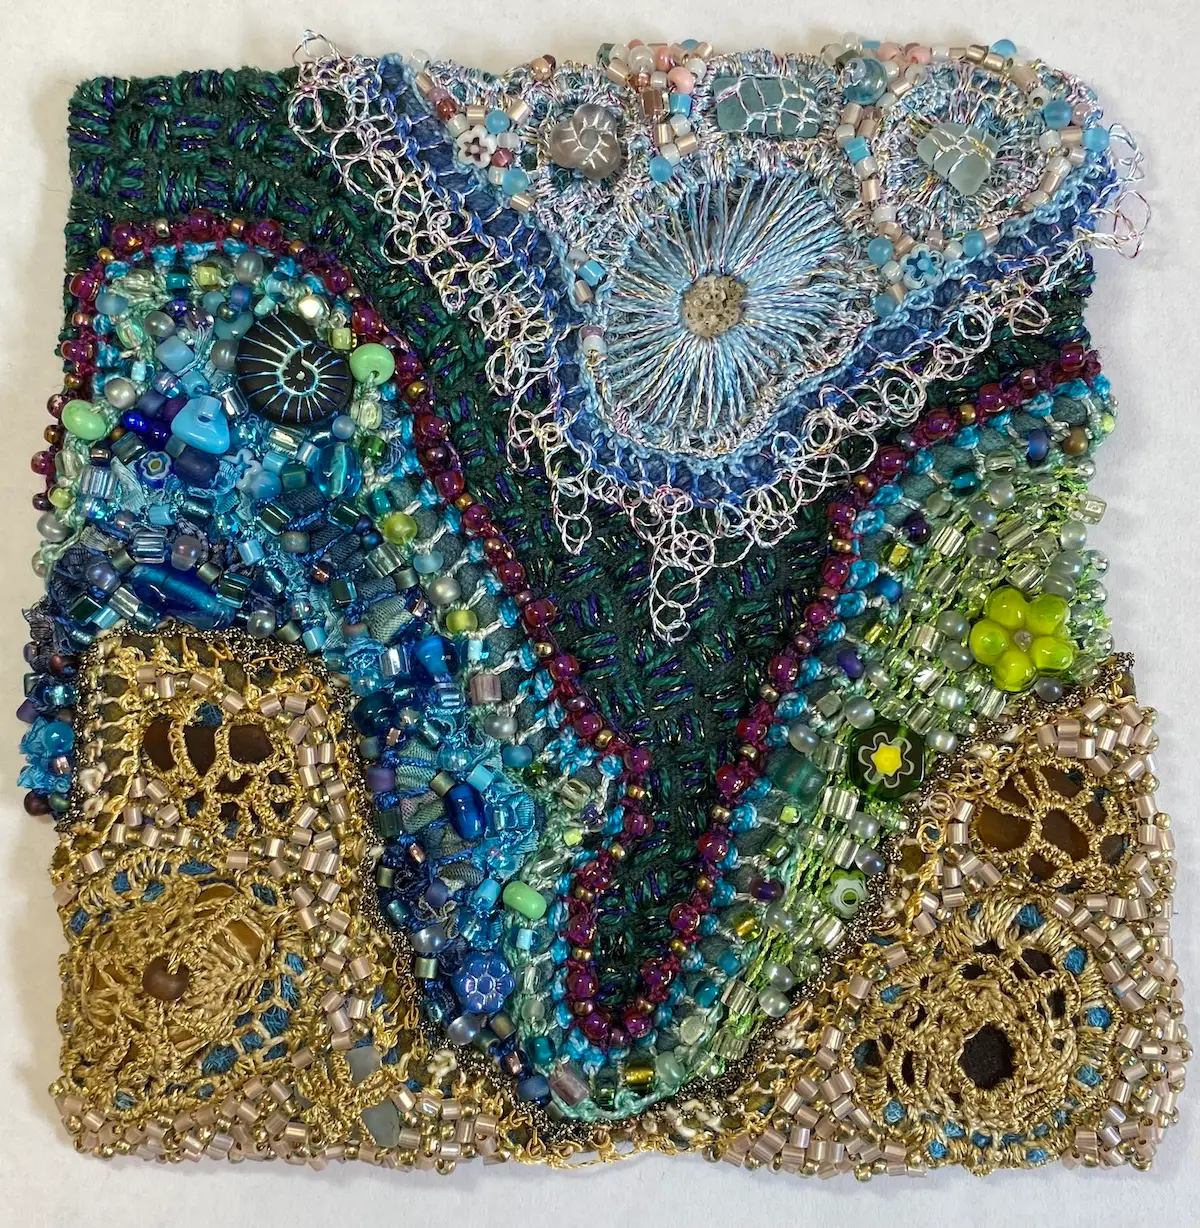
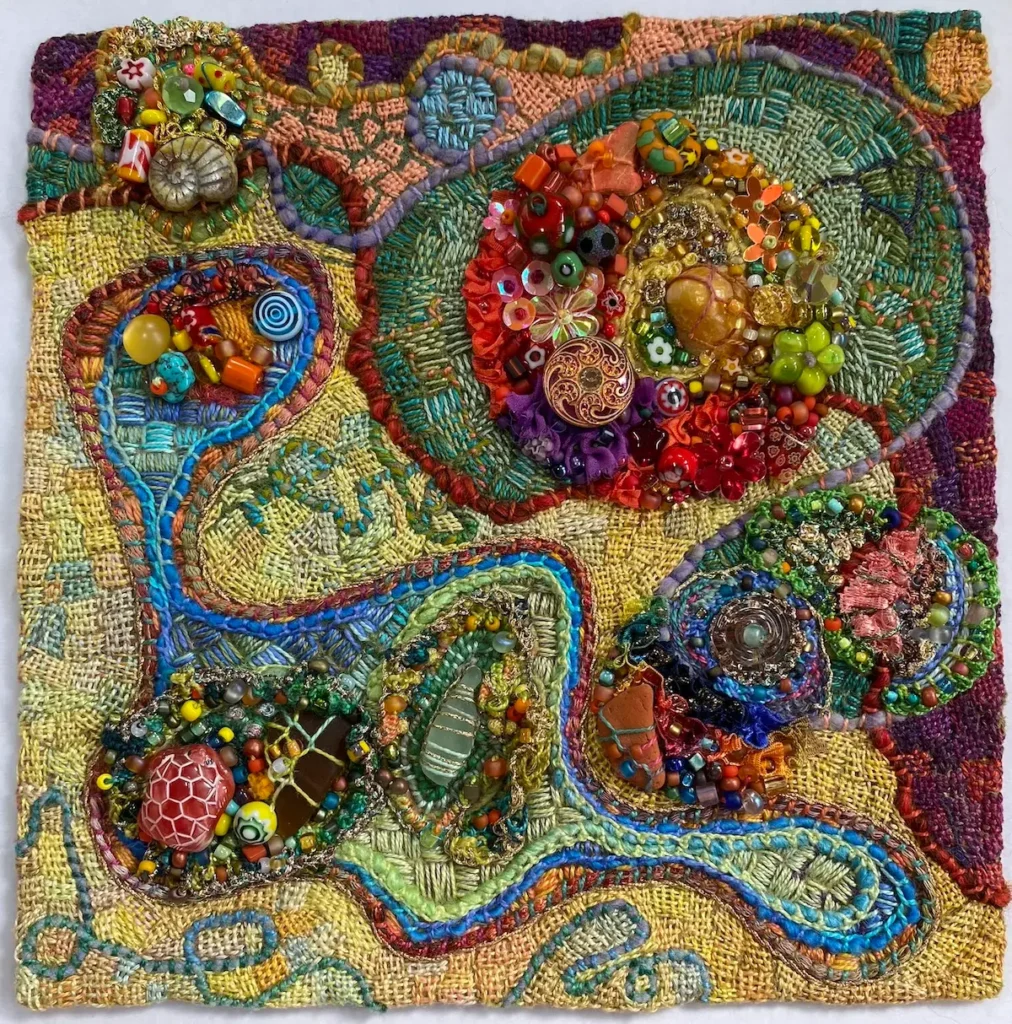
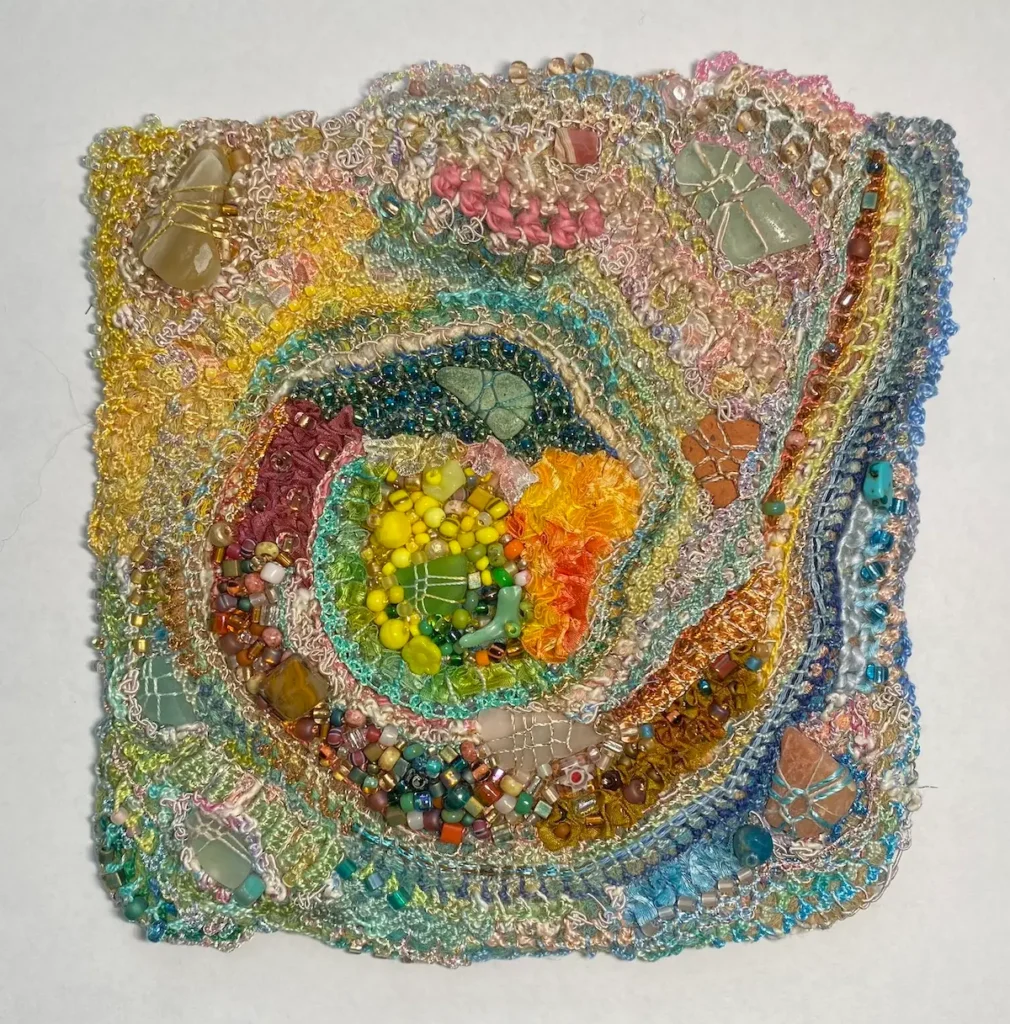
I do a lot of needle weaving, needle lace, bead embroidery, couching and ruching.
Hoop or no hoop? How does the choice affect the energy of the piece?
No hoop. I use a stabilizer, usually wool-blend felt. I like the freedom of working on any part of the piece without having to remove a hoop. I can intentionally distort the final shape of the piece by building out layers beyond the edges.
What are different ways you add surface texture to your work?
I start most of my work with a texture sandwich. I layer fabric bits, painted cheesecloth, and yarns on my base fabric/stabilizer. I cover all this with a layer of tulle to hold the textures in place. I stitch on top of this sandwich.
My stitching, including needle weaving and needle lace, ruching, couching, and bead embroidery, and adding natural objects with stitch nets, adds even more surface texture.
Surface design. Paint? Printed? Dyed? How do you decide which technique is right for a project?
I really enjoy painting lengths of cheesecloth with diluted fabric paints. Cheesecloth becomes a color and texture underlayer for my stitching.
What thread colors or fibers will we see over and over in your work? Why are they anchors in your palette?
I mostly use pearl cotton and metallic threads, but also love including novelty yarns and ribbon yarns in my pieces. The novelty yarns add bits of textural interest, especially yarns that have varying thickness or slubs.
Colors can vary depending on the purpose of the piece. When I stitch a healing cloth, I like to choose colors that the recipient finds joyful or healing.
My recent nature-inspired works tend to generally have watery colors, but yellows/golds, oranges, and reds can sneak in.
I have associations with those warm colors…bright yellow is joyful, oranges equal creativity and warmth, reds for strength/bloodlines (connections to our ancestors).
Walk us through your typical creative flow; from walking and journaling to sketching and layering.
Walking is an almost daily meditation for me. Walking on the beach is also a treasure hunt. I can’t help but look down! I can work out plans and ideas or resolve creative issues on a walk. If I’m thinking about a new idea or series, I often sketch thumbnails in my notebook. I’ll admit, though, recently, my work is much more spontaneous.
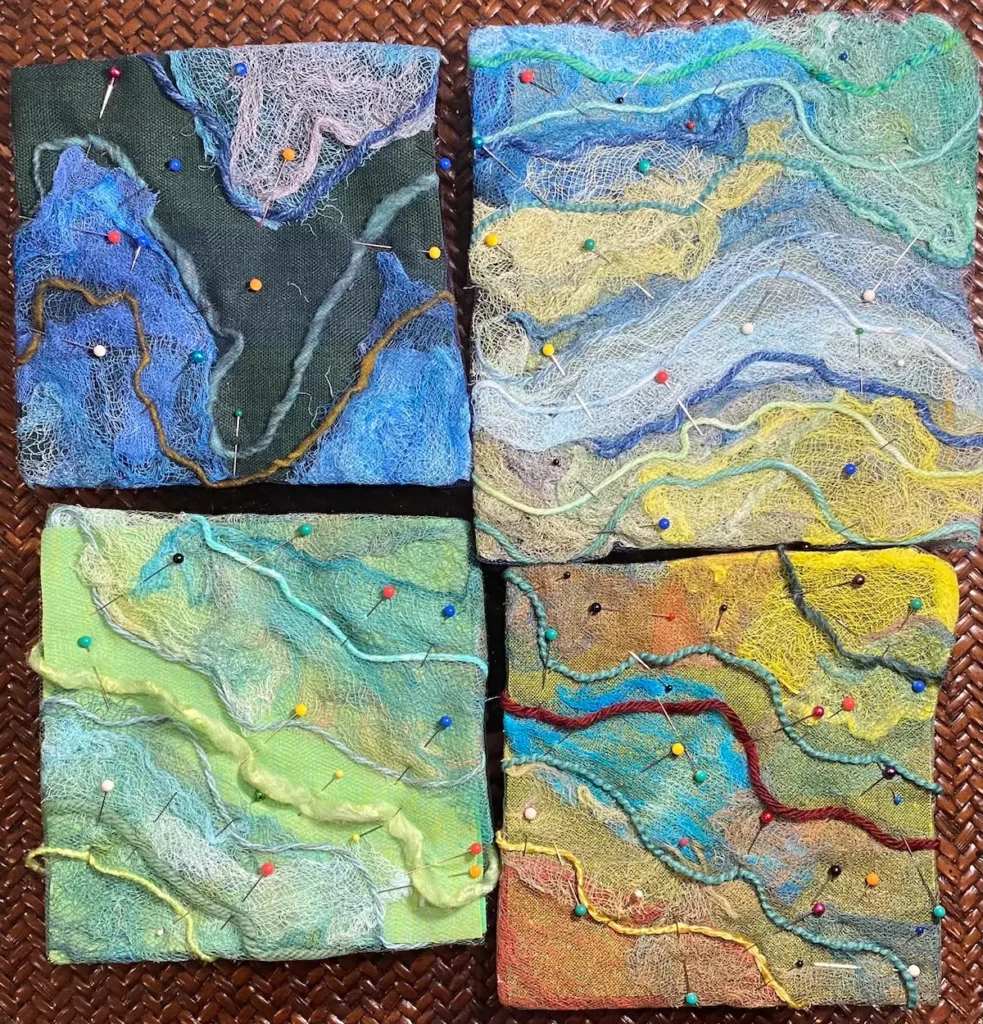
If I have an idea in mind, I usually set up multiple pieces. My format is typically a small square ranging from 4 to 8 inches. I choose the background fabric colors that speak to me in the moment. Next, I pull out my painted cheesecloth bits. I use them like paint, layering and moving them about.
Or I start with some yarn and curve and loop it into organic shapes. This layer usually has a lot of movement and starts signaling the direction of a piece. If I’m working on a mandala piece, I’ll start by drawing a circle or circles on my base fabric and then add cheesecloth and yarns to fill it out. The next layer is tulle before adding my stitching. By setting up several pieces, I can figure out which one is starting to speak to me, and I start on that piece first.
How do you know a piece is done?
Hopefully there is a visual harmony between all the elements of the piece!
When you encounter creative roadblocks, what tools help you push forward?
Taking a photo can point out problem areas. I sometimes use a black and white filter. That can point out if there is a lack of value contrast or other “problem” areas.
Other times I put a piece in “time out” and begin work on a different piece. I keep the “problem piece” near by in case I suddenly have an ah-ha moment and can move forward on it.
Do you ever struggle with color or texture balance? How do you resolve mismatches mid-project?
Generally, I don’t have trouble with color and texture. Usually it’s value contrast or “over stitching”…in that case, I pull out stitches and simplify.
Textile layering can be complex. What strategies help you avoid overwhelm? Is there such a thing as ‘too much’?
I find I can put all sorts of textures under the tulle layer. Ultimately, it’s when I’m stitching that I make decisions about what textures are over-stitched or even obliterated with stitch and what remains visible.
What personal hope or intention do you weave into your healing cloth workshops?
In my healing cloth classes, I start students off with some journaling exercises, including setting an intention for their piece. I have a list of possible intentions, including a healing cloth for oneself, for someone else, a cloth to protect, or to celebrate a life transition. This sets students up at the beginning to think about their direction.
I also give a list of emotions/adjectives around healing. I ask students to pair colors with those words using color pencils or swatches. Then I provide them with a researched list of color symbolism to compare with their personal color symbolism. Color has strong emotional connections and students can weave their personal color symbolism into their pieces.
Placement of elements such as different-sized circles can also start to tell a story. A single large, centered circle creates a direct connection with the viewer. Two circles establish a relationship between each other, and the size and placement of those circles can speak to that relationship. Multiple circles of different sizes and placement can represent networks of relationships.
What one piece of advice would you give someone starting surface design with limited space and supplies?
My advice would be to work small. I suggest using fabric paints instead of dyes. They are much easier to use and clean up. There are all sorts of materials you already have available to you (especially in your kitchen) to create print blocks, stencils, and fabric resists. (see my book, Fabric Printing at Home Quarry 2014)

How do you encourage students to embrace “happy accidents” instead of perfection?
In my stitching classes, I am constantly encouraging students to experiment. I have a list of suggestions for how to change the look of stitches. I provide students with stitch challenges, and the whole experience becomes a sort of game and challenge to see what they can come up with versus perfection.
Where can people see your work?
The best places to see my work are on Instagram and Facebook.
My Instagram handle is boothjb4757. My Facebook account is https://www.facebook.com/julie.b.booth.
For information about my class schedule, see my website: threadborn.com
Interview posted September 2025
Browse through more bead embroidery inspiration and projects on Create Whimsy.