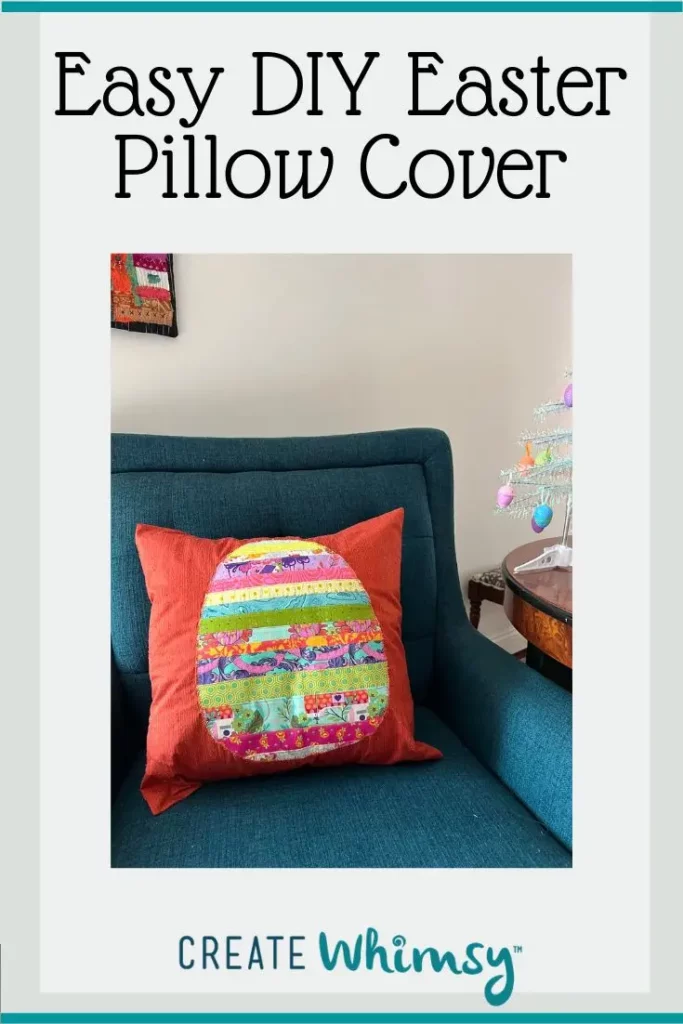
Pillow covers are a great way to switch up your home decor for holidays. In this tutorial, I’ll show you how to make this adorable DIY Easter pillow cover for your home. I made pillow covers for 18-inch pillow forms that are perfect on chairs or couch. Switch them out for plain pillow covers or other seasonal pillow covers to suit your mood!

How to Make an Easter Egg Pillow Cover
Learn how to make an Easter pillow cover. A quick and easy sewing project that is perfect for beginners.
Materials
- 1/2 yard of 45 or 50 inch wide fabric
- 18-inch pillow form
- 1 to 2-inch strips of fabrics so that when sewn together they will make at least 18-inches of fabric. This is perfect for using up fat quarters, as you don't need the full 45-inch width
- 1/2 yard of paper backed fusible web, I use Wonder Under
- Thread for sewing
- Thread for top stitching
- Freezer paper or a piece of paper that is at least 18-inches square to make the egg pattern
Tools
- Sewing machine
- Optional: serger
- Iron
- Pressing surface
- Quilter's ruler
- Rotary cutter
- Cutting mat
- Pencil to draw egg pattern
- Paper scissors to cut our paper pattern and cut out paper backed fusible web
Instructions
- Start by cutting your fabrics into strips, or use strips left from other projects. Use a variety of fabrics to give your Easter Egg appliqué a scrappy and festive look.

- Sew the strips together to form a single piece of fabric. Press. I used my serger to sew the strips together. A sewing machine works great, too. I find the serger is faster.
Once you have fabric piece for the eggs, audition background fabrics for the pillow cover. You may have already decided that, but I was undecided until I had the strippy set put together. Here are three options I explored. 1) piecing the background from turquoise and green, 2) using a natural linen and 3) dark orange. All three will go well with my home decor (I have a bright home!). I decided on the dark orange. Do you think I should have chosen one of the other options?


- Let's make our egg pattern! I used freezer paper because it was handy in my studio. Draw an egg shap on the paper. I drew half of an egg, folded the paper in half and cut with my paper scissors. Remember an egg shape is generally a bit bigger on the bottom and tapers more at the top. Here is my pattern cut out and ready to trace onto the paper side of the paper backed fusible web.

- Trace the egg shape onto the paper side of the fusible web. Using your paper scissors, cut out your egg (or eggs if you are making more than one pillow). Here are my two egg shapes - I made two pillows.

- Take your fabric strips that are sewn together and place the right side down. Position your egg shapes in the paper backed fusible web with the web side down. Move the eggs around until you like the fabric layouts. I wanted them to be a little different, so I shifted the positions of the eggs so they weren't side-by-side.

- Press the paper backed fusible cut out eggs to the wrong side of your fabric strip set following the manufacturers directions.

- Cut out the eggs shapes right along the edge of the paper. With most paper backed fusible web, you need to wait a bit for the fusible to cool off to be able to easily remove the paper backing. I did all of the above one day and came back the next to remove the paper.

- Now we are ready to measure for the pillow cover and place our eggs in the center of the front of the pillow cover. I love 18-inch pillows because you can cover one with only 1/2 yard of fabric. The fabric I'm using is 45-inch wide. Given that you need 36-inches to go around an 18-inch pillow, this gives us an extra 9-inches for the flaps, which is perfect.
I laid the fabric on my table. Folded one side in to the middle, then folded the other side into the middle until the center front measured 18-inches. This way, I can mark the front and center the egg with the fusible web on the back in the middle of the front of the pillow. Since we have an extra 9-inches of fabric, this gives a 4-1/2 inch overlap on the back.
I left the selvedge as the edge for this pillow cover. It was pretty. If I needed to cut the fabric, or the selvedge was ugly, I would turn in 1/2-inch and topstitch along each edge.
- I mark the fold lines with safety pins. This way the pins don't fall out and I can easily open the fabric back up to be able to press the appliqué in place and then stitch around it.

- Open up your fabric and place the fusible side of the egg to the right side of the fabric, centering it on the pillow front.

- Take it to your pressing station and fuse according to the manufacturers directions.

- Next, stitch around the egg to make sure it is secure. Bonus: it makes it more interesting and finishes off the appliqué. This is a time that is perfect for trying out some of those decorative stitches on your sewing machine that you rarely use!

- Now we are ready to finish the pillow cover. Take it to your work table. Use the safety pins to fold the two sides in with right sides together.

- Stitch along both the top and bottom edges with a 1/2-inch seam allowance.

- I like to finish the raw edges with a quick zig zag stitch. This is important if you have a fabric that unravels easily.

- Turn your pillow cover right side out from the flaps. Press the seams nice and flat.

- Insert your pillow form.

- And enjoy your new Easter pillow cover!
Recommended Products
As an Amazon Associate and member of other affiliate programs, I earn from qualifying purchases.


It’s super easy to make a pillow cover for an 18-inch pillow form. All you need is half yard of fabric that is at least 45-inches wide. Fold the fabric to center the front, sew the top and bottom seams and you’ve got a reusable pillow cover.
As an Amazon Associate I earn from qualifying purchases. Read more about our affiliate linking policy.
For this DIY Easter pillow cover, I made a strip set of spring colored fabrics, cut and fused egg shapes to the front of the pillow covers. Then I stitched all around the edge of the egg shape with a decorative stitch. Learn tips about working with fusible web in our article Fusible Web: What it is and How to Use It.
Other ideas include adding rows of rick rack trim to the strip set egg shapes. Or stitching between the rows of fabric with decorative stitches on your machine. How about adding some hand embroidery? The ideas are limitless to make these pillows your own.
Here are the pillows in different places in our home.


Browse through more Easter projects on Create Whimsy. Learn more about raw edge appliqué.