Looking for a great scrap-busting project? Try confetti quilting! No piece is too small. Confetti quilting is an appliqué technique where you use very small pieces of fabric to create a design. It is referred to as confetti quilting because the fabric is cut to pieces the size of confetti.
What is confetti quilting?
Little pieces of fabric are carefully placed to create a design or picture. The fabric confetti is placed on a base which can be fabric, directly on batting or a layer of lightweight fusible interfacing.
RELATED: Fusible web: what is it and how to use it
How to do confetti quilting?
Materials needed for confetti quilting
- A broad selection of fabrics and scraps in colors you want to use in your piece. This is the time to pull out all of the leftover fabric scraps you’ve been saving. No scrap is too small! Having a lot of different fabrics makes your piece more interesting.
- Thread for stitching your piece.
- Light weight fusible interfacing a little larger than what you want for your finished piece
- Optional: Tulle or netting a little larger than your finished piece
Tools needed for making a confetti quilt
- Sewing machine
- Rotary cutter
- Cutting mat
- Iron
- Pressing surface: either a large wool mat or an ironing board
- Teflon pressing sheet or parchment paper

Start by having an idea for a design
Your design can start as a picture, drawing, painting, or graphic design. It can be simple or complex!
For this tutorial, I’m making a small mini quilt meadow nature scape confetti quilt with spring flowers, to show you the steps.
As an Amazon Associate I earn from qualifying purchases. Read more about our affiliate linking policy.
Scroll down to see a simple, small heart you might make for Valentine’s or just for someone you love; continue to see how to use this technique for a larger piece. Whatever you decide, have fun coloring with small fabric scraps!
Gather your fabrics
Go through your scraps and fabric stash to find colors that work for the design you want to do. If you don’t have the right colors in your stash, a great place to find ‘just-the-right-color’ is a trip to a thrift store! With all of those clothes that are reasonably priced you are bound to find the color you are looking for!
I wanted greens for the grass, bright flower colors and light blues for the sky.


Sort your scraps and fabrics by color and/or value
Take your fabrics and sort them into piles by color. Having a variety of shades in a color helps bring more interest to your piece. Add in a few prints to bring in a few more colors.
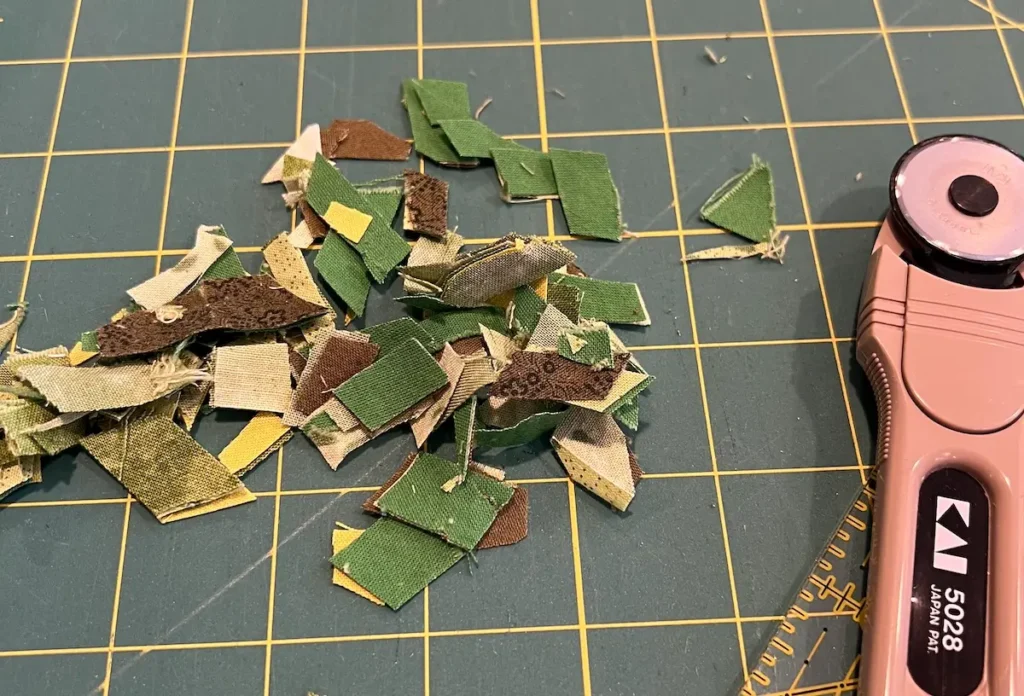
Chop up your fabrics into small pieces
This is the fun part!
Using your rotary cutter, taking one color or value at a time, begin cutting the pieces into very small pieces, the size of confetti! Keep the piles of cut fabrics separate.
TIP: Use disposable plates or bowls for your confetti bins. They make it easy to manage your little piles of confetti.
In the pictures below, you can see I started with scraps. Using my rotary cutter and ruler, I kept cutting, and turning the pile of fabrics until I had tiny pieces of fabric confetti.


Place your interfacing with the rough side up on a pressing surface
If you would like, you can draw your design on the rough side of the interfacing. You’ll see an example below where I did that. For these meadow flowers, I wanted to just let the layers flow into each other.
Place the interfacing rough side up on your pressing surface. This is a small piece so I’m using a wool mat. You can also put it together directly on your ironing board

Getting ready to make your design
It’s important to compose the design right on your ironing board, or on a pressing mat that you can then carry to your pressing station. Or, use a cordless iron to take the iron to your pressing mat!
Trying to carry the piece with just the interfacing to your ironing board doesn’t work. The pieces go everywhere! (Ask me how I know!)
I make little piles right next to the interfacing so it is easy to pick up pieces and place them.

Begin placing your confetti onto your design
Taking one color or value at a time, begin coloring your design with your fabric confetti. Lay each piece down on the rough side of the interfacing. We’ll be fusing the confetti to the interfacing base.
You can place the pieces with the wrong side to the interfacing. Sometimes the wrong side of the fabric is just the right color, and you might want to place the piece with the right side to the interfacing, wrong side up!
TIP: Even though it takes longer, I find it is more successful if I place each little piece one at a time. Make sure that each piece touches the interfacing just a little bit.


You want the entire interfacing covered with confetti. No little gaps showing!
Be careful not to get your sleeves in the little bits you’ve already placed. You’ll be placing them again! (Again, ask me how I know!)
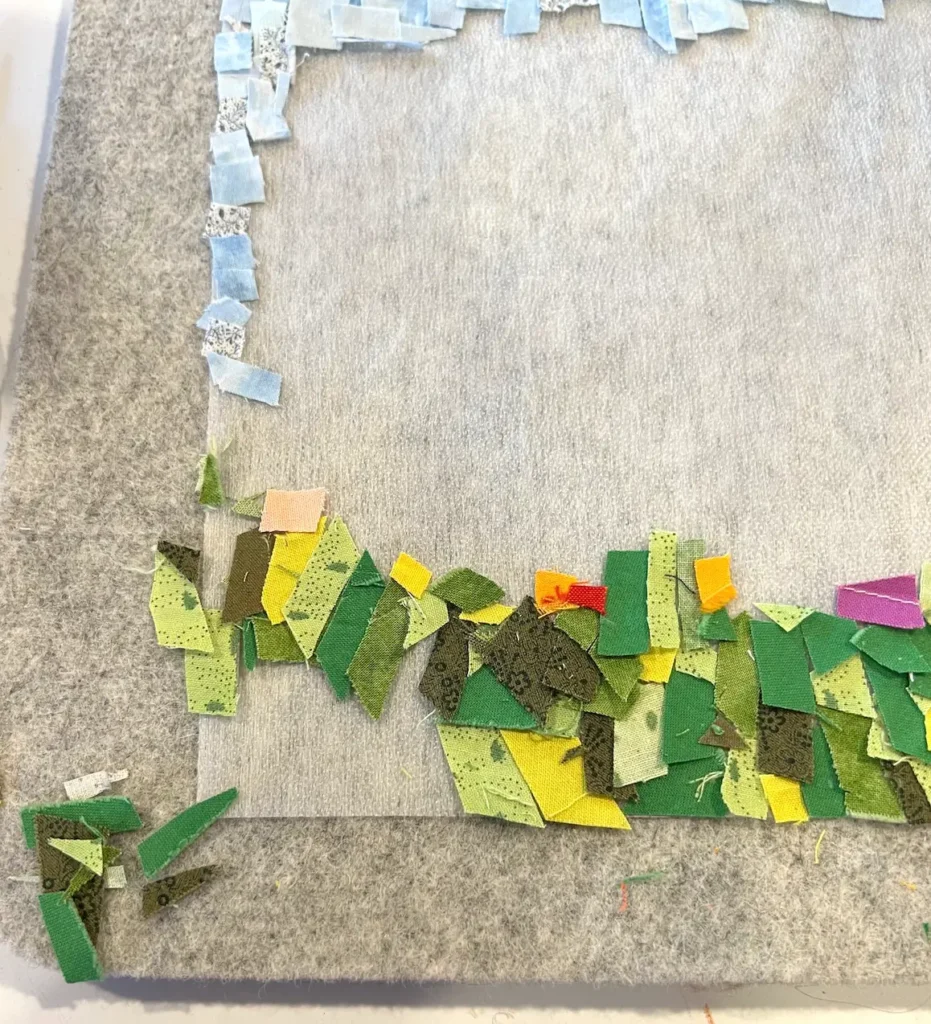
When you think you are almost done, take the smallest scraps and fill in any gaps you see.

Securing the confetti to the interfacing foundation – Fuse and secure your pieces
Once you are happy with your design, press the confetti to the interfacing using the directions provided by the interfacing manufacturer.
Give it a good press. You can lift up your piece to see what confetti might be loose and give it a little more press. These are the little unglued pieces that you can lay on top and stitch down, or remove them from your piece.
TIP: Use a Teflon sheet or a piece of parchment paper over your piece for pressing to make sure no interfacing goo gets on your iron.

Here is the small piece with all of the small bits pressed to the interfacing.

Finishing your confetti quilt top
With a confetti quilt, you want a lot of quilting. The bits that are barely attached will be sewn down in the quilting process. If you see a little bit that might be coming up, just make sure to stitch over it.

If you want you can place a layer of tulle or netting over the confetti before quilting. This will give a layer to make sure none of the little confetti pieces fall off. It is common to use black tulle as the top layer.
Add embellishments or hand stitching
This is an optional step. I wanted to add some hand stitching to this piece. I used some wool thread from Zollie in the sky and the grass. And, French knots to make smaller flowers. Here is the back of my piece after the hand stitching.

Quilt and finish your piece
Add a backing fabric and finish with either a binding or a facing. Enjoy your finished confetti quilt!
RELATED: Crumb Quilting: Zero Waste Idea for Fabric Scraps
Confetti Heart Valentine
Here is another way to use the same technique with small bits of scrap fabric. Start with a foundation of Timtex or similar super heavy-weight interfacing. For the Valentine, I drew a heart directly on the heavy-weight interfacing. It will be covered with small bits of fabric.

The Timtex is double-sided fusible. It’s important to place a piece of parchment paper or a Teflon sheet under the Timtex.

Just like we did above, I had a few little piles of my cut-up little bits ready to place on the card. Here I’m beginning to place the bits. When you have a design with defined lines, I like to start by laying down pieces along the lines. Make sure there are some dark pieces to help define the line.

Here I’ve got the heart all filled in with little bits of reds, pinks and a touch of purples.

Here is the progress on adding the little bits one at at time to complete the heart.


Press these in place, using a piece of parchment paper or a Teflon sheet to protect your iron.

Then I took my blue and green fabrics and filled in the background. For this little piece, I did straight line stitching to hold down all of the bits after pressing them to the heavy interfacing.
If you are working on a larger piece, I’d recommend using a walking foot.

To add more definition to the heart, using my free-motion foot I went around the heart with a variegated pink/red thread several times. Use a thread color that will help define areas of your design.

This is a Valentine’s card and it’s made on double sided fusible. I fused a piece of white fabric to the back, trimmed it, and then finished off the edge with stitching.

Trim up the edges and finish the edge. For this one, I used a zigzag stitch to finish off the edge.

Here is the finished confetti Valentine’s card.

Here is a larger quilt that I made with this same method. This quilt was made 100% from fabric scraps from clothes and quilts I had made.


And, a close up of the bead embellishments on Lotsa Love.


Ideas for using confetti quilting techniques:
- This is a great technique to use to make tree trunks for an art quilt. Take brown, black, and tan leftover fabrics and cut them into small pieces. Layer them on a piece of paper-backed fusible web. Press them into the web forming a new piece of fabric. Cut out the tree and limbs with the fusible on the back of the little pieces to use in your art. This makes a great scrappy quilt.
- Use the basic directions to use your fabric scraps to make confetti backgrounds for your wall hangings or smaller quilts. One great idea for a background is to make an ombre effect using different variations of a color – from light to dark!
- Have fun making small holiday pieces, like a decorated Easter Egg, or a Christmas tree with ornaments – the ideas are endless!
My pieces aren’t sticking, what can I do?
You can use a little touch of glue to make sure they stick down for stitching. It’s easy to use a child’s glue stick on the wrong side of the fabric and that will hold it down enough until you can quilt your piece.
Or, place one layer of tulle over the top and pin it in a few places. That will keep your little pieces in place.
Browse through more quilt tutorials on Create Whimsy.


