What is Kraft-Tex?
Kraft-Tex is a rugged paper that looks, feels and wears like leather, but cuts, sews and washes like fabric. It is supple and lightweight, yet strong enough to use for projects that get tough wear. It is an eco-friendly, color-fast, tear-resistant alternative to leather and vinyl, and comes in basic hues, as well as new hand-dyed colors. Hand-dyed Kraft-Tex is pre-washed, preshrunk and ready to use in your projects.

Sometimes described as paper fabric, Kraft-Tex is perfect for mixed media, paper crafting and sewing projects – it’s very versatile. It’s hard to describe the texture, but any maker will enjoy exploring all you can do with this product. Create custom, multi-color pieces with dyes. Or using permanent inks and paints, stamp, emboss and paint – even put it through your printer!
There is no right or wrong side to Kraft-Tex, but you may prefer the color and texture of one side over the other. That will be YOUR right side. So pick the side you prefer for your project.
There are two types of Kraft-Tex. The Original Unwashed, and the new Prewashed in vintage and rich hand-dyed colors.
The Original Unwashed has a smooth surface and is a bit stiff as it comes out of the package. Run it through the washer and dryer to add texture. Hand-dyed & Prewashed Kraft-Tex has a more leather-like texture right out of the package. If you plan to wash your final project, it’s a good idea to pre-wash your Kraft-Tex and other materials separately before cutting to ensure predictable results.
As an Amazon Associate I earn from qualifying purchases. Read more about our affiliate linking policy.

How to wash Kraft-Tex
Both types of Kraft-Tex are washable. If your finished project will be washed, you will want to wash the Original Unwashed first, as it will change the texture a bit and it might shrink a little. It can go directly from the washer to the dryer. For more texture, just wash again. You can use hot or cold water, laundry detergent, or not — whatever you prefer, it won’t change the final product.
And it’s okay to wash pre-washed Kraft-Tex, too, for additional texture. TIP: Take it out of the dryer just before it is totally dry and lay flat to dry completely. Otherwise, you might get a crease in your Kraft-Tex.
With both types of Kraft-Tex, you can iron them before using in your projects. Ironing will not remove the texture, it just encourages the Kraft-Tex to lie flat while you cut out and work on your project. Iron while damp or use steam on stubborn creases or if you want your Kraft-Tex to be extra flat.
How to soften Kraft-Tex
Want your Kraft-Tex to be softer? Now is the time to take all of your frustrations in life out on the piece of Kraft-Tex! Crunch it up! Ball it up! Do it again and again. Work your Kraft-Tex like you would a piece of leather that you are trying to make look soft and worn. It will get a rougher texture and soften up.

How to sew Kraft-Tex
Sewing Kraft-Tex is easy! It doesn’t require any special needles or thread. One thing to keep in mind is that the hole that your sewing needle puts in the Kraft-Tex is there to stay. It’s not like woven fabrics that allow the fibers to move back and close a space. So – make sure that is where you want to sew before putting your Kraft-Tex project on your machine.
Increase your stitch length a bit to sew on Kraft-Tex. Each needle punch is like a hole in paper – you want fewer holes so that the fiber paper doesn’t perforate and tear.
If you are a person who pins your sewing projects, now is the time to learn new techniques. You can carefully add pins within the seam allowance of your project, and remove them as you sew. Recommendation is to use tiny quilter clips to hold your fabrics in place before and during sewing. The little clips leave no holes and will not mar the Kraft-Tex.

Can you machine embroider on Kraft-Tex?
Yes! Design away with your machine embroidery! Use a cut-away sticky stabilizer in the hoop (such as OESD’s Stabil Stick), then follow the stabilizer instructions for placing the Kraft-Tex. The stabilizer will help secure the stitches to help prevent perforation tears in your project (unless that is what you are going for!). Use designs that have staggered needle points or are less dense rather than a stitch pattern that creates a line of compact stitches. A design that stitches beautifully on woven fabric may create too many holes for Kraft-Tex. Test first!
What is Kraft-Tex used for?
Kraft-Tex can be used for any mixed media, paper crafting or sewing project that’s suitable for vinyl or leather. It is thinner than those products, but just as durable. It is perfect for bags, totes, book covers, wallets, coin purses, organizational containers and more!
What markers work best on Kraft-Tex?
Any permanent marker, like Sharpies or fabric markers, work on Kraft-tex that you want to wash. Making a project that won’t get near water? Any marker works. Always test your markers on a small sample first, just to make sure.

Can you print on Kraft-Tex?
Yes! The product is stiff enough to feed through your printer, just like a piece of cardstock. Press it flat and cut it to the right size for your printer, then print one sheet at a time with the manual feed option.

What are the different ways to surface design on Kraft-Tex?
- Use your favorite stamps and a permanent or pigment ink pad.
- If you are using the Original Unwashed, you can use reactive dyes, or even Rit Dye to make any color you’d like!
- Use acrylic paints directly on either style – they are permanent and washable, and don’t require a base or gesso.
- If the finished item will not see water, play with water colors and water based inks. You can add a layer of matte medium that will help protect your design, but will wear a little bit with use. You can reapply if needed. Test a sample – you might like the look!
- Put the Kraft-Tex through your embossing machine to add unique texture to your base.
- Permanent markers to draw on the fiber paper hold up well. Alcohol or water based pens can be used if the item is not going to get wet, or you can add a layer of matte medium to protect your work.
- Put a piece through your inkjet printer.
- Use an old-fashioned typewriter.
- Stencil. Play around with different stenciling techniques like using spray paint or sponges.
Can you use Kraft-Tex on die cutting machines?
Yes! Kraft-Tex is perfect for making appliqués or other cut-outs for your projects. Read the instructions with your die cutting machine to make sure you have your settings correct for the best cut.

How to make Kraft-Tex look like leather
Want more texture? Moisture and heat add texture. Start by crinkling the fabric paper – smash it up as much as you can. Toss it in boiling water, put it through the washing machine, put it in the dryer until not-quite-dry. Each time you touch it, crunch it up some more to maximize texture.
Too much texture? Just get it wet again to relax some of the wrinkles and press it.
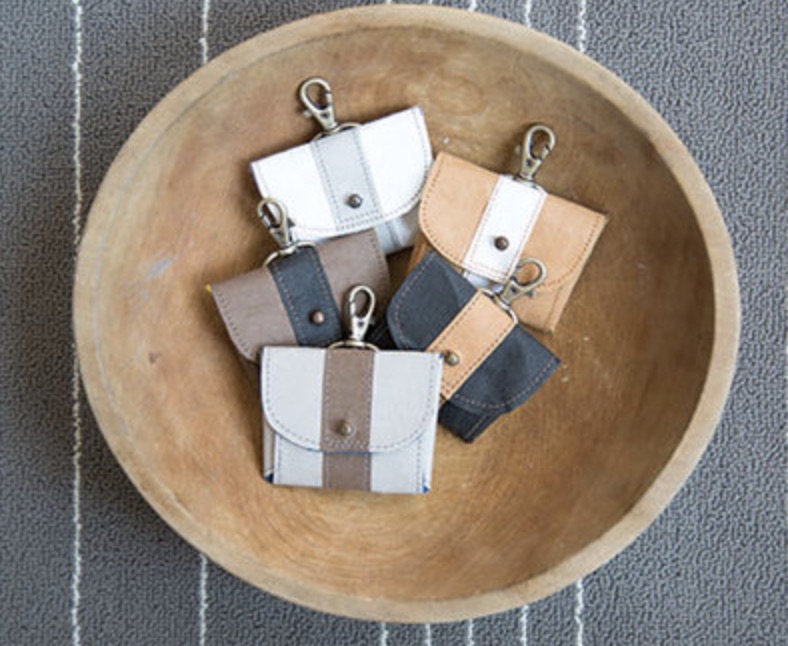
Here is a link to a FREE pattern for the little coin purses.
What are other ideas for working with Kraft-Tex?
Appliqué: Either use your die cutting machine, digital cutter or freehand cut appliqués for your project. Kraft-Tex is perfect for raw edge appliqué since it doesn’t fray. You can use glue, iron-on fusible web or just topstitch your appliqué in place on your project. If you are stitching the appliqué to fabric, use a fabric stabilizer on the underside of the project.
Threadsketching: Add interesting design elements to the base Kraft-Tex with thread. You can draw a design using a removable marker, like Frixion pens, and just sew on the lines, removing the marks when finished.
Decorative stitching: Now is the time to explore all of those designs you have in your machine! Embellish your project with a fancy stitch, using either heavy duty or regular thread — depending on how you want your final project to look. Use your walking foot to keep the stitches eveh. TIP: Do a test strip first to make sure the stitch doesn’t create a hole in your project.
Weaving: Since Kraft-Tex doesn’t fray, it is perfect for a weaving project! Cut strips and use painters tape to hold your strips in place while you weave them together. Perfect for a section of a bag or book cover!

So, now you have all of these scraps, what can you do with them?
First of all, scraps give you a chance to try out some of the techniques that we covered above. Try out your stamp pads, stenciling, decorative stitching and more! Explore new techniques, and share with us so we can add them to this post!
There are so many small projects that are perfect for your scraps.
- Cut them into different shapes, embellish (or not) and make some light weight earrings!
- Weave or piece them into coasters
- Make key chains
- Cut appliqués for your larger project, or to add labels to bags or clothes (think Levi label)
- Small strips can be put together to make leather-like tassels
- Add a bit of color (and functionality) to a zipper pull
- Compile tiny pieces into little pieces of art for brooches – just add a pin back!
Browse through more Kraft-Tex projects on Create Whimsy.