
The scroll stitch is a form of the running knotted stitch that forms a line of little scrolls. The stitch is worked left to right and is great for outlines or edges when you’d like a little bit more visual interest. Key to success for this stitch is keeping your tension even when stitching. You can use this stitch for straight lines, as I have in this tutorial, and it also works nicely with gentle curved lines.

The scroll embroidery stitch is perfect for borders, outlines and fillings – especially if more than one row is stitched at a time. It’s beautiful texture with the scroll helps give a feeling of motion. You can make different patterns by varying the space between rows. Different threads also result in different looks. In the close-up below, you’ll see the thicker threads make beautiful texture. Stranded cotton threads are not as effective for this stitch, so for best results use a twisted thread like a Perle cotton or light weight yarn.
Using a thicker weight thread or light weight yarn, scroll stitch becomes a great filler stitch. Start by stitching the outside lines of your shape and then continue stitching to the inside of your element, staggering the knots to fill your shape. It makes a highly textured fill for an embroidery design.
Take the time to play around with stitch length, hand movements as well as tension to see what you like best. I found if I pulled gently up at the end of the stitch, I was happiest with the stitch.

How to Embroider the Scroll Stitch
Learn how to embroider the scroll stitch with this step-by-step tutorial with photos.
As an Amazon Associate I earn from qualifying purchases. Read more about our affiliate linking policy.
Materials
- Fabric for embroidery
- Embroidery thread
Tools
- Hoop suitable for your fabric
- Embroidery needle suitable for your thread
- Embroidery scissors
- Removable fabric marker - I used a Frixion pen
Instructions
- Start by drawing your design line on your fabric with a removable fabric marker. I used a Frixion pen. NOTE: Always test your marker on your fabric before starting to make sure it removes as you expect!

- This embroidery stitch is worked left to right. Bring your needle up at the left end of your design line A. Then take a very small stitch vertically through your line a short distance away. You can vary the distance of the stitches for different looks, even bring them really close together! I've stitched them about 1/8-inch apart.

- Wrap your working thread around the tip of your needle (C) and pull gently, forming a knot, which becomes the scroll stitch. The important part with this stitch is to keep the knot tight and close to your design line, making nice even knots. By pulling gently, there is less of a tendency for the knot to end up with a big loop on the front of your work. That is why it is important to do a sample as a test, to get the tension of the knot down before your serious work. 🙂

- Take another little stitch with your needle (D).

- Wrap your thread around the needle to form the knot (E).

- Continue making these stitches with knots along your design line. The line can be straight like this sampler, or gentle curved lines. Here is the sampler line in progress.

- At the end of your design line, make your knot and then take your needle to the back side of your embroidery project to tie off.

- Here is the finished stitching line with the markings on the fabric.

- A quick shot of steam with the iron and the markings disappeared for my finished scroll stitch sampler!
Recommended Products
As an Amazon Associate and member of other affiliate programs, I earn from qualifying purchases.


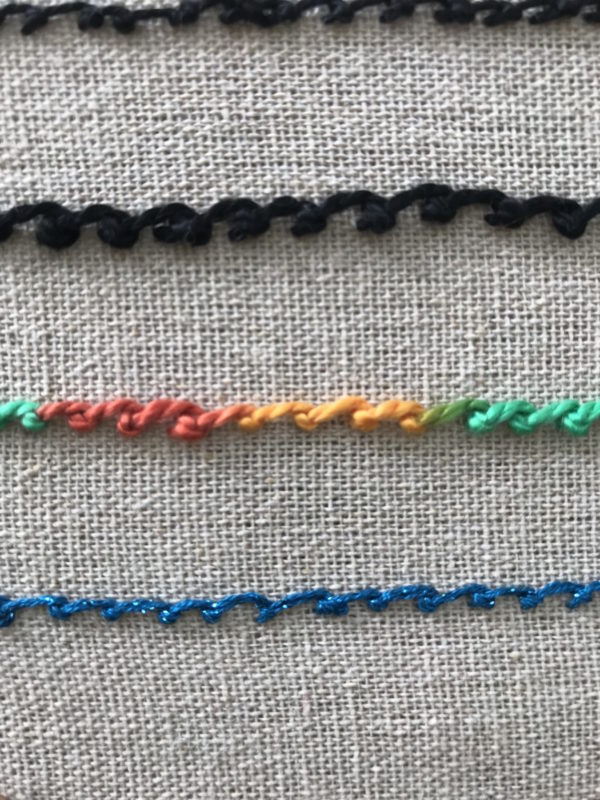
The sample below shows a variety of threads.
- Row 1: #12 pearl cotton (I think this thread is too small for the effort)
- Row 2: #8 pearl cotton
- Row 3: #3 pearl cotton
- Row 4: #3 variegated pearl cotton
- Row 5: Silk Lamé Braid

Here is a closer look of these stitches and threads.
Check out all of the embroidery tutorials on Create Whimsy!


